Chapter 7 Smart video car
You can refer to this video
If you have any concerns, please feel free to contact us via: support@freenove.com
The smart video car integrates the previous functions of light tracing, obstacle avoidance, line tracing, video transmission, face detection, LED and so on. And it is built with a server and a client, so it can be controlled remotely.
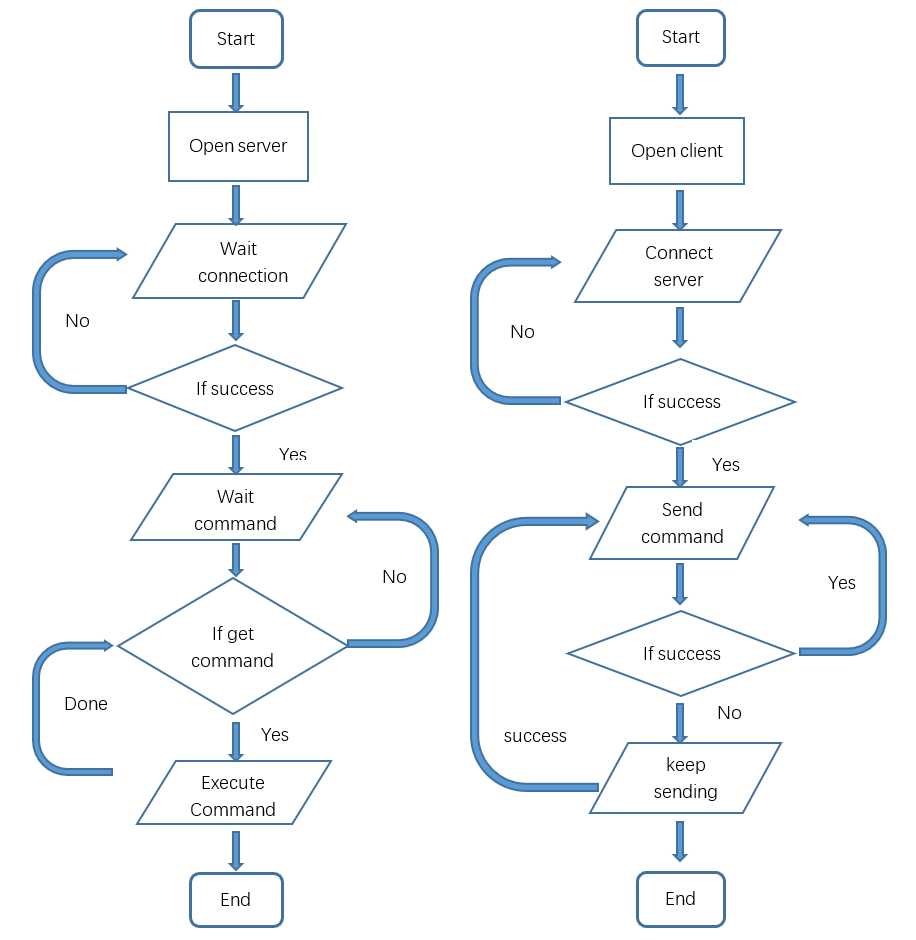
Server
Open Server
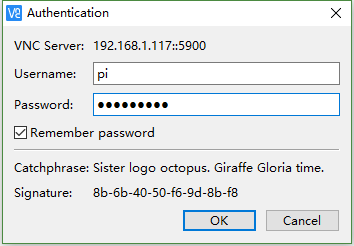
Step 1 Login Raspberry Pi via VNC viewer
Because server and client use GUI. You need use VNC viewer as remote desktop way.
Download and install VNC Viewer according to your computer system by clicking following link:
https://www.realvnc.com/en/connect/download/viewer/
After installation is completed, open VNC Viewer. And click File -> New Connection. Then the interface is shown below.

Enter IP address of your Raspberry Pi and fill in a Name. And click OK.
Then on the VNC Viewer panel, double-click new connection you just created, and the following dialog box pops up. Enter username: pi and Password: raspberry. And click OK.

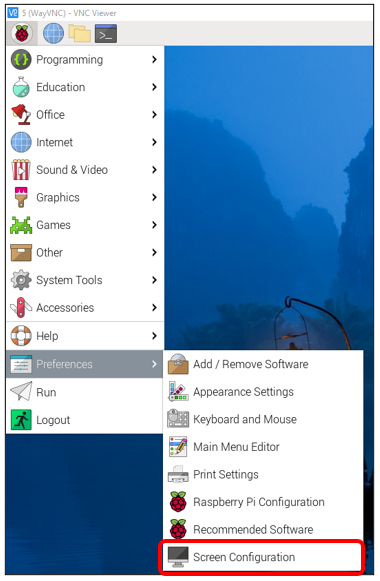
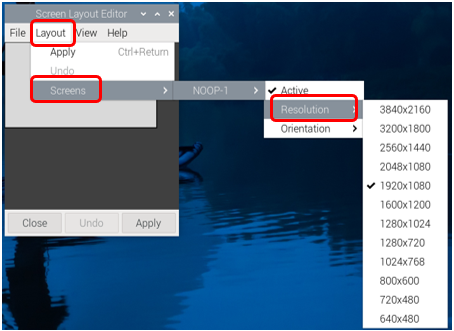
If the resolution ratio is not great or there is just a little window , you can set a proper resolution ratio via steps below.
$ sudo raspi-config
Select Screen Configuration. Select the appropriate resolution in the new window. Click Apply.
In addition, your VNC Viewer window may zoom your Raspberry Pi desktop. You can change it. On your VNC View control panel, click right key. And select Properties->Options label->Scaling. Then set proper scaling.
Step 2 Run commands
If you are using remote desktop mode to login Raspberry Pi, you need use VNC viewer.
Enter the following command in the terminal.
Use cd command to enter directory where main.py is located:
$ cd ~/Freenove_4WD_Smart_Car_Kit_for_Raspberry_Pi/Code/Server
Run main.py:
$ sudo python main.py

The interface is as below:

Sever Auto Start
1 Open the terminal and execute the following two commands respectively to create a “start.sh” file.
$ cd ~
$ sudo touch start.sh
2 Open “start.sh”.
$ sudo nano start.sh
3 Add the following contents to “start.sh” file.
#!/bin/sh
cd "/home/pi/Freenove_4WD_Smart_Car_Kit_for_Raspberry_Pi/Code/Server"
pwd
sleep 10
sudo python main.py
Press Ctrl + O and then press Enter to save it. Press Ctrl+X to exit.

4 Modify permissions.
$ sudo chmod 777 start.sh
5 Enter the following command to create a directory.
$ mkdir ~/.config/autostart/
6 create and open “start.desktop” file
$ sudo nano .config/autostart/start.desktop
7 Add the following content to “start.desktop” file.
[Desktop Entry]
Type=Application
Name=start
NoDisplay=true
Exec=/home/pi/start.sh
Press Ctrl + O and then press Enter to save it. Press Ctrl+X to exit.
8 Modify permissions.
$ sudo chmod +x .config/autostart/start.desktop
9 Finally enter the following content to reboot Raspberry Pi.
$ sudo reboot
Note: To cancel auto start, please delete the files “start.sh” and “start.desktop” created above.
$ cd ~
$ sudo rm start.sh
$ sudo rm .config/autostart/start.desktop
Client
The client connects to the server through TCP, which receives the video stream from the server, and other commands. And it also sends commands to the server to control the car.
Clients can run on different systems, such as windows, Linux, and so on. However, you need to install related software and libraries.
The related program is mainly in the Video.py file under the Client folder.
Part of client code is as below:
 1class VideoStreaming:
 2    def __init__(self):
 3        self.face_cascade = cv2.CascadeClassifier(r'haarcascade_frontalface_default.xml')
 4        self.video_Flag=True
 5        self.connect_Flag=False
 6        self.face_x=0
 7        self.face_y=0
 8    def StartTcpClient(self,IP):
 9        self.client_socket1 = socket.socket(socket.AF_INET, socket.SOCK_STREAM)
10        self.client_socket = socket.socket(socket.AF_INET, socket.SOCK_STREAM)
11    def StopTcpcClient(self):
12        try:
13            self.client_socket.shutdown(2)
14            self.client_socket1.shutdown(2)
15            self.client_socket.close()
16            self.client_socket1.close()
17        except:
18            pass
19
20    def IsValidImage4Bytes(self,buf):
21        bValid = True
22        if buf[6:10] in (b'JFIF', b'Exif'):
23            if not buf.rstrip(b'\0\r\n').endswith(b'\xff\xd9'):
24                bValid = False
25        else:
26            try:
27                Image.open(io.BytesIO(buf)).verify()
28            except:
29                bValid = False
30        return bValid
31
32    def face_detect(self,img):
33        if sys.platform.startswith('win') or sys.platform.startswith('darwin') or sys.platform.startswith('linux'):
34            gray = cv2.cvtColor(img,cv2.COLOR_BGR2GRAY)
35            faces = self.face_cascade.detectMultiScale(gray,1.3,5)
36            if len(faces)>0 :
37                for (x,y,w,h) in faces:
38                    self.face_x=float(x+w/2.0)
39                    self.face_y=float(y+h/2.0)
40                    img= cv2.circle(img, (int(self.face_x),int(self.face_y)), int((w+h)/4), (0, 255, 0), 2)
41            else:
42                self.face_x=0
43                self.face_y=0
44        cv2.imwrite('video.jpg',img)
45
46    def streaming(self,ip):
47        stream_bytes = b' '
48        try:
49            self.client_socket.connect((ip, 8000))
50            self.connection = self.client_socket.makefile('rb')
51        except:
52            #print "command port connect failed"
53            pass
54        while True:
55            try:
56                stream_bytes= self.connection.read(4)
57                leng=struct.unpack('<L', stream_bytes[:4])
58                jpg=self.connection.read(leng[0])
59                if self.IsValidImage4Bytes(jpg):
60                            image = cv2.imdecode(np.frombuffer(jpg, dtype=np.uint8), cv2.IMREAD_COLOR)
61                            if self.video_Flag:
62                                self.face_detect(image)
63                                self.video_Flag=False
64            except Exception as e:
65                print (e)
66                break
Run client on windows system
There are two ways to run Client on Windows.
Option 1 Running executable file directly
Find the “Client.exe” file in the specified directory, double click it and the Client is opened.

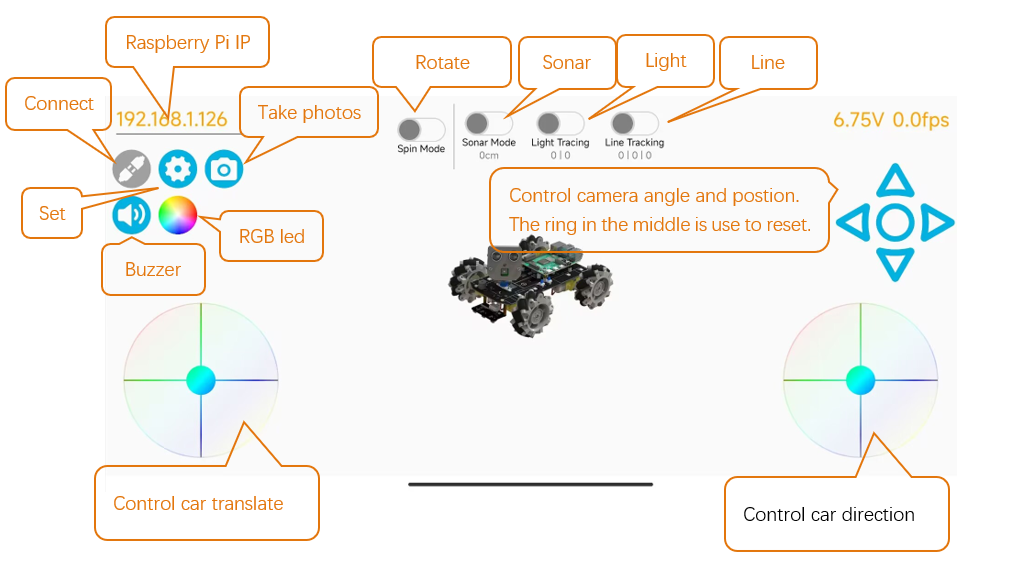
The client interface is shown as below:

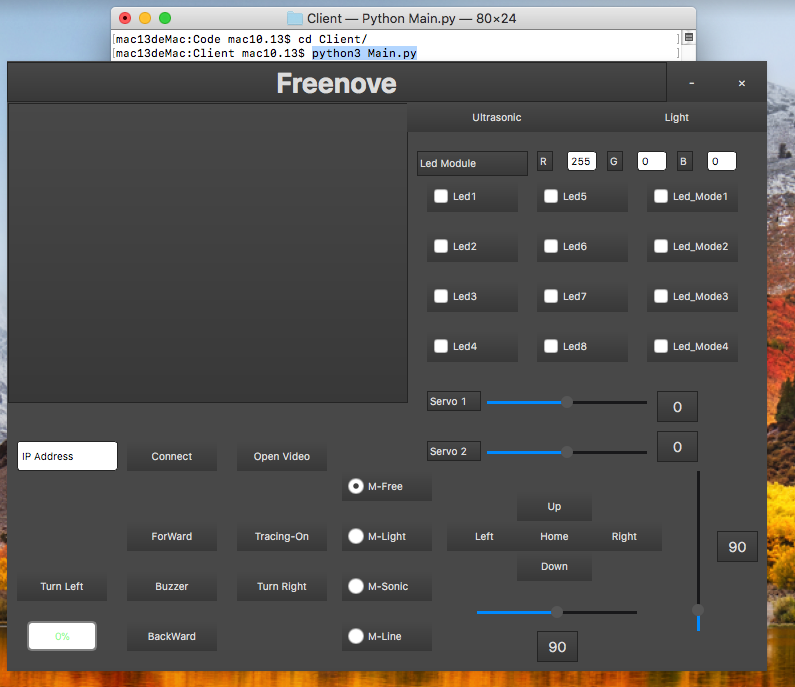
After the client opens successfully, you need open the Raspberry Pi and open server first , then enter the IP address of the Raspberry Pi in the white IP edit box, and then click “Connect” to connect smart car to Raspberry Pi. After the connection is successful, you can click on the controls on the interface to operate the car.
Note
when Raspberry Pi is shut down, server will be closed. You need open server again the next time.
If pressing forward but the car moves backward, please refer to page 51 to modify the code.
Install python3
Download the installation file:
https://www.python.org/downloads/windows/

Click Latest Python 3 Release - Python 3.8.1
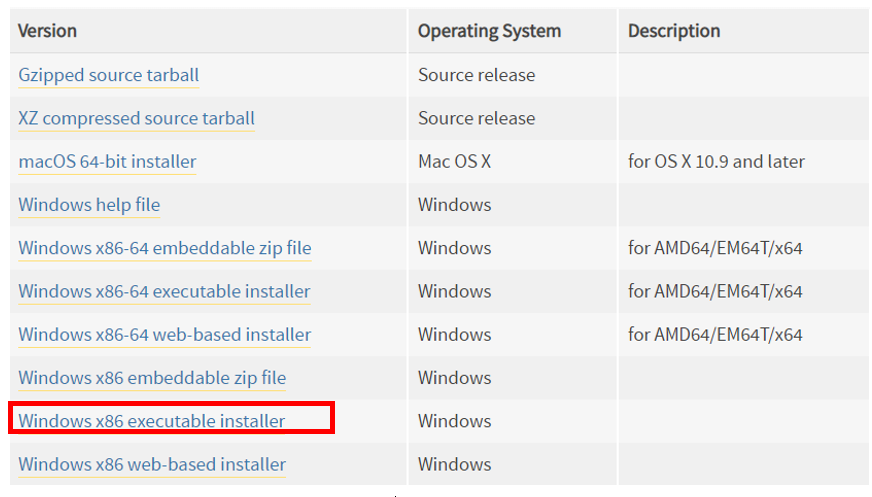
Choose and download Windows x86 executable installer. After downloading successfully, install it.

Select “Add Python 3.8 to PATH”. You can choose other installation features.
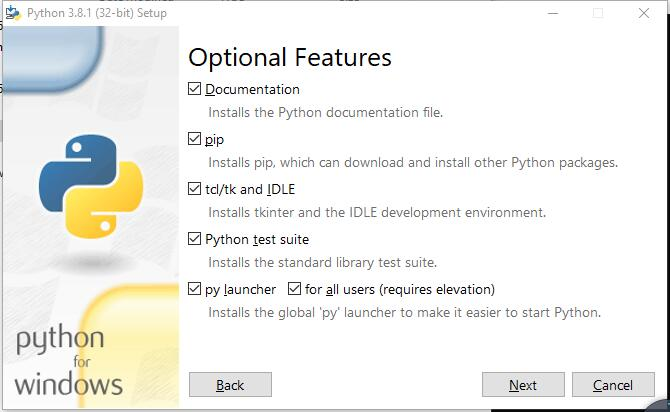
Select all options and click “Next”.
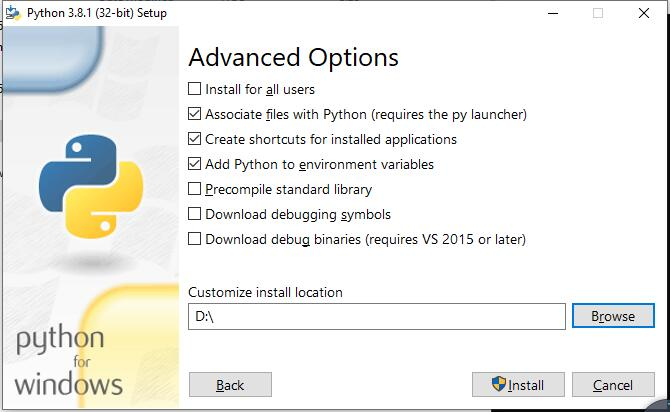
Here, my install location is D. You can also choose other location. Then click “Install”.

Wait installing.

Now, installation is completed.
Install PyQt5、opencv、numpy and other libraries.
If have not download the zip file, do so via:
https://github.com/Freenove/Freenove_4WD_Smart_Car_Kit_for_Raspberry_Pi/archive/master.zip
Then unzip it and delete “-master” to rename it to “Freenove_4WD_Smart_Car_Kit_for_Raspberry_Pi”.
Then put it into D disk for example.
You can also place it into other disks (like E), but the path in the following command should be modified accordingly (replace D: by E:).
Press “win + R” and enter cmd, and click ok. Then enter following commands.
Enter D disk. (If you put it into E, it should be E:)
D:
Enter directory where setup_windows.py is located: (If you put it into E, it should be E:)
cd D:\\Freenove_4WD_Smart_Car_Kit_for_Raspberry_Pi\\Code
Run setup_windows.py:
Python3 setup_windows.py

Or enter the unzipped directory Freenove_4WD_Smart_Car_Kit_for_Raspberry_Pi\Code\Client.
And double-click setup_client.py or open it with python3.
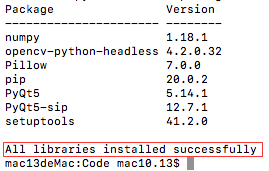
Installation will take some time. Just wait patiently. For successful installation, it will prompt “All libraries installed successfully”:

If not all installations are successful, it will prompt “Some libraries have not been installed yet. Please run ‘ Python3 setup_windows.py ‘ again”, then you need to execute the Python3 setup_windows.py command again. Most of the installation failures are caused by poor networks. You can check your network before installing.
Open client
Press “win + R” and enter cmd, and click ok. Then enter following commands.
Enter D disk. If you put it into E, it should be E:
D:
Enter directory where Main.py is located:
cd D:\\Freenove_4WD_Smart_Car_Kit_for_Raspberry_Pi\\Code\\Client
Run Main.py:
python Main.py

Or enter the unzipped directory and enter following directory: Freenove_4WD_Smart_Car_Kit_for_Raspberry_Pi\Code\Client. And double-click Main.py or open it with python to open the client.
The client interface is shown as below:
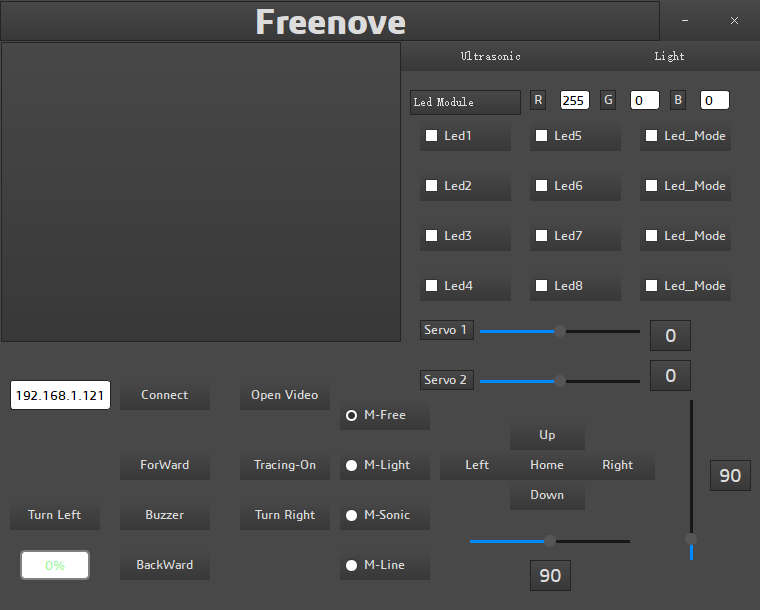
After the client opens successfully, you need open the Raspberry Pi and open server first, then enter the IP address of the Raspberry Pi in the white IP edit box, and then click “Connect” to connect smart car to Raspberry Pi. After the connection is successful, you can click on the controls on the interface to operate the car.
Note
when Raspberry Pi is shut down, server will be closed. You need open server again the next time.
If pressing forward but the car moves backward, please refer to page 51 to modify the code.
Control
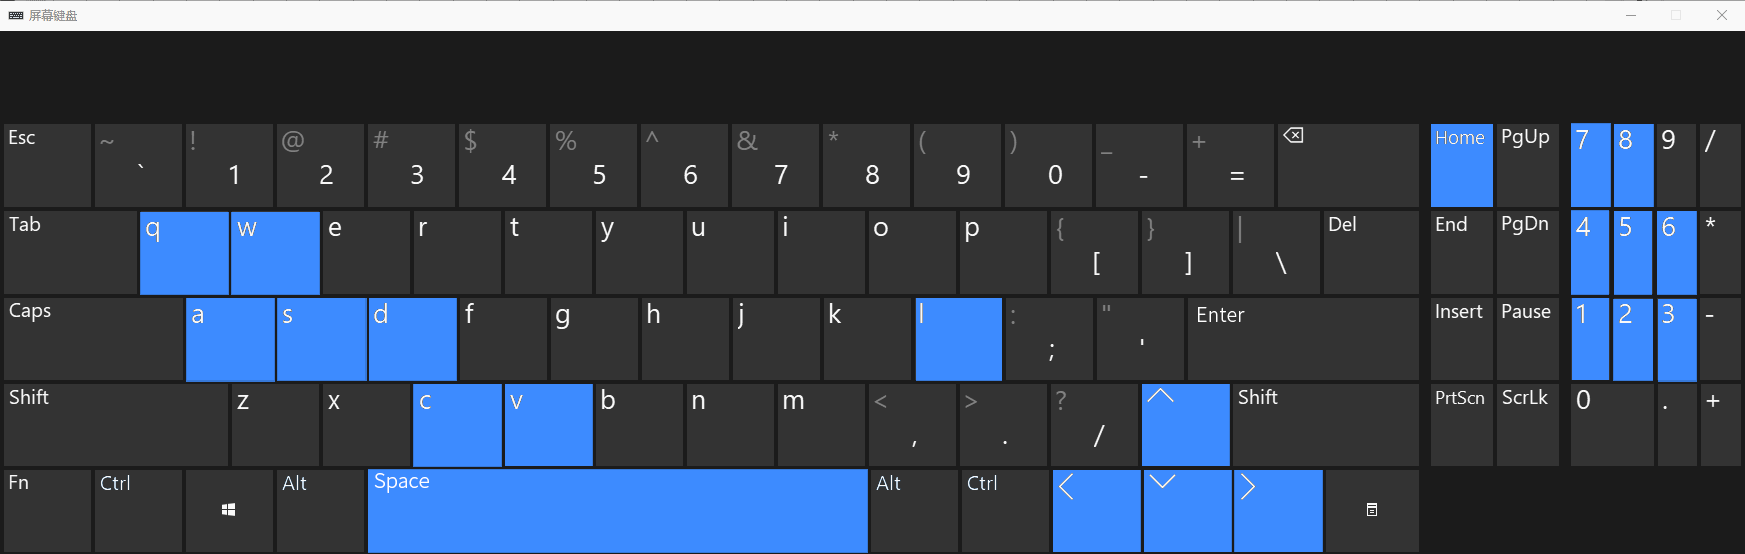
And you can also control the car with following blue keys.
The car has four work modes:
Mode |
Function |
|---|---|
M-Free(Mode1) |
Free control mode |
M-Light(Mode2) |
Light tracing mode |
M-Sonic(Mode3) |
Ultrasonic obstacle avoidance mode |
M-Line(Mode4) |
Infrared line tracking mode |
The following is the corresponding operation of the buttons and keys.
Button on Client |
Key |
Action |
|---|---|---|
ForWard |
W |
Move |
BackWard |
S |
Back off |
Turn left |
A |
Move left |
Turn Right |
D |
Move Right |
Move Left |
Shift+A |
Turn left |
Move Right |
Shift+D |
Turn Right |
↖ |
Q |
Left-forward diagonal |
↗ |
E |
Right-forward diagonal |
↙ |
Z |
Left-backward diagonal |
↘ |
X |
Right-backward diagonal |
Rotate On/Off |
O |
On/off Rotation |
Left |
left arrow |
Turn camera left |
Right |
right arrow |
Turn camera right |
Up |
up arrow |
Turn camera up |
Down |
down arrow |
Turn camera down |
Home |
Home |
Turn camera back Home |
Connect/ Disconnect |
C |
On/off Connection |
Open Video/ Close Video |
V |
On/off Video |
Mode 1,2,3,4 |
R |
Switch Mode |
Buzzer |
Space |
On/off Buzzer |
Led 1,2,3,4,5,6,7,8 |
1,2,3,4,5,6,7,8 |
On/off Led 1,2,3,4,5,6,7,8 |
Led_Mode 1,2,3,4 |
L |
Switch Led Mode |
The function of SliderBar is below:
SliderBar |
Function |
|---|---|
Servo 1,2 |
SliderBar Servo 1, 2 are used to slightly adjust the angle. If the servo is not fully centered during installation, you can slightly tune it via the SliderBar. |
Other control information:
Control |
Function |
|---|---|
IP address Edit box |
Enter IP address of Raspberry Pi |
Power box |
Show power level |
R,G,B Edit box |
Control the color of LED selected. |
Button “Ultrasonic” |
Show the distance from obstacle. |
Button “Light” |
Show voltage of two photoresistors. |
Button “Tracing-On/Off” |
Open and close face tracking |
If you don’t want to enter IP address after open the client, you can make some modification as below:
Open “Client_Ui.py” under directory “Client”, then find code in the thirty-sixth line from the bottom.
self.IP.setText(_translate("Client", "IP address", None))
Modify IP address to IP address of your Raspberry Pi. For example, my rpi IP is 192.168.1.116. After modification, it should be as below:
self.IP.setText(_translate("Client", "192.168.1.116", None))
Then save and close. And then restart your client. You can see it is modified successfully.

Run client on macOS system
Here take MacOS 10.13 as an example. To run the client on MacOS, you need to install some software and libraries. At this time, it does not need to run the server or use the Raspberry Pi. So you can turn off the Raspberry Pi first. After the installation is complete, turn on the Raspberry Pi and run the server. MacOS 10.13 comes with python2, but no python3. However, the programs in this project need run under python3, so you need to install it first.
Install python3
Download installation package, link: https://www.python.org/downloads/

your macOS is 11. Like 11.0, please install python 3.9.
If your macOS is NOT 11, like 10.15, please install python 3.8. If you have installed python 3.9. You need uninstall it first.
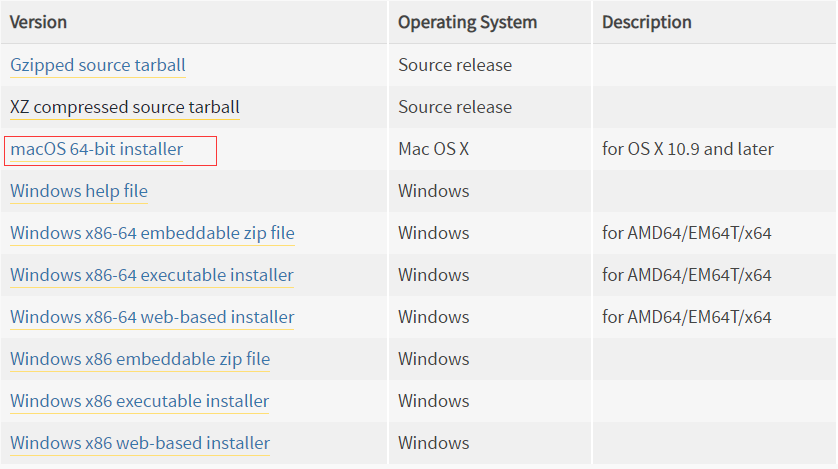
At bottom of the page, click macOS 64-bit installer and download installation package.
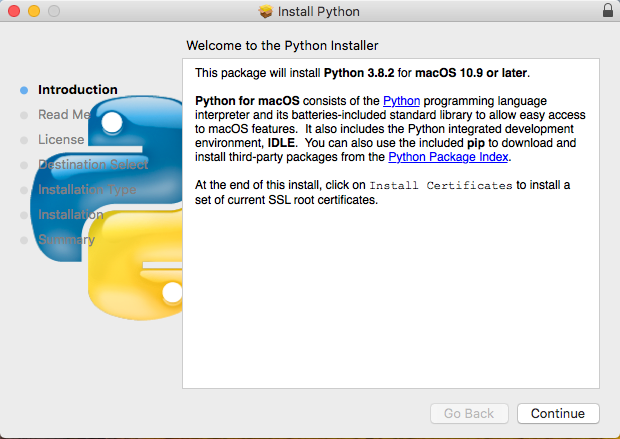
Click Continue.
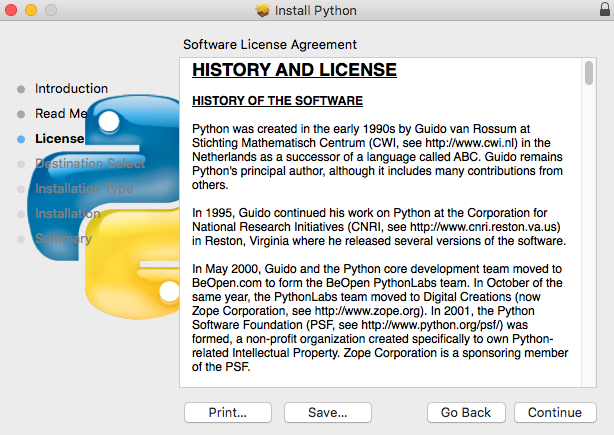
Click Continue
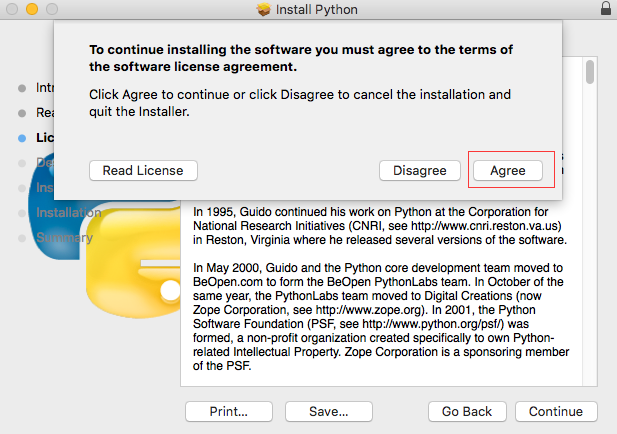
Click Agree.

Click Install. If your computer has a password, enter the password and Install Software.
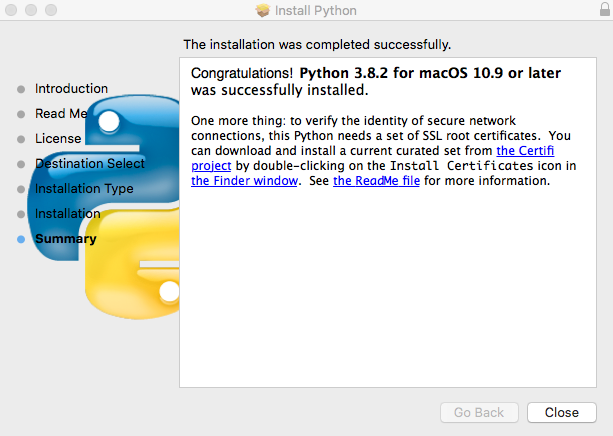
Now the installation succeeds.
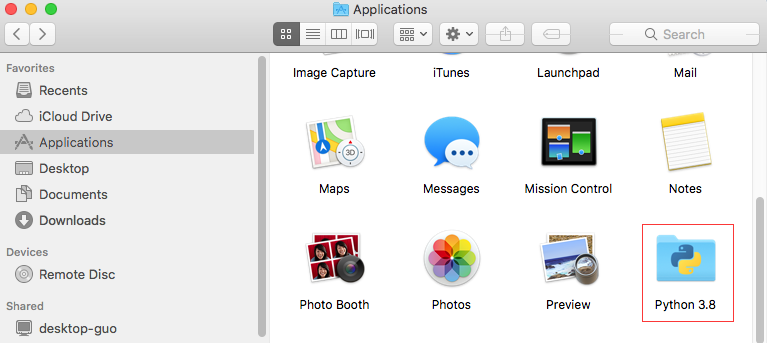
You can find it in Aapplications.
Install PyQt5、opencv、numpy and other libraries
If there is no code for this car in your macOS system device, you can download it via the link below:
https://github.com/Freenove/Freenove_4WD_Smart_Car_Kit_for_Raspberry_Pi/archive/master.zip
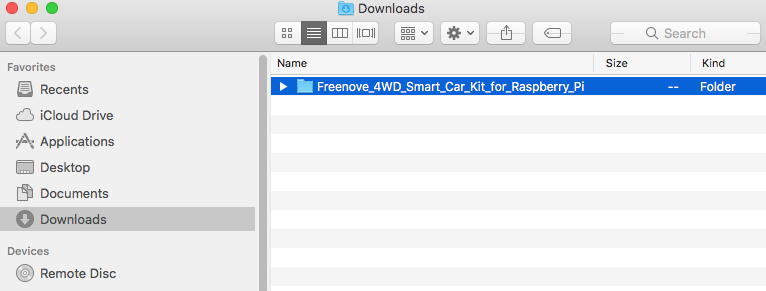
After downloaded successfully, you can find it under Downloads.
Open the Terminal.

Type following commands in Terminal.
Enter “Downloads”, (Where the Car code is located. If your location for it is different, please enter the location in your device.)
$ cd Downloads
Enter directory where setup_macos.py is located:
$ cd Freenove_4WD_Smart_Car_Kit_for_Raspberry_Pi/Code/
Run setup_macos.py:
$ python3 setup_macos.py

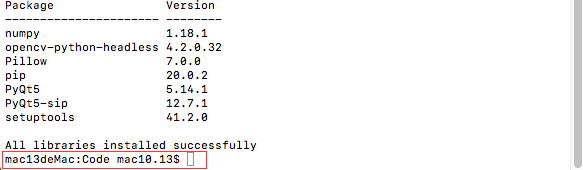
Installation will take some time. Just wait patiently. For successful installation, it will prompt “All libraries installed successfully”:
If not all installations are successful, it will prompt “Some libraries have not been installed yet. Please run ‘python3 setup_macos.py’ again”, then you need to execute the python3 setup_macos.py command again. Most of the installation failures are caused by poor networks. You can check your network before installing.
If you are using macOS under 11.0, like 10.15. Just skip to “Open client”.
If you are using macOS 11.0 or later version. Please run commands below:
$ pip3 uninstall PyQt5
$ pip3 install PyQt5
Open client
Following the previous step, after the installation is completed, you are now in the directory where setup_macos.py is located.
1.Type following command to enter Client folder.
$ cd Client/
2.Type following command to run Main.py.
$ python3 Main.py
The control way of Raspberry Pi macOS System client is same with Windows (Control).
Troubleshooting
If the car works abnormally, it may be caused by following reasons: Raspberry Pi system is stuck or batteries have no power.
You need check batteries power indicator or recharge batteries. Make sure batteries have enough power. When the batteries voltage is less than 7V, the buzzer will make regular sound.
If the batteries are OK, Raspberry Pi system is stuck. You need wait some time to check if the client works. Or reopen the server and client.
The latest Raspberry Pi official system is not stable. It occasionally is stuck. The old version is more stable.
If the Raspberry Pi system is stuck for a long time, you need reboot Raspberry Pi.
If you have any concerns, please feel free to contact us with pictures:
Communication Command
Communication Command Format
Each command is composed of four parts: command string, delimiter, parameter, and terminator.
The first string of each command serves to differentiate the primary category of the command, such as “CMD_MODE.”
The “#” character acts as a delimiter between the command string and the parameter, used to separate the two elements.
Each command concludes with “\n,” which serves to terminate the command. It is utilized to distinguish between individual commands. For instance: “CMD_MODE #0n.”
Parse of Commands 0
When parsing commands, first separate the commands with “\n”, and then separate the command word
and parameters of each command with“#”. The characters after “\n” are divided to the next command for
parsing.
Command Words
We have defined the following command strings.
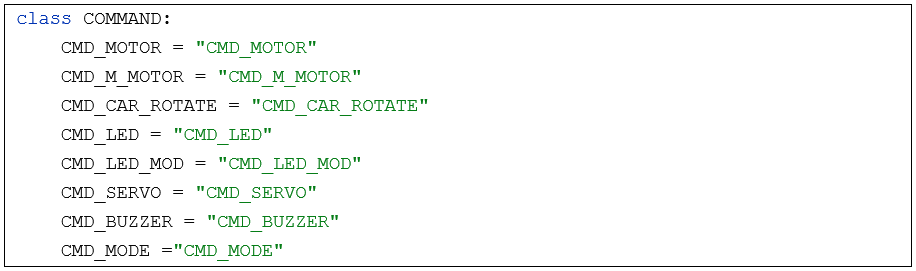
Explanation of Communication Commands
CMD_MOTOR
CMD_MOTOR is used to control the motor speeds of the standard version of the car. The four parameters correspond to the speeds of the four motors: left-front, left-rear, right-front, and right-rear. The speed range for each motor is from -4056 to 4056.
App command |
Action |
|---|---|
CMD_MOTOR#1500#1500#1500#1500n |
Forward |
CMD_MOTOR#-1500#-1500#-1500#-1500n |
Backward |
CMD_MOTOR#-1500#-1500#1500#1500n |
Turn Left |
CMD_MOTOR#1500#1500#-1500#-1500n |
Turn Right |
CMD_MOTOR#0#0#0#0n |
Stop |
CMD_M_MOTOR
CMD_M_MOTOR is used to regulate the motor speeds of the standard version of the car. The command incorporates four parameters, each with a distinct role:
The first parameter signifies the angle, with respect to the Y-axis, of joystick one on the mobile app.
The second parameter denotes the displacement of joystick one.
The third parameter represents the angle, again relative to the Y-axis, of joystick two.
The fourth parameter indicates the displacement of joystick two.
In this context:
The angle ranges from -180 to 180 degrees.
The displacement falls within the interval of 0 to 4056.
App command |
Action |
|---|---|
CMD_M_MOTOR#0#1500#0#0n |
Forward |
CMD_M _MOTOR#180#1500#0#0n |
Reverse |
CMD_M_MOTOR#0#0#90#1500n |
Turn-left |
CMD_M_MOTOR#0#0#-90#1500n |
Turn-right |
CMD_M_MOTOR#0#0#0#0n |
Stop |
CMD_M_MOTOR#90#1500#0#0n |
Left-translation |
CMD_M_MOTOR#90#1500#0#0n |
Right-translation |
CMD_M_MOTOR#45#1500#0#0n |
Front-left, diagonal translation |
CMD_M_MOTOR#45#1500#0#0n |
Front-right, diagonal translation |
CMD_M_MOTOR#135#1500#0#0n |
Rear-left, diagonal translation |
CMD_M_MOTOR#-135#1500#0#0n |
Rear-right, diagonal translation |
CMD_CAR_ROTATE
CMD_CAR_ROTATE is employed to manage the directional control of the car’s rotation. The command integrates four parameters, each with a distinct function:
The first parameter signifies the angle, relative to the Y-axis, of joystick one on the mobile app.
The second parameter represents the displacement of joystick one.
The third parameter denotes the angle, with respect to the Y-axis, of joystick two.
The fourth parameter indicates the displacement of joystick two.
In this context:
The angle ranges from -180 to 180 degrees.
The displacement falls within the interval of 0 to 4056.
The extent of rotation is contingent upon the angle specified in the third parameter, offering precise control over the direction of rotation for the car.
App command |
Action |
|---|---|
CMD_CAR_ROTATE#0#0#0#0n |
Rotate forward |
CMD_CAR_ROTATE #0#0#0#0n |
Rotate backward |
CMD_CAR_ROTATE #0#0#0#0n |
Stop |
CMD_CAR_ROTATE #90#1500#0#0n |
Rotate to the left |
CMD_CAR_ROTATE #90#1500#0#0n |
Rotate to the right |
CMD_LED
CMD_LED is used to control the color of the light in RGB mode. There are four parameters, representing the intensity values of the red, green, and blue color channels, as well as transparency. The range for each channel is from 0 to 255.
App command |
Action |
|---|---|
CMD_LED#255#0#0#0 |
RGB Red |
CMD_LED#0#255#0#0 |
RGB Green |
CMD_LED#0#255#0#0 |
RGB Bliue |
CMD_LED_MOD
CMD_LED_MOD is used to control the RGB LED to different modes, with one parameter.
App command |
Action |
|---|---|
CMD_LED_MOD #0 |
Turn OFF RGB LEDs |
CMD_LED_MOD #1 |
Common RGB Mode |
CMD_LED_MOD #2 |
Following Mode |
CMD_LED_MOD #3 |
Blink Mode |
CMD_LED_MOD #4 |
Breathing Mode |
CMD_LED_MOD #5 |
Rainbow Mode |
CMD_SERVO
CMD_SERVO is used to control the angle of the servo motor. It has two parameters, representing the rotation angles of servo 0 and servo 1.
CMD_BUZZER
CMD_BUZZER is used to control the buzzer. It has one parameter: when the parameter is set to 0, the buzzer is turned off; when set to 1, it is turned on.
CMD_MODE
CMD_MODE is used to control the auto modes of the car with one parameter.
App command |
Action |
|---|---|
CMD_MODE #0 |
Control mode |
CMD_MODE #1 |
Light-tracing mode |
CMD_MODE #2 |
Line-tracking mode |
CMD_MODE #3 |
Obstacle avoidance mode |
Android and iOS app
You can download and install the Freenove Android app from below:
On Google play:
https://play.google.com/store/apps/details?id=com.freenove.suhayl.Freenovez
On GitHub:
https://github.com/Freenove/Freenove_App_for_Android
In this github repository, you can find the App instruction (Tutorial.pdf).
You can download and install the Freenove iPhone ios app by searching freenove in app store.
Open the app and select the car.
Open the server in Raspberry Pi car first. And enter your Pi IP.
Before proceeding with mobile app control, ensure the following:
Connect both your phone and Raspberry Pi to the same network environment.
Adjust the rotation time ratio as per the Advanced Movements section in Chapter 3.
Upon entering the mobile app, you will see two control joysticks. The first one is for controlling the car’s omnidirectional movement. The second joystick has two functions. When the “Spin Mode” above it is not activated, it controls the direction of the car’s movement. When the “Spin Mode” is activated, it controls the angle at which the car rotates while moving forward. In spin mode, keep the joystick pressed; releasing it will stop the car.
Free innovation
If you have any concerns, please feel free to contact us via support@freenove.com
If you want to write your own program to control the car, just follow this section. We will teach you how to program this car.
If you have never learned python before, you can learn some basic knowledge via the link below: https://python.swaroopch.com/basics.html
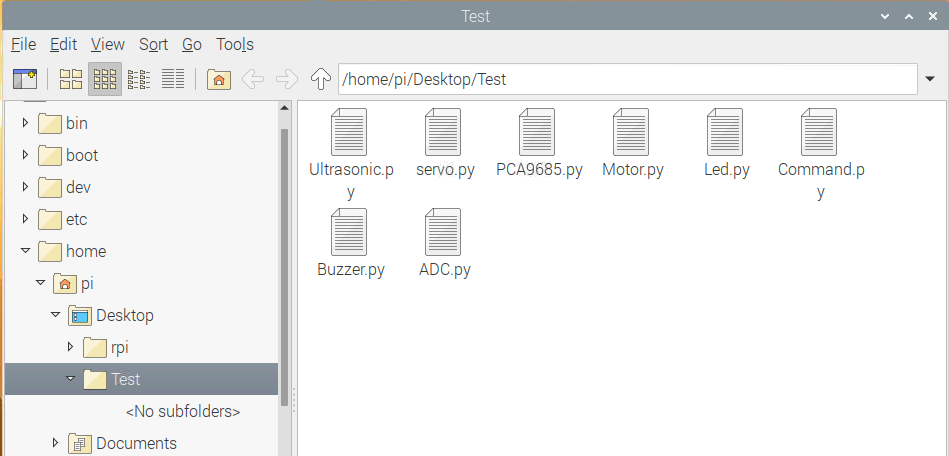
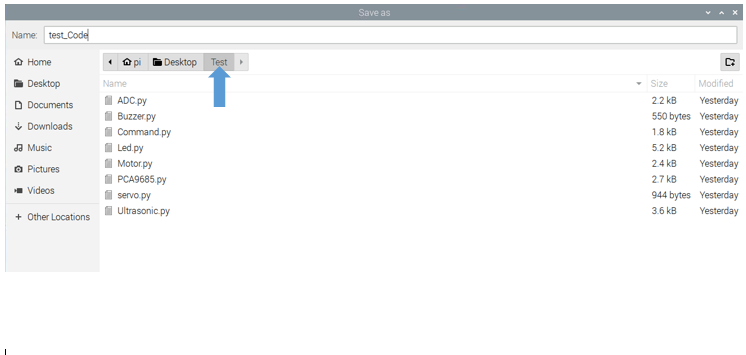
First, turned on S1 and S2. Then open Raspberry Pi, right click and create a new folder on the desktop: Test
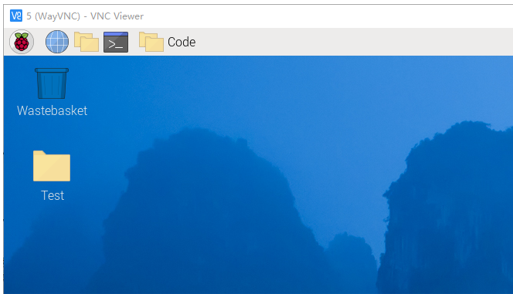
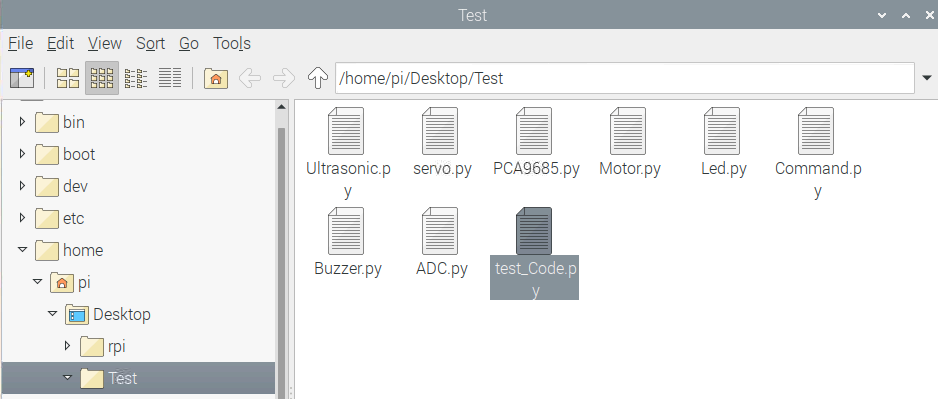
Open Freenove_4WD_Smart_Car_Kit_for_Raspberry_Pi/Code/Server in your Raspberry Pi and copy the following 8 files into the Test folder we created.
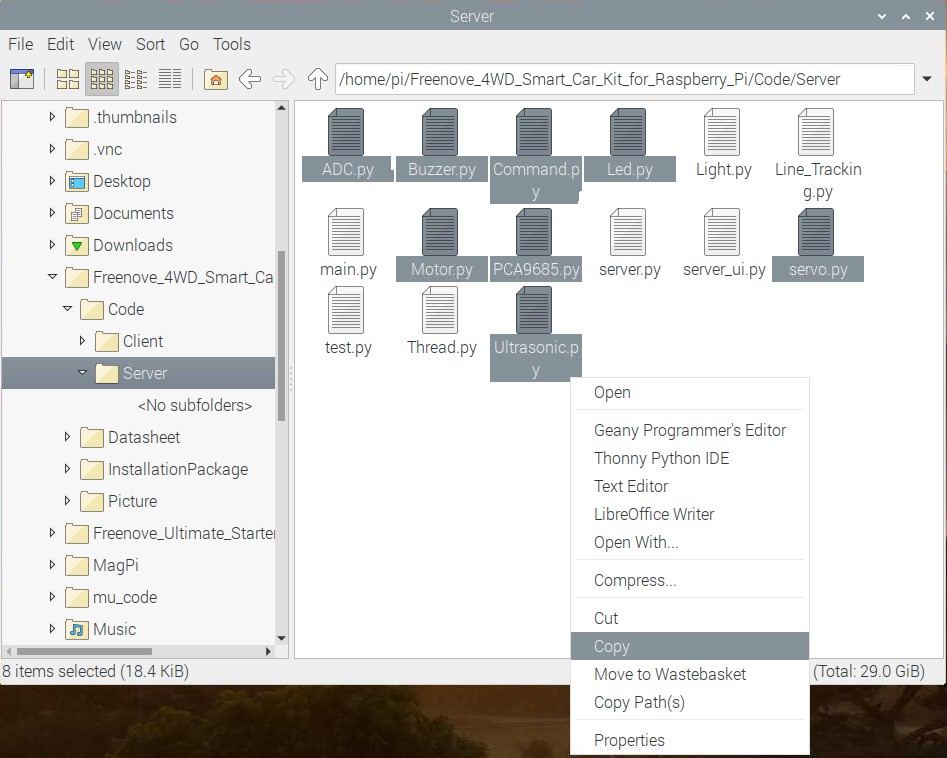
Paste them in Test folder.
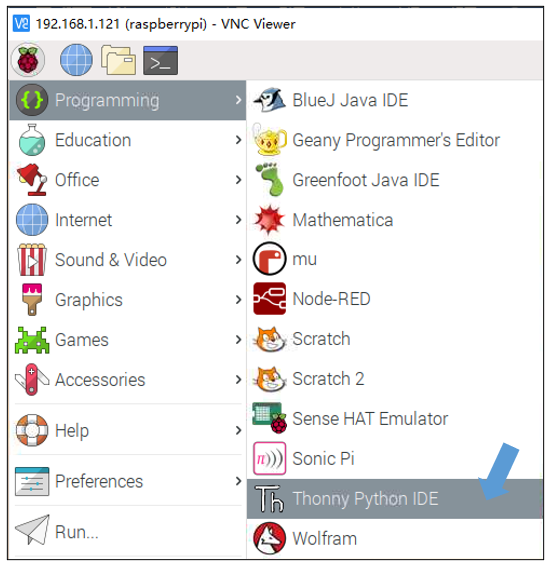
Run Thonny Python IDE
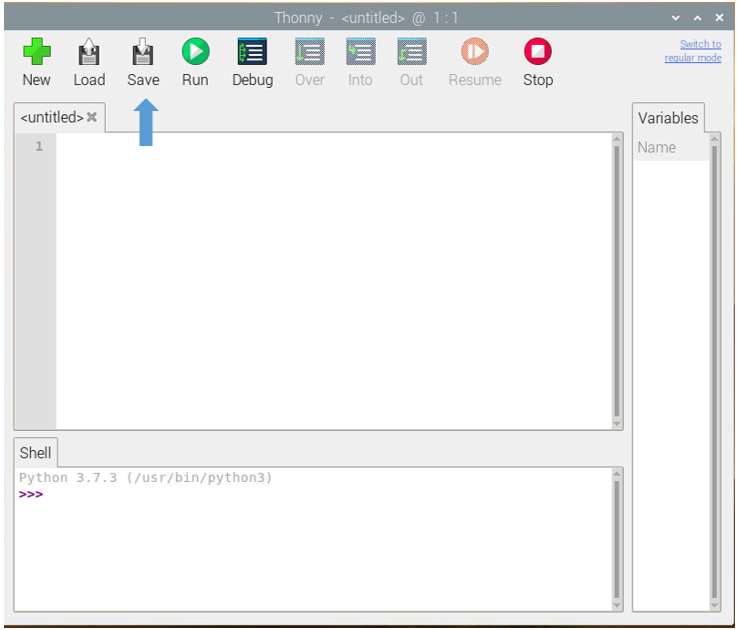
Click Save and save it into the Test folder, with name: test_Code.
Now you can see the file test_Code.py we created.
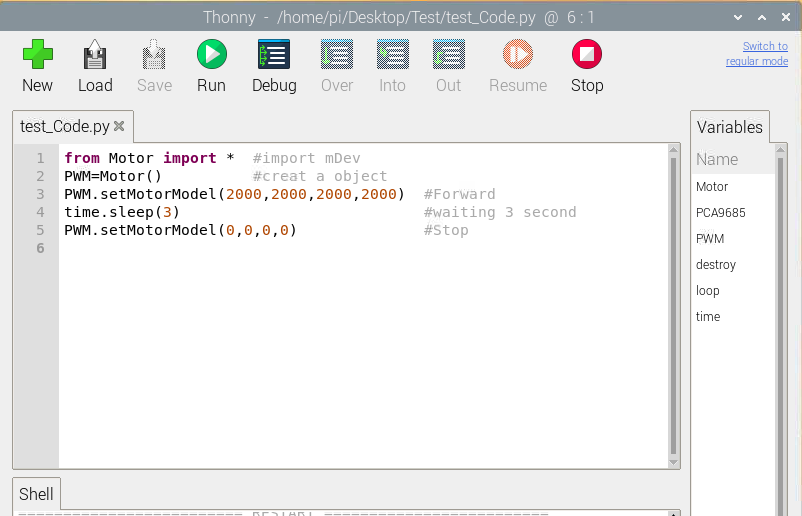
Then write code in test_Code.py, then click save.
Note
The code and library are written by Python 3. You need execute the code with python 3.
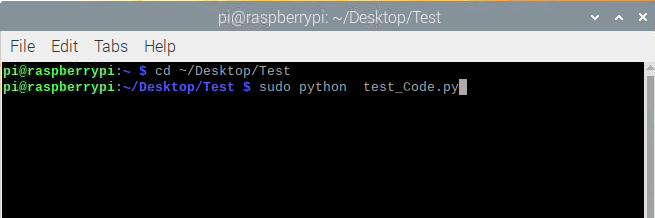
Open the terminal and use the following command to enter the directory where test_Code.py is located:
$ cd ~/Desktop/Test
Run test_Code.py:
$ sudo python test_Code.py
Code example
Following are code example for the parts. For more detail, please refer to Module test section.
For more details, please refer to Motor.
1from Motor import *                       #import Motor
2PWM=Motor()                               #create an object
3PWM.setMotorModel(2000,2000,2000,2000)    #Forward
4time.sleep(3)                             #waiting 3 second
5PWM.setMotorModel(0,0,0,0)                #Stop
ADC. For more details, please refer to ADC.
1from ADC import *             # import ADC
2adc=Adc()                     # create an object
3Left_IDR=adc.recvADC(0)       # get value
4print ("The photoresistor voltage on the left is "+str(Left_IDR)+"V")
LED. For more details, please refer to LED.
1from Led import *                       # import Led
2led=Led()                               # create an object
3led.ledIndex(0x04,255,255,0)            # yellow
4led.ledIndex(0x80,0,255,0)              # green
5time.sleep(5)                           # wait 5s
6led.colorWipe(led.strip, Color(0,0,0))  # turn off
Buzzer. For more details, please refer to Buzzer.
1from Buzzer import *                # import Led
2from Command import COMMAND as cmd  # import Led
3buzzer=Buzzer()                     # create an object
4buzzer.run('1')                     # Start
5time.sleep(3)                       # wait 3s
6buzzer.run('0')                     # Stop
Servo. For more details, please refer to Servo.
 1from servo import *   #import Led
 2pwm = Servo()           #create an object
 3#Servo rotates from 30 degrees to 150 degrees
 4for i in range(30, 150, 1) :
 5    pwm.setServoPwm('0', i)
 6    time.sleep(0.01)
 7#Servo rotates from 150 degrees to 0 degrees
 8for i in range(150, 30, -1) :
 9    pwm.setServoPwm('0', i)
10    time.sleep(0.01)
Ultrasonic module. For more details, please refer to Ultrasonic module.
1from Ultrasonic import *         #import Led
2ultrasonic=Ultrasonic()          #create an object
3data=ultrasonic.get_distance()   #Get the value
4print ("Obstacle distance is "+str(data)+"CM")
These codes can be integrated into one code to achieve your requirement.