Chapter 14 Smart home
In this chapter, we will use ESP8266 to make a simple smart home.We will learn how to control LED lights through web pages.
Project 14.1 Control_LED_through_Web
In this project, we need to build a Web Service and then use ESP8266 to control the LED through the Web browser of the phone or PC.Through this example, you can remotely control the appliances in your home to achieve smart home.
Component List
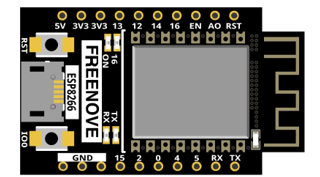
ESP8266 x1 |
USB cable |
|
|
Component knowledge
HTML
HyperText Markup Language (HTML) is a standard Markup Language for creating web pages.It includes a set of tags that unify documents on the network and connect disparate Internet resources into a logical whole.HTML text is descriptive text composed of HTML commands that describe text, graphics, animations, sounds, tables, links, etc.The extension of the HTML file is HTM or HTML.Hyper Text is a way to organize information.It uses hyperlinks to associate words and charts in Text with other information media.These related information media may be in the same Text, other files, or files located on a remote computer.This way of organizing information connects the information resources distributed in different places, which is convenient for people to search and retrieve information.
The nature of the Web is hypertext Markup Language (HTML), which can be combined with other Web technologies (e.g., scripting languages, common gateway interfaces, components, etc.) to create powerful Web pages. Thus, HYPERtext Markup Language (HTML) is the foundation of World Wide Web (Web) programming, that is, the World Wide Web is based on hypertext. Hypertext Markup Language is called hypertext Markup language because the text contains so-called “hyperlink” points.
You can build your own WEB site using HTML, which runs on the browser and is parsed by the browser.
Example analysis is shown in the figure below:
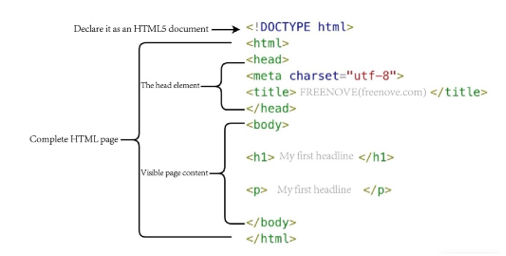
<!DOCTYPE html>: Declare it as an HTML5 document
<html>: Is the root element of an HTML page
<head>: Contains meta data for the document, such as < meta charset=”utf-8”> Define the web page encoding format to UTF-8.
<title>: Notesthe title of the document
<body>: Contains visible page content
<h1>: Define a big heading
<p>: Define a paragraph
For more information, please visit: https://developer.mozilla.org/en-US/docs/Web/HTML
Circuit
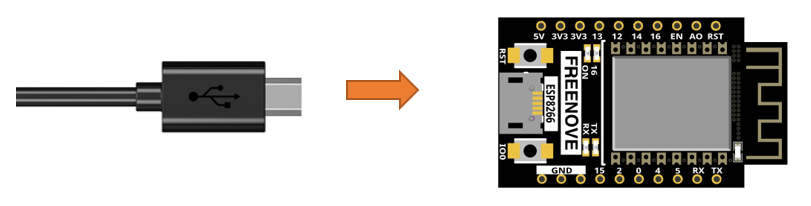
Connect Freenove ESP8266 to the computer using USB cable.
Sketch
Sketch_14.1_Control_LED_through_Web

Download the code to ESP8266, open the serial port monitor, set the baud rate to 115200 and you can use it to measure the distance between the ultrasonic module and the object. As shown in the following figure:
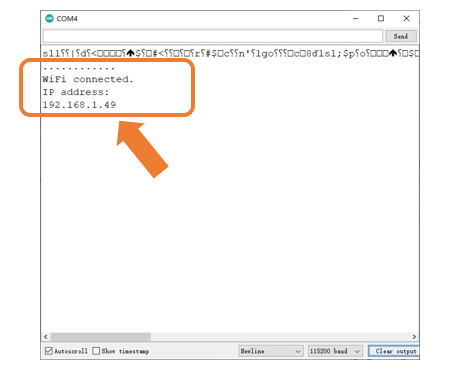
When ESP8266 successfully connects to “ssid_Router”, serial monitor will print out the IP address assigned to ESP8266 by the router. Access http://192.168.1.49 in a computer browser on the LAN. As shown in the following figure:
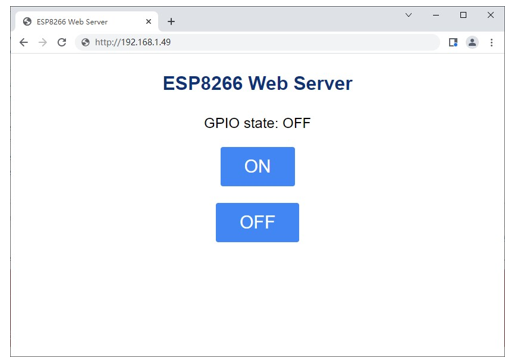
You can click the corresponding button to control the LED on and off.
The following is the program code:
  1/**********************************************************************
  2* Filename    : Control LED through Web
  3* Description : Make an led blinking.
  4* Auther      : www.freenove.com
  5* Modification: 2022/05/11
  6**********************************************************************/
  7#include <ESP8266WiFi.h>
  8// Replace with your network credentials
  9const char* ssid     = "********";
 10const char* password = "********";
 11// Set web server port number to 80
 12WiFiServer server(80);
 13// Variable to store the HTTP request
 14String header;
 15// Auxiliar variables to store the current output state
 16String PIN_LEDState = "OFF";
 17// Assign output variables to GPIO pins
 18const int PIN_LED = 2;
 19// Current time
 20unsigned long currentTime = millis();
 21// Previous time
 22unsigned long previousTime = 0;
 23// Define timeout time in milliseconds (example: 2000ms = 2s)
 24const long timeoutTime = 2000;
 25
 26void setup() {
 27  Serial.begin(115200);
 28  // Initialize the output variables as outputs
 29  pinMode(PIN_LED, OUTPUT);
 30  // Set outputs to LOW
 31  digitalWrite(PIN_LED, HIGH);
 32  // Connect to Wi-Fi network with SSID and password
 33  Serial.print("Connecting to ");
 34  Serial.println(ssid);
 35  WiFi.begin(ssid, password);
 36  while (WiFi.status() != WL_CONNECTED) {
 37    delay(500);
 38    Serial.print(".");
 39  }
 40  // Print local IP address and start web server
 41  Serial.println("");
 42  Serial.println("WiFi connected.");
 43  Serial.println("IP address: ");
 44  Serial.println(WiFi.localIP());
 45  server.begin();
 46}
 47void loop(){
 48  WiFiClient client = server.available();   // Listen for incoming clients
 49  if (client) {                        // If a new client connects,
 50    Serial.println("New Client.");     // print a message out in the serial port
 51    String currentLine = "";           // make a String to hold incoming data from the client
 52    currentTime = millis();
 53    previousTime = currentTime;
 54    while (client.connected() && currentTime - previousTime <= timeoutTime) { // loop while the client's connected
 55      currentTime = millis();
 56      if (client.available()) {             // if there's bytes to read from the client,
 57        char c = client.read();             // read a byte, then
 58        Serial.write(c);                    // print it out the serial monitor
 59        header += c;
 60        if (c == '\n') {                    // if the byte is a newline character
 61          // if the current line is blank, you got two newline characters in a row.
 62          // that's the end of the client HTTP request, so send a response:
 63          if (currentLine.length() == 0) {
 64            // HTTP headers always start with a response code (e.g. HTTP/1.1 200 OK)
 65            // and a content-type so the client knows what's coming, then a blank line:
 66            client.println("HTTP/1.1 200 OK");
 67            client.println("Content-type:text/html");
 68            client.println("Connection: close");
 69            client.println();
 70            // turns the GPIOs on and off
 71            if (header.indexOf("GET /5/ON") >= 0) {
 72              Serial.println("GPIO 5 ON");
 73              PIN_LEDState = "ON";
 74              digitalWrite(PIN_LED, LOW);
 75            } else if (header.indexOf("GET /5/OFF") >= 0) {
 76              Serial.println("GPIO 5 OFF");
 77              PIN_LEDState = "OFF";
 78              digitalWrite(PIN_LED, HIGH);
 79            }
 80            // Display the HTML web page
 81            client.println("<!DOCTYPE html><html>");
 82            client.println("<head> <title>ESP8266 Web Server</title> <meta name=\"viewport\" content=\"width=device-width, initial-scale=1\">");
 83            client.println("<link rel=\"icon\" href=\"data:,\">");
 84            // CSS to style the on/off buttons
 85// Feel free to change the background-color and font-size attributes to fit your preferences
 86            client.println("<style>html {font-family: Helvetica; display:inline-block; margin: 0px auto; text-align: center;}");
 87            client.println(" h1{color: #0F3376; padding: 2vh;} p{font-size: 1.5rem;}");
 88            client.println(".button{background-color: #4286f4; display: inline-block; border: none; border-radius: 4px; color: white; padding: 16px 40px;text-decoration: none; font-size: 30px; margin: 2px; cursor: pointer;}");
 89            client.println(".button2{background-color: #4286f4;display: inline-block; border: none; border-radius: 4px; color: white; padding: 16px 40px;text-decoration: none; font-size: 30px; margin: 2px; cursor: pointer;}</style></head>");
 90            // Web Page Heading
 91            client.println("<body><h1>ESP8266 Web Server</h1>");
 92            client.println("<p>GPIO state: " + PIN_LEDState + "</p>");
 93            client.println("<p><a href=\"/5/ON\"><button class=\"button button2\">ON</button></a></p>");
 94            client.println("<p><a href=\"/5/OFF\"><button class=\"button button2\">OFF</button></a></p>");
 95            client.println("</body></html>");
 96            // The HTTP response ends with another blank line
 97            client.println();
 98            // Break out of the while loop
 99            break;
100          } else { // if you got a newline, then clear currentLine
101            currentLine = "";
102          }
103        } else if (c != '\r') {  // if you got anything else but a carriage return character,
104          currentLine += c;      // add it to the end of the currentLine
105        }
106      }
107    }
108    // Clear the header variable
109    header = "";
110    // Close the connection
111    client.stop();
112    Serial.println("Client disconnected.");
113    Serial.println("");
114  }
115}
Include the WiFi Library header file of ESP8266.
1#include <ESP8266WiFi.h>
Enter correct router name and password.
1const char* ssid     = "********";
2const char* password = "********";
Set ESP8266 in Station mode and connect it to your router.
1WiFi.begin(ssid, password);
Check whether ESP8266 has connected to router successfully every 0.5s.
1while (WiFi.status() != WL_CONNECTED) {
2  delay(500);
3  Serial.print(".");
4}
Serial monitor prints out the IP address assigned to ESP8266.
1Serial.println(WiFi.localIP());
Click the button on the web page to control the LED light on and off.
1if (header.indexOf("GET /5/ON") >= 0) {
2  Serial.println("GPIO 5 ON");
3  PIN_LEDState = "ON";
4  digitalWrite(PIN_LED, LOW);
5} else if (header.indexOf("GET /5/OFF") >= 0) {
6  Serial.println("GPIO 5 OFF");
7  PIN_LEDState = "OFF";
8  digitalWrite(PIN_LED, HIGH);
9}