5. Chapter Camera Web Server
In this section, we’ll use ESP32’s video function as an example to study.
5.1. Project 05.1 Camera Web Server
Connect ESP32 using USB and check its IP address through serial monitor. Use web page to access IP address to obtain video and image data.
5.1.1. Component List
ESP32-S3 WROOM x1
|
USB cable x1
|


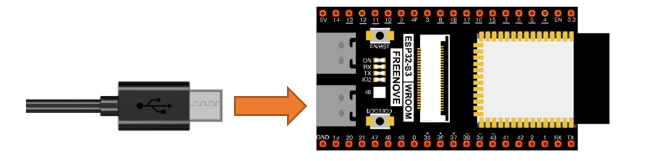
5.1.2. Circuit
Connect Freenove ESP32-S3 to the computer using the USB cable.
5.1.3. Code
Move the program folder “Freenove ESP32-S3 WROOM Board/Python/Python_Codes” to disk(D) in advance with the path of “D:/Micropython_Codes”.
Since Micropython does not provide firmware including camera module, in this chapter, we will use the camera based on the firmware in lemariva’s Github project, micropython-camera-driver.
Project link: https://github.com/lemariva/micropython-camera-driver
Before starting the project, we need to re-upload the firmware with the camera module via steps below.
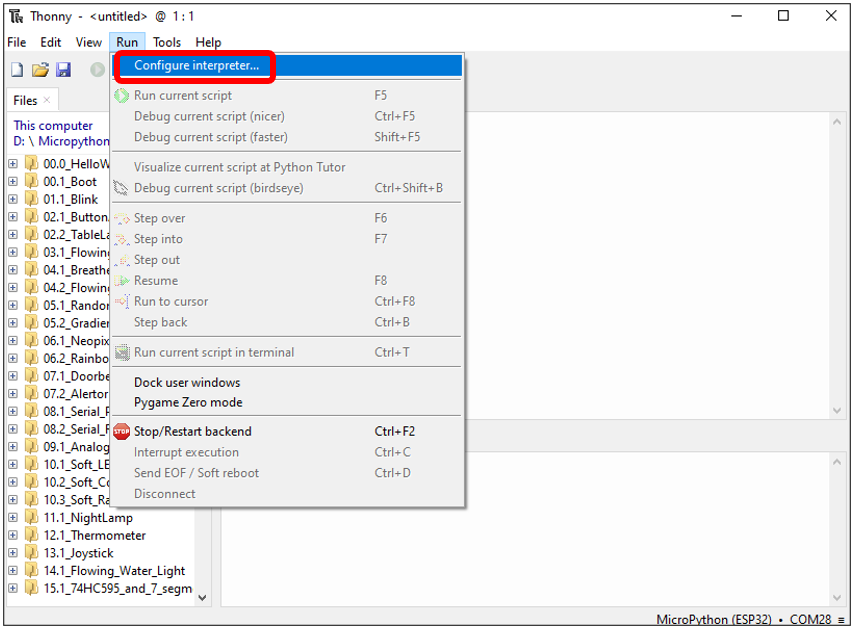
Open Thonny, click “run” and select “Select interpreter…”
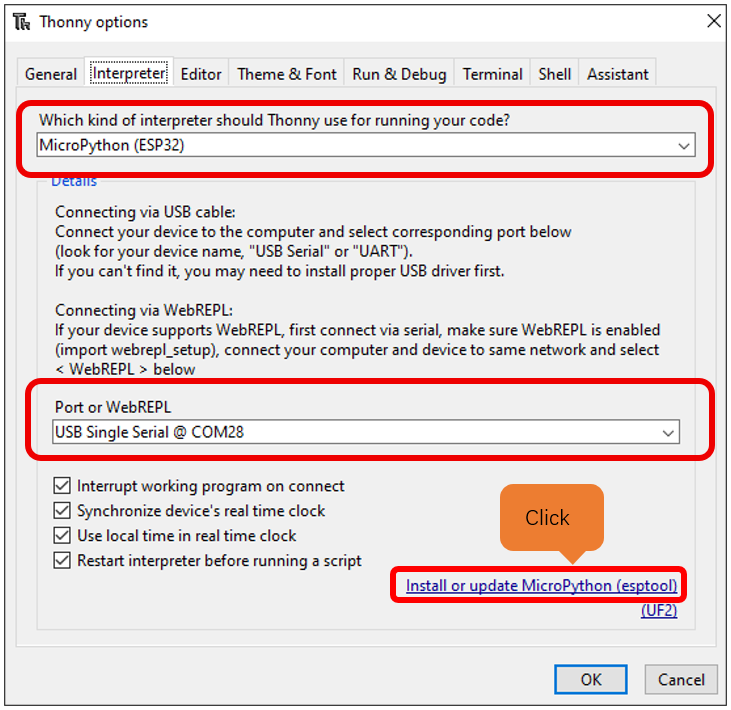
Select “Micropython (ESP32)”, select “USB Single Serial @ COM28”, and then click the long button under “Firmware”.
Click “Select local MicroPython image ...”.
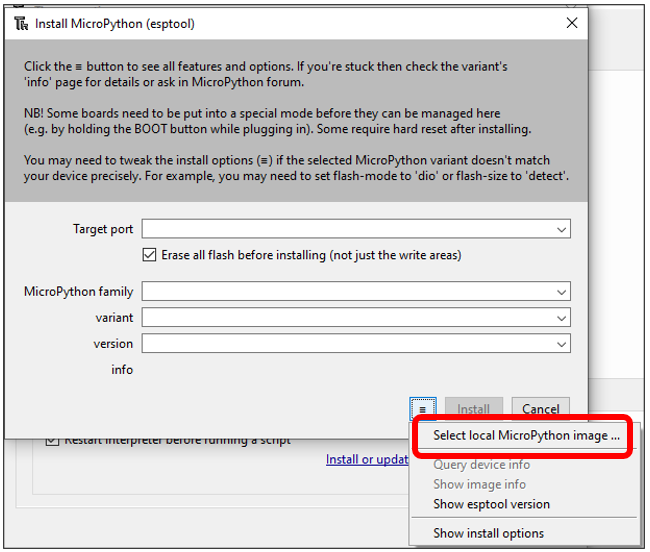
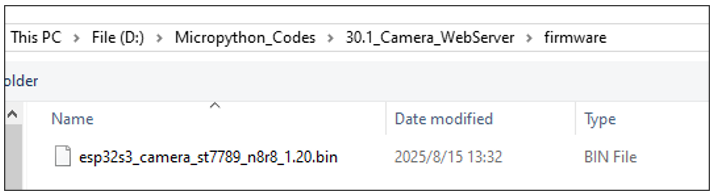
Choose “esp32s3_camera_st7789_n8r8_1.20.bin”
Select “USB Single Serial @ COM28”
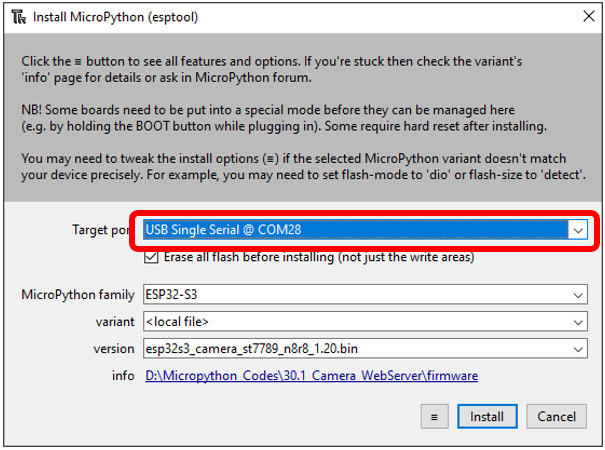
Click “Install”, Wait for completion.
Open “Thonny”, click “This computer” -> “D:” -> “Micropython_Codes” -> “05.1_Camera_WebServer”. Select folder “lib”, right click your mouse to select “Upload to /”, wait for “lib” to be uploaded to ESP32-WROVER and then double click “picoweb_video.py”.
5.1.3.1. 05.1_Camera_WebServer
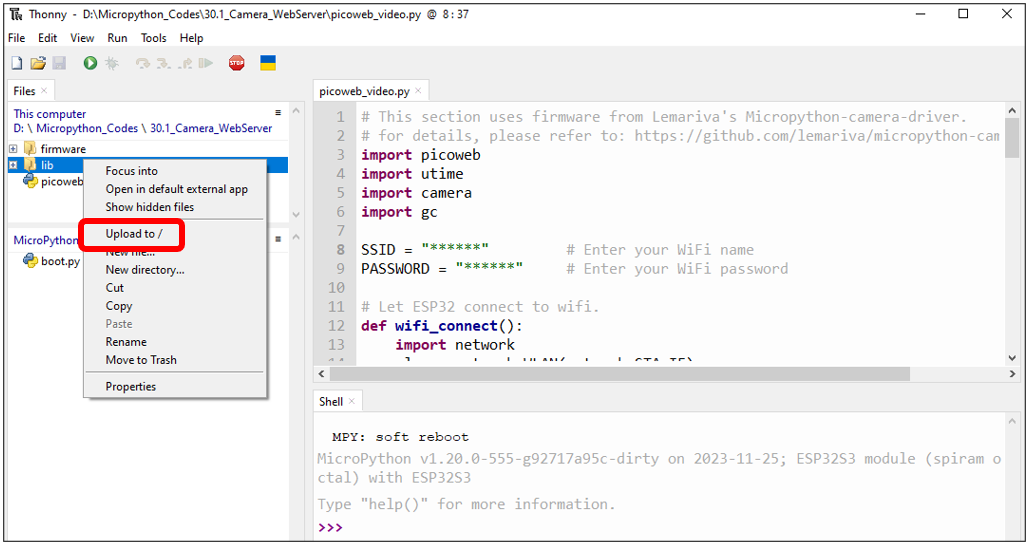
Before running the program, please modify your router’s name and password in the box shown in the illustration above to make sure that your code can compile and work successfully.
Click “run” to run the code “picoweb_video.py”, then you can see the following content in the shell area.
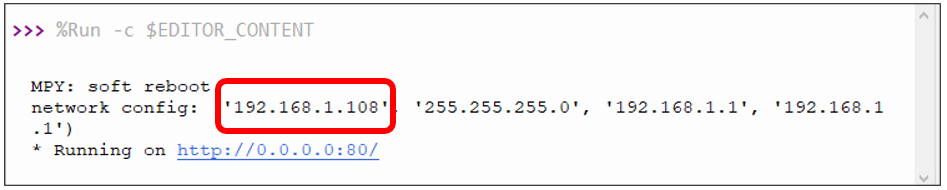
If your ESP32S3 has been in the process of connecting to router, but the information above has not been printed out, please re-check whether the router name and password have been entered correctly and press the reset key on ESP32S3 to wait for a successful connection prompt.
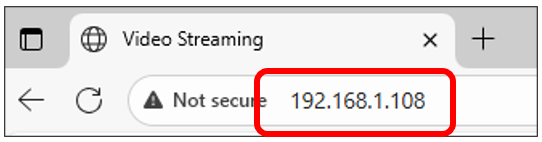
Open a web browser, enter the IP address printed by the serial monitor in the address bar, and access it.
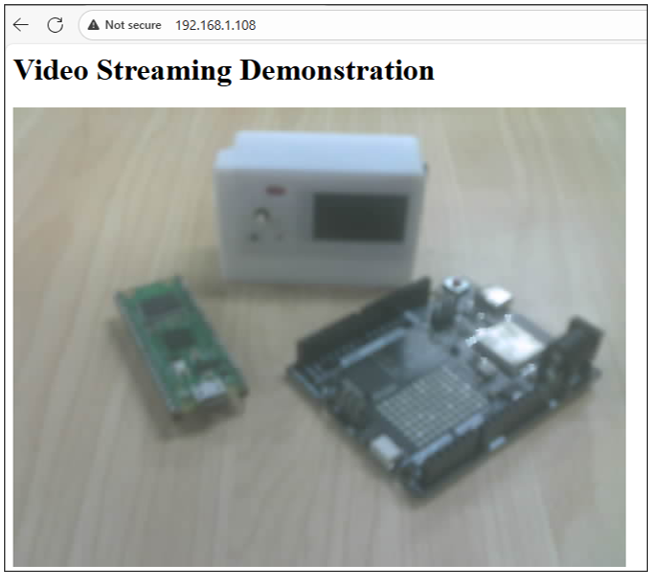
Taking the Google browser as an example, here’s what the browser prints out after successful access to ESP32S3’s IP.
The effect is shown in the image below.
Please note:
If the shell area prompts an error when you click to run the code, please press the rst button on the ESP32S3, wait for the system reset to complete, and then re-run the code.
The following is the program code.
  1# This section uses firmware from Lemariva's Micropython-camera-driver.
  2# for details, please refer to: https://github.com/lemariva/micropython-camera-driver
  3import picoweb
  4import utime
  5import camera
  6import gc
  7
  8SSID = "FYI_2.4G"         # Enter your WiFi name
  9PASSWORD = "freenove208"     # Enter your WiFi password
 10
 11# Let ESP32 connect to wifi.
 12def wifi_connect():
 13    import network
 14    wlan = network.WLAN(network.STA_IF)
 15    wlan.active(True)
 16    if not wlan.isconnected():
 17        print('connecting to network...')
 18        wlan.connect(SSID, PASSWORD)
 19    start = utime.time()
 20    while not wlan.isconnected():
 21        utime.sleep(1)
 22        if utime.time()-start > 5:
 23            print("connect timeout!")
 24            break
 25    if wlan.isconnected():
 26        print('network config:', wlan.ifconfig())
 27
 28# Initializing the Camera
 29def camera_init():
 30    # Disable camera initialization
 31    camera.deinit()
 32    # Enable camera initialization
 33    camera.init(0, d0=11, d1=9, d2=8, d3=10, d4=12, d5=18, d6=17, d7=16,
 34                format=camera.JPEG, framesize=camera.FRAME_VGA,
 35                xclk_freq=camera.XCLK_10MHz,
 36                href=7, vsync=6, reset=-1, pwdn=-1,
 37                sioc=5, siod=4, xclk=15, pclk=13, fb_location=camera.PSRAM)
 38
 39    camera.framesize(camera.FRAME_VGA) # Set the camera resolution
 40    # The options are the following:
 41    # FRAME_96X96 FRAME_QQVGA FRAME_QCIF FRAME_HQVGA FRAME_240X240
 42    # FRAME_QVGA FRAME_CIF FRAME_HVGA FRAME_VGA FRAME_SVGA
 43    # FRAME_XGA FRAME_HD FRAME_SXGA FRAME_UXGA
 44    # Note: The higher the resolution, the more memory is used.
 45    # Note: And too much memory may cause the program to fail.
 46
 47    camera.flip(0)                       # Flip up and down window: 0-1
 48    camera.mirror(0)                     # Flip window left and right: 0-1
 49    camera.saturation(0)                 # saturation: -2,2 (default 0). -2 grayscale
 50    camera.brightness(0)                 # brightness: -2,2 (default 0). 2 brightness
 51    camera.contrast(0)                   # contrast: -2,2 (default 0). 2 highcontrast
 52    camera.quality(10)                   # quality: # 10-63 lower number means higher quality
 53    # Note: The smaller the number, the sharper the image. The larger the number, the more blurry the image
 54
 55    camera.speffect(camera.EFFECT_NONE)  # special effects:
 56    # EFFECT_NONE (default) EFFECT_NEG EFFECT_BW EFFECT_RED EFFECT_GREEN EFFECT_BLUE EFFECT_RETRO
 57    camera.whitebalance(camera.WB_NONE)  # white balance
 58    # WB_NONE (default) WB_SUNNY WB_CLOUDY WB_OFFICE WB_HOME
 59
 60# HTTP Response Content
 61index_web="""
 62HTTP/1.0 200 OK\r\n
 63<html>
 64  <head>
 65    <title>Video Streaming</title>
 66  </head>
 67  <body>
 68    <h1>Video Streaming Demonstration</h1>
 69    <img src="/video" margin-top:100px; style="transform:rotate(180deg)"; />
 70  </body>
 71</html>
 72"""
 73
 74# HTTP Response
 75def index(req, resp):
 76    # You can construct an HTTP response completely yourself, having
 77    yield from resp.awrite(index_web)
 78
 79# Send camera pictures
 80def send_frame():
 81    buf = camera.capture()
 82    yield (b'--frame\r\n'
 83           b'Content-Type: image/jpeg\r\n\r\n'
 84           + buf + b'\r\n')
 85    del buf
 86    gc.collect()
 87
 88# Video transmission
 89def video(req, resp):
 90    yield from picoweb.start_response(resp, content_type="multipart/x-mixed-replace; boundary=frame")
 91    while True:
 92        yield from resp.awrite(next(send_frame()))
 93        gc.collect()
 94
 95
 96ROUTES = [
 97    # You can specify exact URI string matches...
 98    ("/", index),
 99    ("/video", video),
100]
101
102
103if __name__ == '__main__':
104
105    import ulogging as logging
106    logging.basicConfig(level=logging.INFO)
107    camera_init()
108    wifi_connect()
109
110    #Create an app object that contains two decorators
111    app = picoweb.WebApp(__name__, ROUTES)
112
113    app.run(debug=1, port=80, host="0.0.0.0")
114    # debug values:
115    # -1 disable all logging
116    # 0 (False) normal logging: requests and errors
117    # 1 (True) debug logging
118    # 2 extra debug logging
Import picoweb、utime、camera、gc modules.
1import picoweb
2import utime
3import camera
4import gc
Before running the code, please modify the WiFi name and password in the code to ensure that the ESP32S3 can connect to the network.
1SSID = "FYI_2.4G"         # Enter your WiFi name
2PASSWORD = "freenove208"     # Enter your WiFi password
Define the WiFi connection function, set the ESP32S3 to STA mode, and let the ESP32S3 connect to the nearby WiFi. If the connection is successful, the WiFi configuration information of the ESP32S3 will be printed; if the connection fails, the connection timeout will be printed.
 1def wifi_connect():
 2    import network
 3    wlan = network.WLAN(network.STA_IF)
 4    wlan.active(True)
 5    if not wlan.isconnected():
 6        print('connecting to network...')
 7        wlan.connect(SSID, PASSWORD)
 8    start = utime.time()
 9    while not wlan.isconnected():
10        utime.sleep(1)
11        if utime.time()-start > 5:
12            print("connect timeout!")
13            break
14    if wlan.isconnected():
15        print('network config:', wlan.ifconfig())
The deinit() is used to disable the configuration of the camera to prevent the previous configuration from interfering with the following configuration.
The init() is used to configure the camera’s pin driver, image data format, resolution and other information. By default, please do not modify this function, otherwise the camera initialization fails and the image cannot be obtained.
1camera.deinit()
2# Enable camera initialization
3camera.init(0, d0=11, d1=9, d2=8, d3=10, d4=12, d5=18, d6=17, d7=16,
4            format=camera.JPEG, framesize=camera.FRAME_VGA,
5            xclk_freq=camera.XCLK_10MHz,
6            href=7, vsync=6, reset=-1, pwdn=-1,
7            sioc=5, siod=4, xclk=15, pclk=13, fb_location=camera.PSRAM)
This function can set the resolution of the camera individually, you can refer to the notes below to select the appropriate resolution size.
1camera.framesize(camera.FRAME_VGA) # Set the camera resolution
2# The options are the following:
3# FRAME_96X96 FRAME_QQVGA FRAME_QCIF FRAME_HQVGA FRAME_240X240
4# FRAME_QVGA FRAME_CIF FRAME_HVGA FRAME_VGA FRAME_SVGA
5# FRAME_XGA FRAME_HD FRAME_SXGA FRAME_UXGA
6# Note: The higher the resolution, the more memory is used.
7# Note: And too much memory may cause the program to fail.
The following functions can modify the image information obtained by the camera.
 1camera.flip(0)                       # Flip up and down window: 0-1
 2camera.mirror(0)                     # Flip window left and right: 0-1
 3camera.saturation(0)                 # saturation: -2,2 (default 0). -2 grayscale
 4camera.brightness(0)                 # brightness: -2,2 (default 0). 2 brightness
 5camera.contrast(0)                   # contrast: -2,2 (default 0). 2 highcontrast
 6camera.quality(10)                   # quality: # 10-63 lower number means higher quality
 7# Note: The smaller the number, the sharper the image. The larger the number, the more blurry the image
 8
 9camera.speffect(camera.EFFECT_NONE)  # special effects:
10# EFFECT_NONE (default) EFFECT_NEG EFFECT_BW EFFECT_RED EFFECT_GREEN EFFECT_BLUE EFFECT_RETRO
11camera.whitebalance(camera.WB_NONE)  # white balance
12# WB_NONE (default) WB_SUNNY WB_CLOUDY WB_OFFICE WB_HOME
This is the code for a simple web interface, used here as an example.
 1index_web="""
 2HTTP/1.0 200 OK\r\n
 3<html>
 4  <head>
 5    <title>Video Streaming</title>
 6  </head>
 7  <body>
 8    <h1>Video Streaming Demonstration</h1>
 9    <img src="/video" margin-top:100px; style="transform:rotate(180deg)"; />
10  </body>
11</html>
12"""
Web page response function. When a user visits the webpage “/” built by ESP32S3, ESP32S3 calls this function, allowing the user to observe a display interface in the browser.
1def index(req, resp):
2    # You can construct an HTTP response completely yourself, having
3    yield from resp.awrite(index_web)
send_frame() can send the image obtained by ESP32S3 in web page format. When someone visits the webpage “/video” built by the ESP32S3, the video(req, resp) function is used to continuously fetch images and send them to the browser.
 1# Send camera pictures
 2def send_frame():
 3    buf = camera.capture()
 4    yield (b'--frame\r\n'
 5           b'Content-Type: image/jpeg\r\n\r\n'
 6           + buf + b'\r\n')
 7    del buf
 8    gc.collect()
 9
10# Video transmission
11def video(req, resp):
12    yield from picoweb.start_response(resp, content_type="multipart/x-mixed-replace; boundary=frame")
13    while True:
14        yield from resp.awrite(next(send_frame()))
15        gc.collect()
Create two route decorators and declare their listening strings and corresponding response handlers respectively.
1ROUTES = [
2    # You can specify exact URI string matches...
3    ("/", index),
4    ("/video", video),
5]
This is the main part of the program. First initialize the ESP32S3 camera, and then configure WiFi to connect the ESP32S3 to the network. Call the picoweb library, build a webserver, and run it.
1import ulogging as logging
2logging.basicConfig(level=logging.INFO)
3camera_init()
4wifi_connect()
5
6#Create an app object that contains two decorators
7app = picoweb.WebApp(__name__, ROUTES)
8
9app.run(debug=1, port=80, host="0.0.0.0")
5.1.3.2. Reference
Image resolution |
Sharpness |
Image resolution |
Sharpness |
|---|---|---|---|
FRAMESIZE_96x96 |
96x96 |
FRAMESIZE_HVGA |
480x320 |
FRAMESIZE_QQVGA |
160x120 |
FRAMESIZE_VGA |
640x480 |
FRAMESIZE_QCIF |
176x144 |
FRAMESIZE_SVGA |
800x600 |
FRAMESIZE_HQVGA |
240x176 |
FRAMESIZE_XGA |
1024x768 |
FRAMESIZE_240x240 |
240x240 |
FRAMESIZE_HD |
1280x720 |
FRAMESIZE_QVGA |
320x240 |
FRAMESIZE_SXGA |
1280x1024 |
FRAMESIZE_CIF |
400x296 |
FRAMESIZE_UXGA |
1600x1200 |
We recommend that the resolution not exceed VGA(640x480).