Chapter 1 Introduction to Main Components
In this chapter, we will introduce the main components of this case and their functionalities.
1.1 Introduction to Freenove Case GPIO Adapter for Raspberry Pi
In this tutorial, we name this model as GPIO Board.
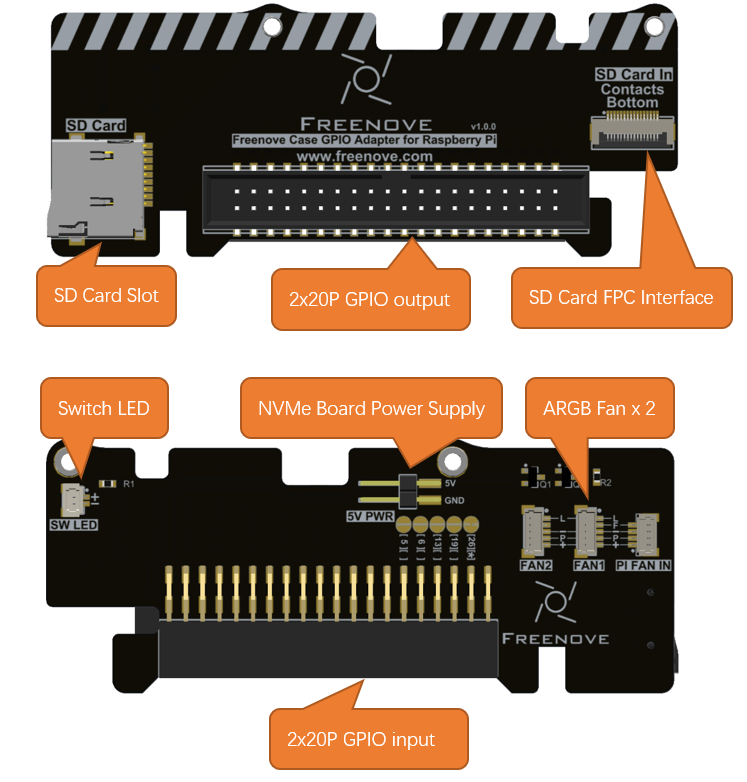
The GPIO Board serves to externally expose the Raspberry Pi 5’s GPIO pins and SD card slot, allowing convenient connection of external peripherals and SD card access.
Its integrated features also include:
Two ARGB fan headers for independent control of the tower cooler fan and the case fan (Multiple RGB LED interface controls are available.).
LED control for the case power switch, providing a clear visual indication of the Raspberry Pi 5’s power state (on/off).
An auxiliary power connector for the NVMe Board.
1.2 Introduction to Freenove Power Button Board for Raspberry Pi
In this tutorial, we name this model as Switch Board.
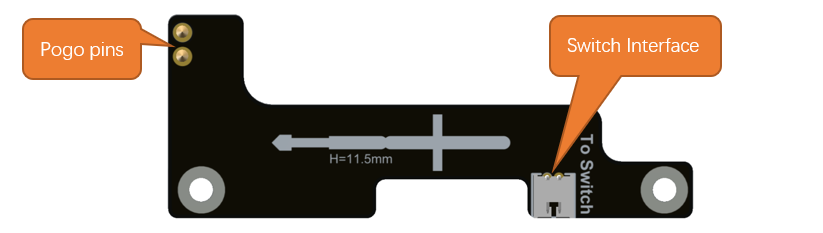
The Switch Board connects to the J2 interface of the Raspberry Pi 5 via pogo pins, enabling the use of a custom power button. A 12mm power button with an indicator light is included, offering identical functionality to the onboard power button of the Raspberry Pi 5. For detailed specifications and usage of the power button, please refer to the Raspberry Pi official documentation:
https://www.raspberrypi.com/documentation/computers/raspberry-pi.html#power-button
1.3 Introduction to Freenove M.2 NVMe Adapter Series for Raspberry Pi
The Raspberry Pi 5 includes a PCIe x1 slot that is certified for PCIe Gen 2.0, providing a theoretical maximum throughput of 5GT/sec, which roughly translates to 500MB/sec for read and write operations. Although this slot is not officially certified for PCIe Gen 3.0, it is possible to force the use of Gen 3.0 for potentially higher speeds.
The PCIe consortium states that the speed of PCIe Gen 3.0 x1 is up to 8GT/sec, which translates to approximately 985MB/sec.
https://en.wikipedia.org/wiki/PCI_Express#Comparison_table
https://www.raspberrypi.com/documentation/computers/raspberry-pi.html#pcie-gen-3-0
SSDs generally provide significantly faster read and write speeds compared to SD cards and USB drives, which can notably elevate the user experience when operating the Raspberry Pi 5.
1.3.1 Freenove M.2 NVMe Adapter for Raspberry Pi
In this tutorial, we name this model as NVMe Adapter Board.
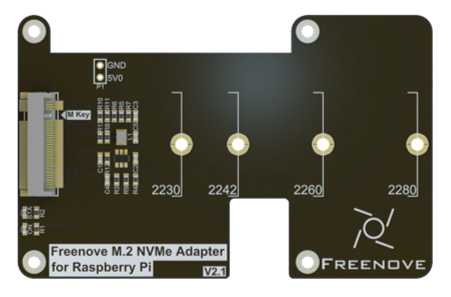
Here are its key features:
Interface Type: M.2 with M-Key
Supported Protocol: NVMe
PCIe Channel: PCIe 3.0 x1(Compatible with PCIe 2.0)
Compatible Sizes: 2230, 2242, 2260, 2280
Power Supply: 3.3V, up to 3A (maximum)
Indicator Lights: Includes both power and SSD status LEDs.
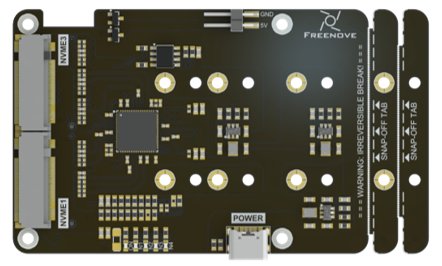
1.3.2 Freenove Dual M.2 NVMe Adapter for Raspberry Pi
This model has four NVMe SSD interface, supporting up to 2 NVMe SSDs to run simultaneously. In this tutorial, we name this model as Dual-NVMe Adapter Board.
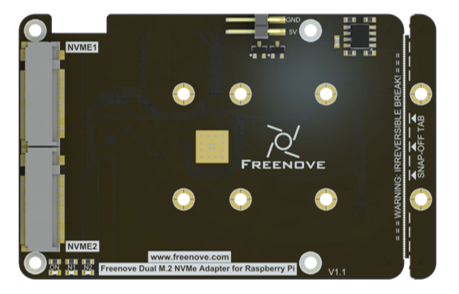
Here are its key features:
Interface Type: 2x M.2 with M-Key
Supported Protocol: NVMe
PCIe Channel: PCIe 2.0 x2
Compatible Sizes: 2230, 2242, 2260, 2280
Power Supply: 3.3V, up to 3A (maximum)
Indicator Lights: Includes both power and x2 SSD status LEDs.
1.3.3 Freenove Quad M.2 NVMe Adapter for Raspberry Pi
This model has four NVMe SSD interface, supporting up to 4 NVMe SSDs to run simultaneously. In this tutorial, we name this model as Quad-NVMe Adapter Board.
Here are its key features:
Interface Type: 4x M.2 with M-Key
Supported Protocol: NVMe
PCIe Channel: PCIe 2.0 x4
Compatible Sizes: 2230, 2242, 2260, 2280
Power Supply: 3.3V, up to 3A (maximum)
Indicator Lights: Includes both power and x4 SSD status LEDs.
1.4 Introduction to Freenove Case Power Board for Raspberry Pi
In this tutorial, we name this model as Audio-Video Board.
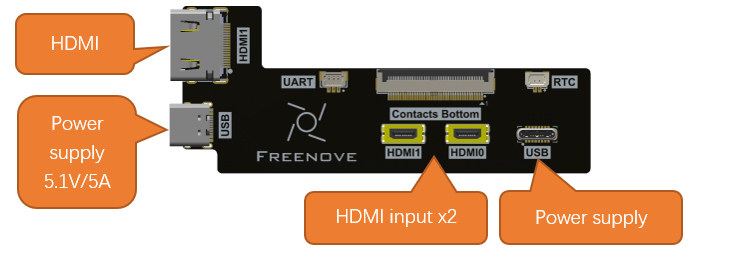
Its core function is to relocate the power connector and HDMI ports to the rear of the case, creating a consolidated I/O layout. It also routes the HDMI0 signal to the Audio-Video Board to enable audio expansion for the case.
1.4 Introduction to Freenove Case Adapter for Raspberry Pi
In this tutorial, we name this model as Audio-Video Board.
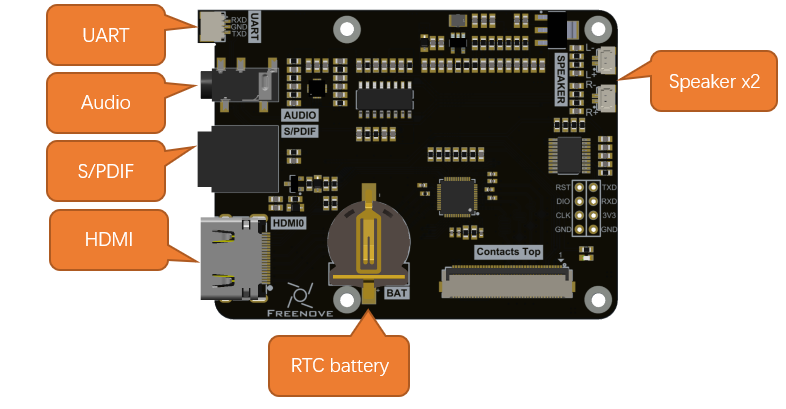
The core function of the Audio-Video Board is to losslessly extract audio from the Raspberry Pi 5’s HDMI0 signal, leaving the original video signal intact. The board provides the following interfaces:
3.5mm audio jack and two speaker connectors: Directly play audio from the HDMI source.
S/PDIF interface: For connecting to higher-fidelity audio equipment.
RTC battery holder and UART header: Enhance system clock accuracy and enable debugging/expansion.
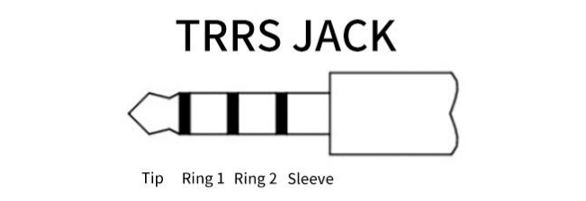
3.5mm JACK Audio Interface
In the RPi 5 design, the traditional 3.5mm audio output interface has been removed, and audio signals are now solely output through HDMI. To address this, we have developed an audio separation circuit on the Case Adapter Board. This circuit enables audio to be output via the 3.5mm audio interface on the board, You can use the external 3.5mm TRS headphone jack on the Raspberry Pi 5 to listen to audio output. For proper functionality, ensure your headphone connector is compatible. Below is an explanation of common jack types:
|
Tip |
Left Channel |
|
Ring |
Right Channel |
||
Sleeve |
GND |
||
OMTP |
|
Tip |
Left Channel |
Ring1 |
Right Channel |
||
Ring2 |
MIC |
||
Sleeve |
GND |
||
CTIA |
|
Tip |
Left Channel |
Ring1 |
Right Channel |
||
Ring2 |
GND |
||
Sleeve |
MIC |
||

RTC Interface
To enhance the accuracy of the Raspberry Pi’s clock, it is advisable to add a battery to the RTC. For this purpose, we have installed a battery holder on the board. If you decide to add a battery, we recommend either purchasing a rechargeable lithium-manganese button-cell battery (with dimensions of 1220 and a voltage of 3V) or an official battery.
https://www.raspberrypi.com/documentation/computers/raspberry-pi.html#real-time-clock-rtc
Due to the addition of audio processing capabilities, multiple lighting effects, an enhanced cooling system, and multiple NVMe interfaces (supporting additional SSDs), the overall power consumption during operation has increased. Therefore, only the official 5.1V/5A power adapter (or compatible models with equivalent specifications) should be used to ensure stable system performance.
1.6 Introduction to Raspberry Pi 5 (RPi 5)
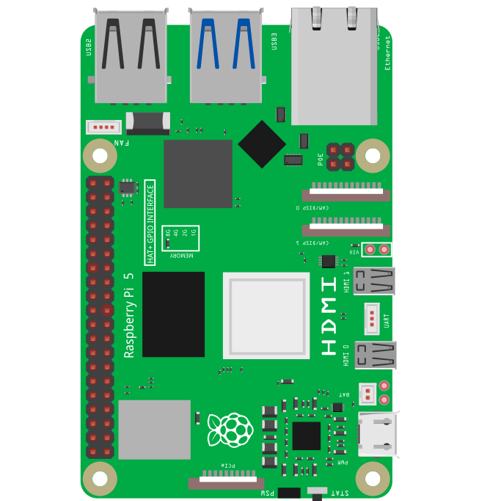
At the time of this writing, this product only supports RPi5. The following shows the physical and model figures of an RPi 5.
Practicality picture of Raspberry Pi 5:
|
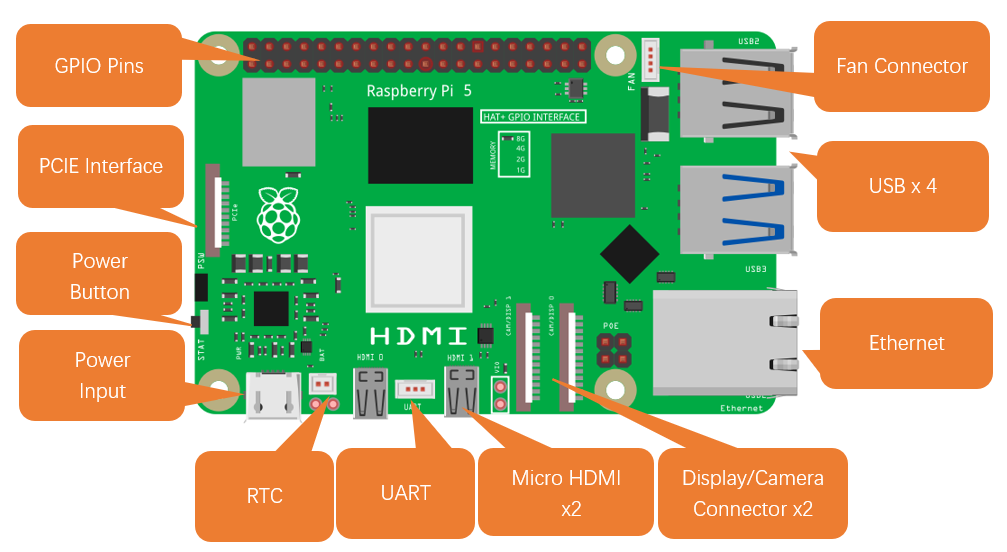
Model diagram of Raspberry Pi 5:
|

Hardware interface diagram of RPi 5 is shown below:
GPIO
GPIO: General purpose input/output. We will introduce the specific feature of the pins on the Raspberry Pi and how you can utilize them in all sorts of ways in your projects. Most RPi Module pins can be used as either an input or output, depending on your program and its functions. When programming the GPIO pins, there are three different ways to reference them: GPIO numbering, physical numbering, WiringPi GPIO Numbering.
BCM GPIO Numbering
The Raspberry Pi CPU uses Broadcom (BCM) processing chips BCM2835, BCM2836 or BCM2837. GPIO pin numbers are assigned by the processing chip manufacturer and are how the computer recognizes each pin. The pin numbers themselves do not make sense or have meaning, as they are only a form of identification. Since their numeric values and physical locations have no specific order, there is no way to remember them, so you will need to have a printed reference or a reference board that fits over the pins.
Each pin is defined as below:
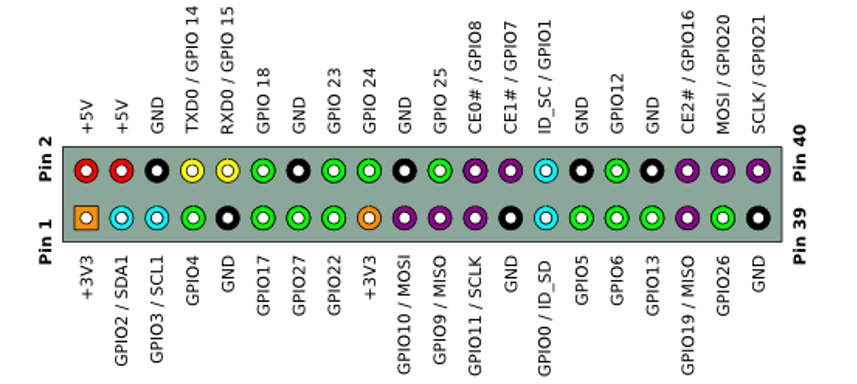
For more details about pin definition of GPIO, please refer to https://pinout.xyz/
Power requirements of various versions of Raspberry Pi are shown in following table:
Product |
Recommended PSU current capacity |
Maximum total USB peripheral current draw |
Typical bare-board active current consumption |
|---|---|---|---|
Raspberry Pi Model A |
700mA |
500mA |
200mA |
Raspberry Pi Model B |
1.2A |
500mA |
500mA |
Raspberry Pi Model A+ |
700mA |
500mA |
180mA |
Raspberry Pi Model B+ |
1.8A |
600mA/1.2A (switchable) |
330mA |
Raspberry Pi 2 Model B |
1.8A |
600mA/1.2A (switchable) |
350mA |
Raspberry Pi 3 Model B |
2.5A |
1.2A |
400mA |
Raspberry Pi 3 Model A+ |
2.5A |
Limited by PSU, board, and connector ratings only. |
350mA |
Raspberry Pi 3 Model B+ |
2.5A |
1.2A |
500mA |
Raspberry Pi 4 Model B |
3.0A |
1.2A |
600mA |
Raspberry Pi 5 Model B |
5.0A |
1.6A (600mA if using a 3A power supply) |
800mA |
Raspberry Pi Zero W |
1.2A |
Limited by PSU, board, and connector ratings only. |
150mA |
Raspberry Pi Zero |
1.2A |
Limited by PSU, board, and connector ratings only |
100mA |
For more details, please refer to
https://www.raspberrypi.com/documentation/computers/raspberry-pi.html#power-supply
In this product, the Raspberry Pi 5 is used and it must be powered by a 5.1V/5A power supply. Insufficient power may cause various functions to operate abnormally, or even permanently damage your Raspberry Pi 5. Therefore, we strongly recommend using a 5.1V/5A power supply to ensure optimal performance and avoid potential hardware failure.