Chapter 4 Infrared Robot
Introduction of infrared reception function
Infrared Remote
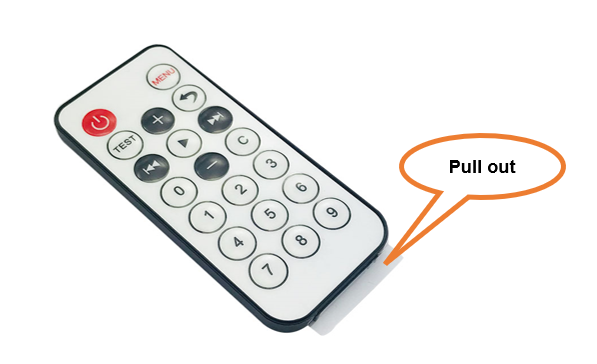
An infrared (IR) remote control is a device with a certain number of buttons. Pressing down different buttons will make the infrared emission tube, which is located in the front of the remote control, send infrared ray with different command. Infrared remote control technology is widely used in electronic products such as TV, air conditioning, etc. Thus making it possible for you to switch TV programs and adjust the temperature of the air conditioning when away from them. The remote control we use is shown below:

Infrared receiver
An infrared (IR) receiver is a component which can receive the infrared light, so we can use it to detect the signal emitted by the infrared remote control. DATA pin here outputs the received infrared signal.

When you use the infrared remote control, the infrared remote control sends a key value to the receiving circuit according to the pressed keys. We can program the Raspberry Pi Pico W to do things like lighting, when a key value is received.
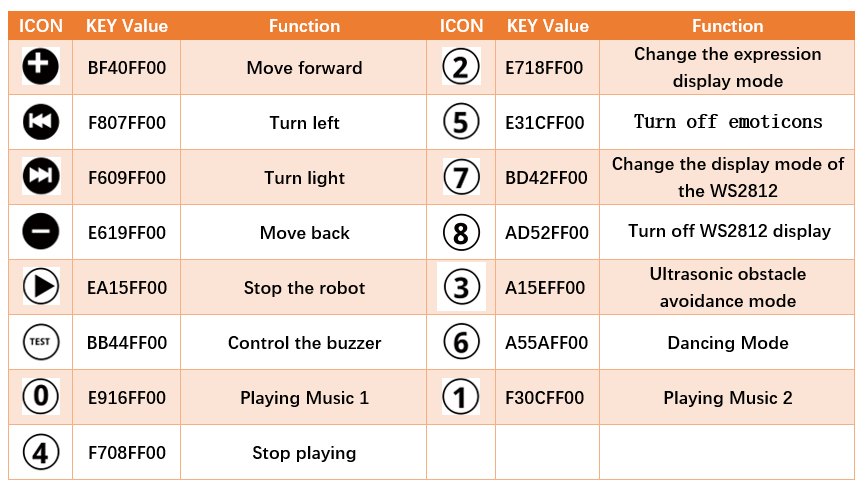
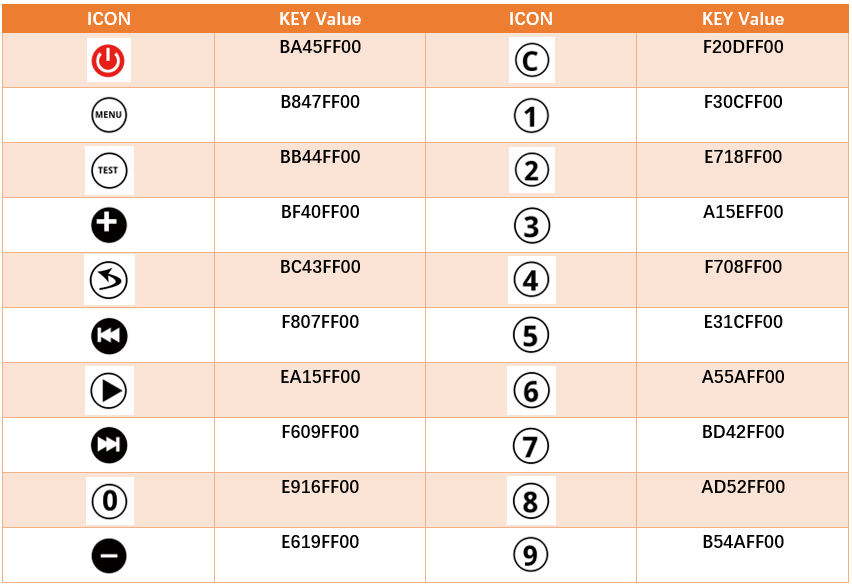
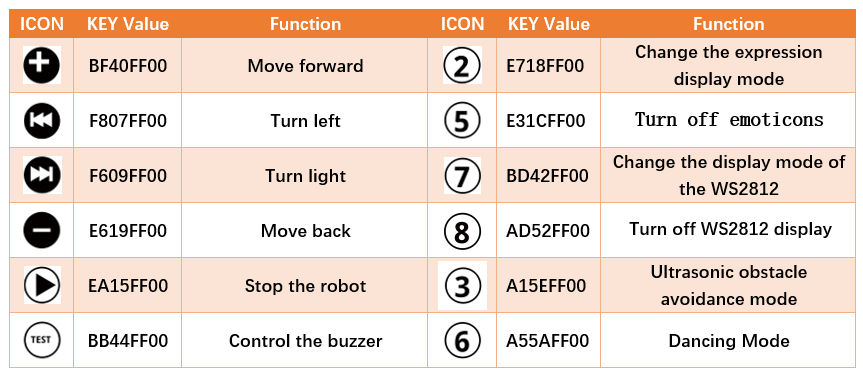
The following is the key value that the receiving circuit will receive when each key of the infrared remote control is pressed.
Install IRremote library
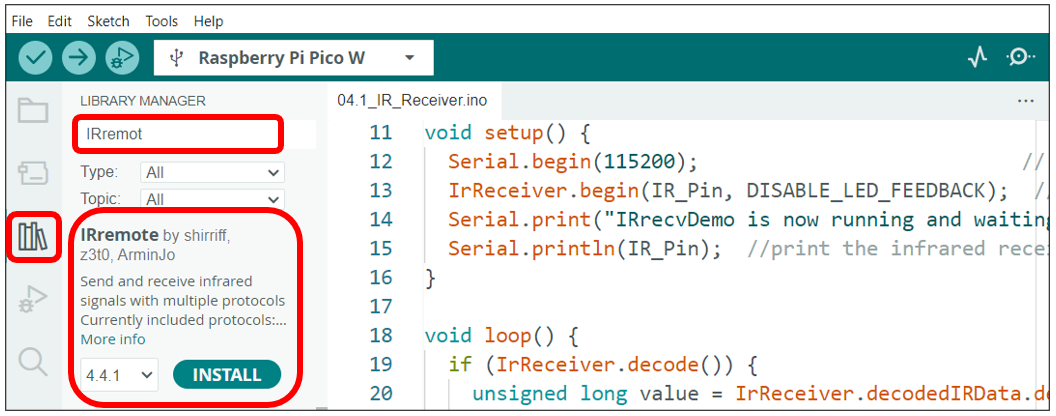
In this project, we use a third-party library named IRremote. Please install it first.
Open Arduino IDE, click Library Manage on the left, and search “IRremote” to install.
It is recommended to use version 4.4.1 of the IRremote library to avoid compatibility issues.
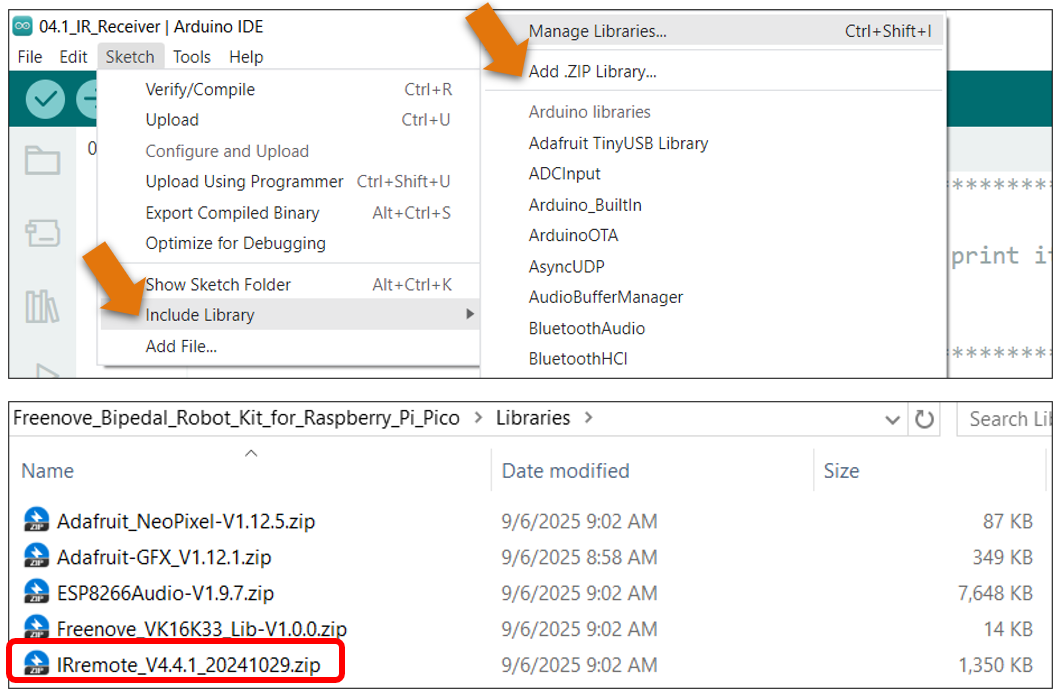
The second way, open Arduino IDE, click Sketch -> Include Library -> Add .ZIP Library. In the pop-up window, find the file named “./Libraries/ IRremote_V4.4.1_20241029.Zip” which locates in this directory, and click OPEN.
Sketch
Each time when you press the infrared remote control, the car will print the received infrared coding value through serial port.
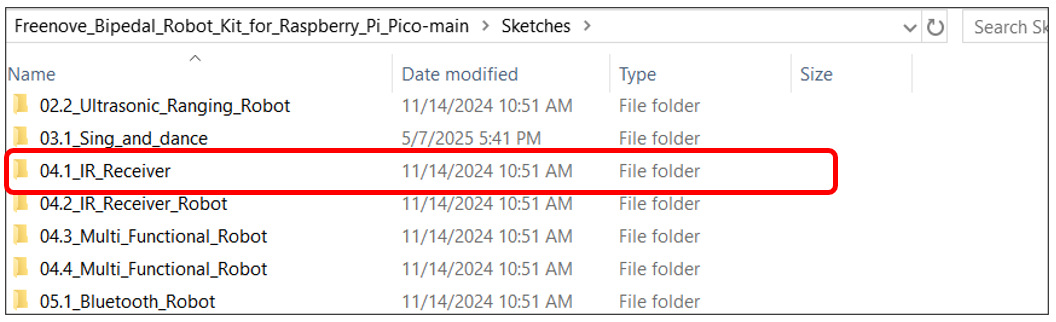
Open the folder “04.1_IR_Receiver”in
“ Freenove_Robot_Kit_for_Raspberry_Pi_Pico\Ordinary_wheels\Sketches ” and double click
“04.1_IR_Receiver.ino”.
Code
 1/**********************************************************************
 2  Filename    : Infrared Remote Control
 3  Description : Decode the infrared remote control and print it out through the serial port.
 4  Auther      : www.freenove.com
 5  Modification: 2023/11/07
 6**********************************************************************/
 7#include <IRremote.hpp>
 8#define IR_Pin 3  // Infrared receiving pin
 9#define ENABLE_LED_FEEDBACK true
10#define DISABLE_LED_FEEDBACK false
11void setup() {
12  Serial.begin(115200);                           // Initialize the serial port and set the baud rate to 115200
13  IrReceiver.begin(IR_Pin, DISABLE_LED_FEEDBACK);  // Start the receiver
14  Serial.print("IRrecvDemo is now running and waiting for IR message on Pin ");
15  Serial.println(IR_Pin);  //print the infrared receiving pin
16}
17
18void loop() {
19  if (IrReceiver.decode()) {
20    unsigned long value = IrReceiver.decodedIRData.decodedRawData;
21    Serial.println(value, HEX);  // Print "old" raw data
22    IrReceiver.resume();    // Enable receiving of the next value
23  }
24}
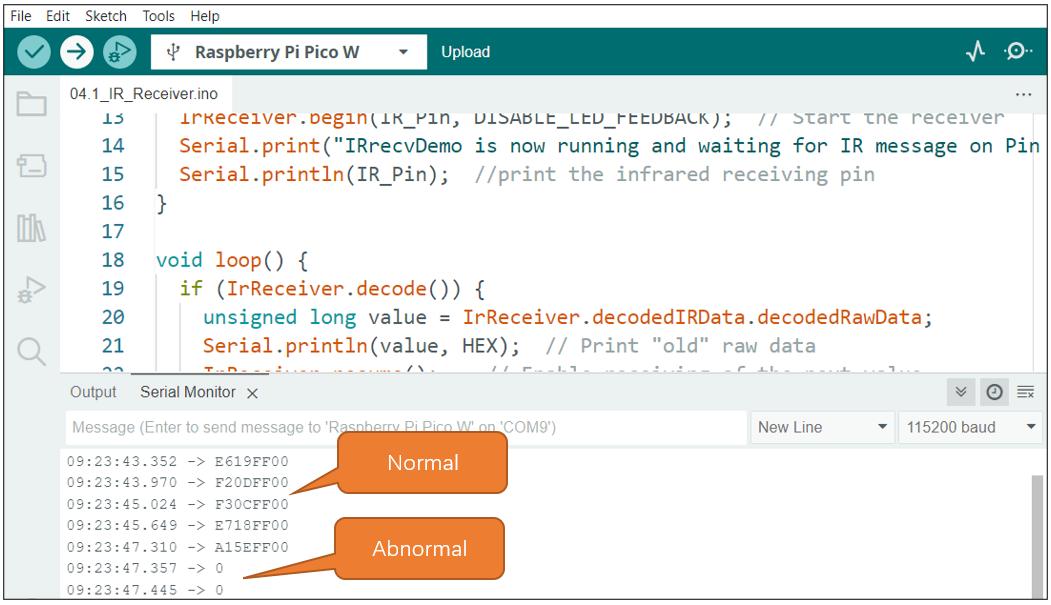
Download the code to Raspberry Pi Pico (W), open the serial port monitor and set the baud rate to 115200. Press any keys on the IR remote and their corresponding values will be printed out through the serial port. As shown in the following figure: (Note that if the remote control button is long pressed, the infrared receiving circuit receives a “0”.)
First, include header file. Each time you use the infrared sensor, you need to include the header file at the beginning of the program.
1#include <IRremote.hpp>
Second, define an infrared receive pin and the infrared sensor is initialized.
1#define IR_Pin 3                      // Infrared receiving pin
2...
3IrReceiver.begin(IR_Pin, DISABLE_LED_FEEDBACK);  // Start the receiver
Finally, IrReceiver.decode() is used to determine whether an infrared signal has been received, returning true/1 if an infrared signal has been received, or false/0 if no infrared signal has been received; If an infrared signal is received, the received infrared coded value is printed through the serial port.
Please note that IrReceiver.resume() must be applied to release the infrared receiver function each time data are received. Otherwise, the infrared receiver function can only be used once and data cannot be received next time.
1if (IrReceiver.decode()) {
2  unsigned long value = IrReceiver.decodedIRData.decodedRawData;
3  Serial.println(value, HEX);  // Print "old" raw data
4  IrReceiver.resume();    // Enable receiving of the next value
5}
4.2 Infrared Robot
On the basis of the previous section, we further controls the robot via the infrared remote controller. Press the black buttons on the remote, the robot will move forward, move backward, turn left and turn right accordingly. Press other buttons will stop the robot.
Sketch
Open the folder “04.2_IR_Receiver_Robot” in the
“ Freenove_Bipedal_Robot_Kit_for_Raspberry_Pi_Pico\Sketches ” and double click “04.2_IR_Receiver_Robot.ino”.
Code
1/**********************************************************************
2 Filename : IR_Receiver_Car.ino
3 Product : Freenove Robot for Raspberry Pi Pico (W)
4 Auther : www.freenove.com
5 Modification: 2023/11/07
6**********************************************************************/
7#include <Arduino.h>
8#include <IRremote.hpp>
9#include <EEPROM.h>
10#include "Bipedal_Robot.h"
11
12#define LeftLeg 10
13#define RightLeg 12
14#define LeftFoot 11
15#define RightFoot 13
16
17#define IR_Pin 3
18#define ENABLE_LED_FEEDBACK true
19#define DISABLE_LED_FEEDBACK false
20
21// #define USE_NO_SEND_PWM
22
23int move_flag = 0;
24
25Bipedal_Robot Bipedal_Robot;
26int calibratePosition[4] = { -17, -10, -15, 12 };
27
28void calib_homePos() {
29 int servoPos[4];
30 servoPos[0] = 90;
31 servoPos[1] = 90;
32 servoPos[2] = 90;
33 servoPos[3] = 90;
34 Bipedal_Robot._moveServos(500, servoPos);
35 Bipedal_Robot.detachServos();
36}
37
38void setup() {
39 Serial.begin(115200);
40 EEPROM.begin(512);
41 Bipedal_Robot.init(LeftLeg, RightLeg, LeftFoot, RightFoot, true); //Set the servo pins
42 //Bipedal_Robot.setTrims(calibratePosition[0], calibratePosition[1], calibratePosition[2], calibratePosition[3]);
43 calib_homePos();
44 Bipedal_Robot.saveTrimsOnEEPROM();
45 EEPROM.commit();
46 Bipedal_Robot.home();
47 IrReceiver.begin(IR_Pin, DISABLE_LED_FEEDBACK); // Start the receiver
48}
49
50void loop() {
51 if (IrReceiver.decode()) {
52 unsigned long value = IrReceiver.decodedIRData.decodedRawData;
53 handleControl(value); // Handle the commands from remote control
54 Serial.println(value, HEX); // Print "old" raw data
55 Serial.println();
56 IrReceiver.resume(); // Enable receiving of the next value
57 }
58 Move(move_flag);
59}
60
61void handleControl(unsigned long value) {
62 // Handle the commands
63 switch (value) {
64 case 0xBF40FF00: // Receive the number '+'
65 move_flag = 1;
66 break;
67 case 0xE619FF00: // Receive the number '-'
68 move_flag = 2;
69 break;
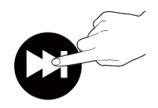
70 case 0xF807FF00: // Receive the number '|<<'
71 move_flag = 3;
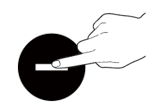
72 break;
73 case 0xF609FF00: // Receive the number '>>|'
74 move_flag = 4;
75 break;
76 case 0xEA15FF00: // Receive the number '▶'
77 move_flag = 0;
78 break;
79 default:
80 move_flag = 0;
81 break;
82 }
83}
84void Move(int data) {
85 // Handle the commands
86 switch (data) {
87 case 1: // Receive the number '+'
88 Bipedal_Robot.walk(2, 1500, 1);
89 break;
90 case 2: // Receive the number '-'
91 Bipedal_Robot.walk(2, 1500, -1);
92 break;
93 case 3: // Receive the number '|<<'
94 Bipedal_Robot.turn(2, 1500, 1);
95 break;
96 case 4: // Receive the number '>>|'
97 Bipedal_Robot.turn(2, 1500, -1);
98 break;
99 case 0: // Receive the number '▶'
100 Bipedal_Robot.home();
101 break;
102 default:
103 move_flag = 0;
104 Bipedal_Robot.home();
105 break;
106 }
107}
Compile and upload the code to Raspberry Pi Pico (W). When pressing “0” of the infrared remote control, the expression module will randomly display the content dynamically.
|
|
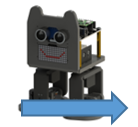
Move forward |
|
|
Turn left |
|
|
Turn right |
|
|
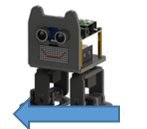
Move back |

Code Explanation:
Variable IrReceiver.DecodedIRData.DecodedRawData holds the infrared remote control encoding information; call handleccontrol function performs different code value corresponding action.
After each execution of the program, call the IrReceiver.resume() function to release the infrared pin. If you do not call this function, you cannot use the infrared receiving and decoding functions again.
 1void loop() {
 2  if (IrReceiver.decode()) {
 3    unsigned long value = IrReceiver.decodedIRData.decodedRawData;
 4    handleControl(value);        // Handle the commands from remote control
 5    Serial.println(value, HEX);  // Print "old" raw data
 6    Serial.println();
 7    IrReceiver.resume();  // Enable receiving of the next value
 8  }
 9  Move(move_flag);
10}
Infrared key code value processing function, receives instructions sent by the infrared remote control, and execute the corresponding program.
 1void handleControl(unsigned long value) {
 2    // Handle the commands
 3    switch (value) {
 4        case 0xBF40FF00:  // Receive the number '+'
 5        ...
 6        case 0xE619FF00:  // Receive the number '-'
 7        ...
 8        case 0xF807FF00:  // Receive the number '|<<'
 9        ...
10        case 0xF609FF00:  // Receive the number '>>|'
11        ...
12        case 0xE916FF00:  // Receive the number '0'
13        ...
14        default:        // Control the car to stop moving
15        ...
16    }
17}
Multi-Functional Infrared Robot
Now we integrated other functions to the infrared remote, so that most functions of the robot can be controlled via the infrared remote.
Sketch
Open the folder “04.3_Multi_Functional_Robot” in the “Freenove_Bipedal_Robot_Kit_for_Raspberry_Pi_Pico\Sketches” and double click “04.3_Multi_Functional_Robot.ino”.
code
  1/**********************************************************************
  2  Filename    : IR_Receiver_Robot.ino
  3  Product     : Freenove Robot for Raspberry Pi Pico (W)
  4  Auther      : www.freenove.com
  5  Modification: 2023/11/07
  6**********************************************************************/
  7#include <Arduino.h>
  8#include <Adafruit_NeoPixel.h>
  9#include <IRremote.hpp>
 10#include <EEPROM.h>
 11#include "Freenove_Robot_For_Pico_W.h"
 12#include "Freenove_Robot_Emotion.h"
 13#include "Freenove_VK16K33_Lib.h"
 14#include "Freenove_Robot_WS2812.h"
 15#include "Bipedal_Robot.h"
 16
 17#define LeftLeg 10
 18#define RightLeg 12
 19#define LeftFoot 11
 20#define RightFoot 13
 21
 22#define IR_Pin 3  // Infrared receiving pin
 23#define ENABLE_LED_FEEDBACK true
 24#define DISABLE_LED_FEEDBACK false
 25
 26int move_flag = 0;
 27extern int move_flag;
 28
 29Bipedal_Robot Bipedal_Robot;
 30int calibratePosition[4] = { -17, -10, -15, 12 };
 31int emotion_flag = 0;
 32int ws2812_flag = 0;
 33
 34void calib_homePos() {
 35  int servoPos[4];
 36  servoPos[0] = 90;
 37  servoPos[1] = 90;
 38  servoPos[2] = 90;
 39  servoPos[3] = 90;
 40  Bipedal_Robot._moveServos(500, servoPos);
 41  Bipedal_Robot.detachServos();
 42}
 43
 44void setup() {
 45  Serial.begin(115200);  //Turn on the serial port monitor and set the baud rate to 115200
 46  WS2812_Setup();        //WS2812 initialization
 47  Buzzer_Setup();        //Initialize the buzzer
 48  Ultrasonic_Setup();
 49  EEPROM.begin(512);
 50  Bipedal_Robot.init(LeftLeg, RightLeg, LeftFoot, RightFoot, true);  //Set the servo pins
 51  //Bipedal_Robot.setTrims(calibratePosition[0], calibratePosition[1], calibratePosition[2], calibratePosition[3]);
 52  calib_homePos();
 53  Bipedal_Robot.saveTrimsOnEEPROM();
 54  EEPROM.commit();
 55  Bipedal_Robot.home();
 56  IrReceiver.begin(IR_Pin, DISABLE_LED_FEEDBACK);  // Start the receiver
 57  delay(100);
 58}
 59
 60void loop() {
 61  if (IrReceiver.decode()) {
 62    unsigned long value = IrReceiver.decodedIRData.decodedRawData;
 63    handleControl(value);        // Handle the commands from remote control
 64    Serial.println(value, HEX);  // Print "old" raw data
 65    Serial.println();
 66    IrReceiver.resume();  // Enable receiving of the next value
 67  }
 68  Emotion_Detection();
 69  Emotion_Show(emotion_task_mode);  //Led matrix display function
 70  WS2812_Show(ws2812_task_mode);    //Car color lights display function
 71  Move(move_flag);
 72}
 73
 74void handleControl(unsigned long value) {
 75  // Handle the commands
 76  switch (value) {
 77    case 0xBF40FF00:  // Receive the number '+'
 78      move_flag = 1;
 79      break;
 80    case 0xE619FF00:  // Receive the number '-'
 81      move_flag = 2;
 82      break;
 83    case 0xF807FF00:  // Receive the number '|<<'
 84      move_flag = 3;
 85      break;
 86    case 0xF609FF00:  // Receive the number '>>|'
 87      move_flag = 4;
 88      break;
 89    case 0xEA15FF00:  // Receive the number '▶'
 90      move_flag = 0;
 91      break;
 92    case 0xE916FF00:  // Receive the number '0'
 93      break;
 94    case 0xF30CFF00:  // Receive the number '1'
 95      break;
 96    case 0xF708FF00:  // Receive the number '4'
 97      break;
 98    case 0xF20DFF00:  // Receive the number 'C'
 99      break;
100    case 0xA15EFF00:  // Receive the number '3'
101      move_flag = 5;
102      break;
103    case 0xA55AFF00:  // Receive the number '6'
104      move_flag = 6;
105      break;
106    case 0xB54AFF00:  // Receive the number '9'
107      break;
108    case 0xBB44FF00:  // Receive the number 'TEST'
109      Buzzer_Variable(2000, 100, 1);
110      break;
111    case 0xE718FF00:  // Receive the number '2'
112      emotion_flag = emotion_flag + 1;
113      if (emotion_flag > 7) {
114        emotion_flag = 0;
115      }
116      Emotion_SetMode(emotion_flag);  //Display
117      break;
118    case 0xE31CFF00:  // Receive the number '5'
119      emotion_flag = 0;
120      Emotion_SetMode(emotion_flag);
121      break;
122    case 0xBD42FF00:  // Receive the number '7'
123      ws2812_flag = ws2812_flag + 1;
124      if (ws2812_flag >= 6) {
125        ws2812_flag = 0;
126      }
127      WS2812_SetMode(ws2812_flag);
128      break;
129    case 0xAD52FF00:  // Receive the number '8'
130      ws2812_flag = 0;
131      WS2812_SetMode(ws2812_flag);
132      break;
133    case 0xFFFFFFFF:  // Remain unchanged
134      break;
135    default:
136      break;
137  }
138}
139
140void Move(int data) {
141  // Handle the commands
142  switch (data) {
143    case 1:  // Receive the number '+'
144      Bipedal_Robot.walk(2, 1500, 1);
145      move_flag = 0;
146      break;
147    case 2:  // Receive the number '-'
148      Bipedal_Robot.walk(2, 1500, -1);
149      move_flag = 0;
150      break;
151    case 3:  // Receive the number '|<<'
152      Bipedal_Robot.turn(2, 1500, 1);
153      move_flag = 0;
154      break;
155    case 4:  // Receive the number '>>|'
156      Bipedal_Robot.turn(2, 1500, -1);
157      move_flag = 0;
158      break;
159    case 5:  // Receive the number '3'
160      Ultrasonic_Avoid();
161      break;
162    case 6:  // Receive the number '6'
163      dance();
164      move_flag = 0;
165      break;
166    case 0:  // Receive the number '▶'
167      Bipedal_Robot.home();
168      break;
169    default:
170      move_flag = 0;
171      Bipedal_Robot.home();
172      break;
173  }
174}
175
176void dance() {
177  Bipedal_Robot.jitter(1, 1000, 40);
178  Bipedal_Robot.home();
179  Bipedal_Robot.moonwalker(1, 1200, 30, 1);
180  Bipedal_Robot.home();
181  Bipedal_Robot.ascendingTurn(1, 1000, 50);
182  Bipedal_Robot.home();
183  Bipedal_Robot.tiptoeSwing(1, 1000, 30);
184  Bipedal_Robot.home();
185  Bipedal_Robot.flapping(1, 1000, 40, 1);
186  Bipedal_Robot.home();
187  Bipedal_Robot.crusaito(1, 3000, 40, 1);
188  Bipedal_Robot.home();
189  Bipedal_Robot.shakeLeg(1, 1000, 1);
190  Bipedal_Robot.home();
191}
After the code uploads successfully, turn on the power of the car and use the infrared remote to control the car and other functions. The corresponding keys and their functions are shown in the following table:
Code Explanation:
Add the header file for the robot.
1#include <Arduino.h>
2#include <Adafruit_NeoPixel.h>
3#include <IRremote.hpp>
4#include <EEPROM.h>
5#include "Freenove_Robot_For_Pico_W.h"
6#include "Freenove_Robot_Emotion.h"
7#include "Freenove_VK16K33_Lib.h"
8#include "Freenove_Robot_WS2812.h"
9#include "Bipedal_Robot.h"
Infrared key code value processing function receives instructions sent by the infrared remote control and execute the corresponding program.
 1void handleControl(unsigned long value) {
 2// Handle the commands
 3    switch (value) {
 4        case 0xBF40FF00:  // Receive the number '+'
 5        ...
 6        case 0xE619FF00:  // Receive the number '-'
 7        ...
 8        case 0xF807FF00:  // Receive the number '|<<'
 9        ...
10        case 0xF609FF00:  // Receive the number '>>|'
11        ...
12        case 0xEA15FF00:  // Receive the number '▶'
13        ...
14        case 0xE916FF00:  // Receive the number '0'
15        ...
16        case 0xF30CFF00:  // Receive the number '1'
17        ...
18        case 0xF708FF00:  // Receive the number '4'
19        ...
20        case 0xF20DFF00:  // Receive the number 'C'
21        ...
22        case 0xA15EFF00:  // Receive the number '3'
23        ...
24        case 0xA55AFF00:  // Receive the number '6'
25        ...
26        case 0xB54AFF00:  // Receive the number '9'
27        ...
28        case 0xBB44FF00:  // Receive the number 'TEST'
29        ...
30        case 0xE718FF00:  // Receive the number '2'
31        ...
32        case 0xE31CFF00:  // Receive the number '5'
33        ...
34        case 0xBD42FF00:  // Receive the number '7'
35        ...
36        case 0xAD52FF00:  // Receive the number '8'
37        ...
38        case 0xFFFFFFFF:  // Remain unchanged
39        break;
40        default:
41        break;
42    }
43}
Sketch 04.4_Multi_Functional_Robot.ino is almost the same as 04.3_Multi_Functional_Robot.ino, except that it is added with the music play function. You can find the function of each key in the table below.