4. Chapter RGBLED
In this chapter, we will learn how to use RGBLED.
4.1. Project Multicolored LED
This project will make a Multicolored LED, namely, use Processing to control the color of RGBLED.
4.1.1. Component List
Raspberry Pi (with 40 GPIO) x1 GPIO Extension Board & Ribbon Cable x1 Breadboard x1 |
RGB LED x1 |
Jumper Wire |
Resistor 220Ω x3 |


4.1.2. Circuit
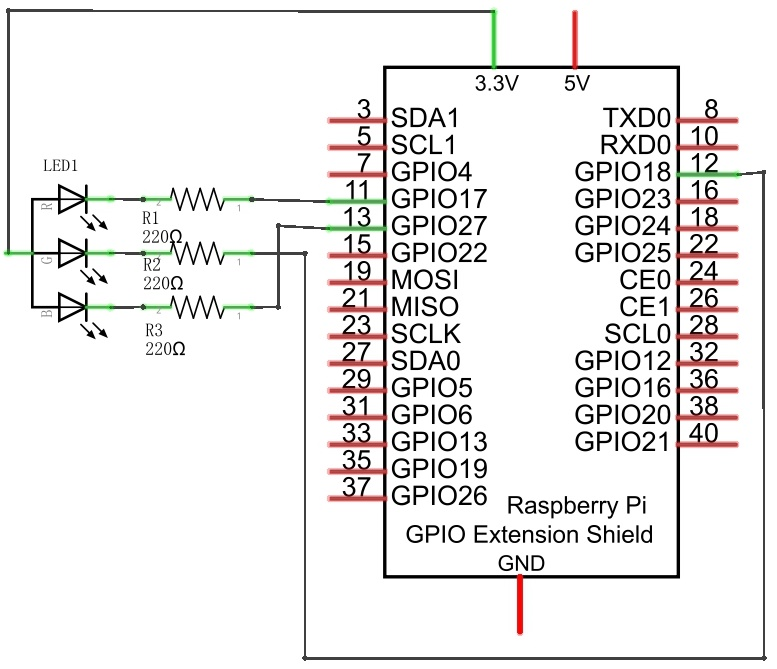
Schematic diagram
|
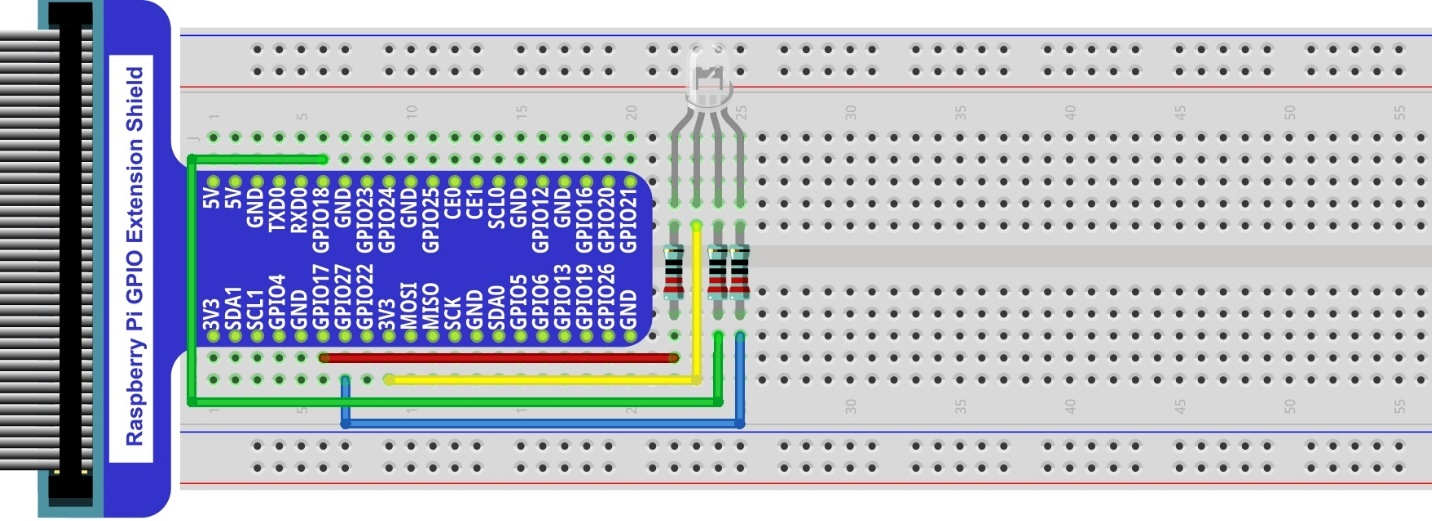
Hardware connection. If you need any support,please feel free to contact us via:
|
4.1.3. Sketch
4.1.3.1. Sketch ColorfulLED
First, observe the result after running the sketch, and then learn about the code in detail.
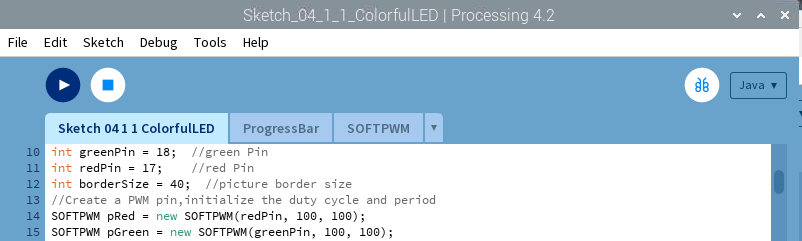
Use Processing to open the file Sketch_04_1_1_ColorfulLED.
$ processing ~/Freenove_Kit/Processing/Sketches/Sketch_04_1_1_ColorfulLED/Sketch_04_1_1_ColorfulLED.pde
Click on “RUN” to run the code.
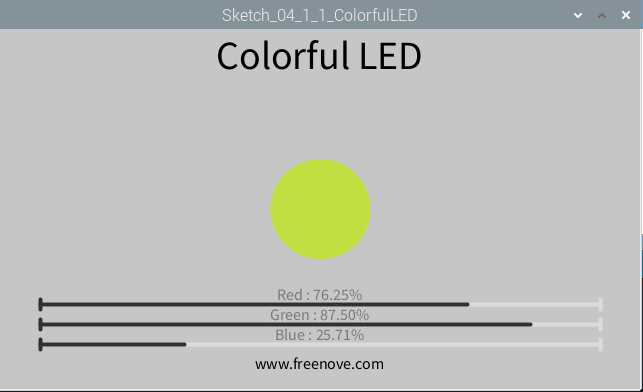
After the program is executed, RGBLED is in OFF-state. And in Display Window, the pattern used to simulate LED is black. Red, Green and Blue progress bars are at 0%. By using mouse to click on and drag any progress bar, you can set the PWM duty cycle of color channels, and then RGBLED in the circuit will show corresponding colors. At the same time, the pattern in Display Window will show the same color.
This project contains a lot of code files, and the core code is contained in the file Sketch_04_1_1_ColorfulLED.
The other files only contain some custom classes.
The following is program code:
 1/*****************************************************
 2 * Filename    : Sketch_04_1_1_ColorfulLED
 3 * Description : Using slider controlRGBLED
 4 * auther      : www.freenove.com
 5 * modification: 2024/09/04
 6 *****************************************************/
 7import freenove.processing.io.*;
 8
 9int bluePin = 27;     //blue Pin
10int greenPin = 18;    //green Pin
11int redPin = 17;      //red Pin
12int borderSize = 40;  //picture border size
13//Create a PWM pin,initialize the duty cycle and period
14SOFTPWM pRed = new SOFTPWM(redPin, 100, 100);
15SOFTPWM pGreen = new SOFTPWM(greenPin, 100, 100);
16SOFTPWM pBlue = new SOFTPWM(bluePin, 100, 100);
17//instantiate three ProgressBar Object
18ProgressBar rBar, gBar, bBar;
19boolean rMouse = false, gMouse = false, bMouse = false;
20void setup() {
21  size(640, 360);  //display window size
22  strokeWeight(4);  //stroke Weight
23  //define the ProgressBar length
24  int barLength = width - 2*borderSize;
25  //Create ProgressBar Object
26  rBar = new ProgressBar(borderSize, height - 85, barLength);
27  gBar = new ProgressBar(borderSize, height - 65, barLength);
28  bBar = new ProgressBar(borderSize, height - 45, barLength);
29  //Set ProgressBar's title
30  rBar.setTitle("Red");gBar.setTitle("Green");bBar.setTitle("Blue");
31}
32
33void draw() {
34  background(200);  //A white background
35  titleAndSiteInfo();  //title and Site infomation
36
37  fill(rBar.progress*255, gBar.progress*255, bBar.progress*255);  //cycle color
38  ellipse(width/2, height/2, 100, 100);  //show cycle
39
40  rBar.create();  //Show progressBar
41  gBar.create();
42  bBar.create();
43}
44
45void mousePressed() {
46  if ( (mouseY< rBar.y+5) && (mouseY>rBar.y-5) ) {
47    rMouse = true;
48  } else if ( (mouseY< gBar.y+5) && (mouseY>gBar.y-5) ) {
49    gMouse = true;
50  } else if ( (mouseY< bBar.y+5) && (mouseY>bBar.y-5) ) {
51    bMouse = true;
52  }
53}
54void mouseReleased() {
55  rMouse = false;
56  bMouse = false;
57  gMouse = false;
58}
59void mouseDragged() {
60  int a = constrain(mouseX, borderSize, width - borderSize);
61  float t = map(a, borderSize, width - borderSize, 0.0, 1.0);
62  if (rMouse) {
63    pRed.softPwmWrite((int)(100-t*100)); //wirte the duty cycle according to t
64    rBar.setProgress(t);
65  } else if (gMouse) {
66    pGreen.softPwmWrite((int)(100-t*100)); //wirte the duty cycle according to t
67    gBar.setProgress(t);
68  } else if (bMouse) {
69    pBlue.softPwmWrite((int)(100-t*100)); //wirte the duty cycle according to t
70    bBar.setProgress(t);
71  }
72}
73
74void titleAndSiteInfo() {
75  fill(0);
76  textAlign(CENTER);    //set the text centered
77  textSize(40);        //set text size
78  text("Colorful LED", width / 2, 40);    //title
79  textSize(16);
80  text("www.freenove.com", width / 2, height - 20);    //site
81}
In the code, first create three PWM pins and three progress bars to control RGBLED.
1SOFTPWM pRed = new SOFTPWM(redPin, 100, 100);
2SOFTPWM pGreen = new SOFTPWM(greenPin, 100, 100);
3SOFTPWM pBlue = new SOFTPWM(bluePin, 100, 100);
4//instantiate three ProgressBar Object
5ProgressBar rBar, gBar, bBar;
And then in function setup(), define position and length of progress bar according to the size of Display Window, and set the name of each progress bar.
 1void setup() {
 2  size(640, 360);  //display window size
 3  strokeWeight(4);  //stroke Weight
 4  //define the ProgressBar length
 5  int barLength = width - 2*borderSize;
 6  //Create ProgressBar Object
 7  rBar = new ProgressBar(borderSize, height - 85, barLength);
 8  gBar = new ProgressBar(borderSize, height - 65, barLength);
 9  bBar = new ProgressBar(borderSize, height - 45, barLength);
10  //Set ProgressBar's title
11  rBar.setTitle("Red");gBar.setTitle("Green");bBar.setTitle("Blue");
12}
In function draw(), first set background, header and other basic information. Then draw a circle and set its color according to the duty cycle of three channels of RGB. Finally draw three progress bars.
 1void draw() {
 2  background(200);  //A white background
 3  titleAndSiteInfo();  //title and Site infomation
 4
 5  fill(rBar.progress*255, gBar.progress*255, bBar.progress*255);  //cycle color
 6  ellipse(width/2, height/2, 100, 100);  //show cycle
 7
 8  rBar.create();  //Show progressBar
 9  gBar.create();
10  bBar.create();
11}
System functions mousePressed(), mouseReleased() and mouseDragged() are used to determine whether the mouse drags the progress bar and set the schedule. If the mouse button is pressed in a progress bar, then the mousePressed () sets the progress flag rgbMouse to true, mouseDragged (mouseX) maps progress value to set corresponding PWM. When the mouse is released, mouseReleased() sets the progress flag rgbMouse to false.
 1void mousePressed() {
 2  if ( (mouseY< rBar.y+5) && (mouseY>rBar.y-5) ) {
 3    rMouse = true;
 4  } else if ( (mouseY< gBar.y+5) && (mouseY>gBar.y-5) ) {
 5    gMouse = true;
 6  } else if ( (mouseY< bBar.y+5) && (mouseY>bBar.y-5) ) {
 7    bMouse = true;
 8  }
 9}
10void mouseReleased() {
11  rMouse = false;
12  bMouse = false;
13  gMouse = false;
14}
15void mouseDragged() {
16  int a = constrain(mouseX, borderSize, width - borderSize);
17  float t = map(a, borderSize, width - borderSize, 0.0, 1.0);
18  if (rMouse) {
19    pRed.softPwmWrite((int)(100-t*100)); //wirte the duty cycle according to t
20    rBar.setProgress(t);
21  } else if (gMouse) {
22    pGreen.softPwmWrite((int)(100-t*100)); //wirte the duty cycle according to t
23    gBar.setProgress(t);
24  } else if (bMouse) {
25    pBlue.softPwmWrite((int)(100-t*100)); //wirte the duty cycle according to t
26    bBar.setProgress(t);
27  }
28}
4.1.3.2. Reference
- class ProgressBar
This is a custom class that is used to create a progress bar.
public ProgressBar (int ix, int iy, int barlen)
Constructor, used to create ProgressBar, the parameters for coordinates X, Y and length of ProgressBar.
public void setTitle (String str)
Used to set the name of progress bar, which will be displayed in the middle of the progress bar.
public void setProgress (float pgress)
Used to set the progress of progress bar. The parameter: 0<pgress<1.0.
public void create () & public void create (float pgress)
Used to draw progress bar.