11. Chapter LCD1602
In this chapter, we will learn about the LCD1602 Display Screen
11.1. Project I2C LCD1602
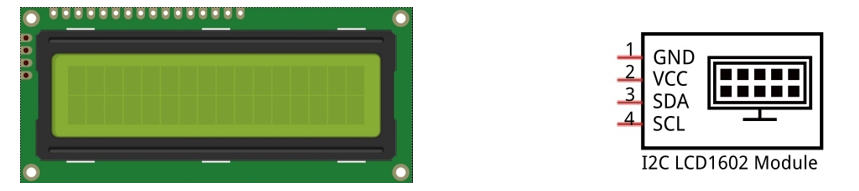
There are LCD1602 display screen and the I2C LCD. We will introduce both of them in this chapter. But what we use in this project is an I2C LCD1602 display screen. The LCD1602 Display Screen can display 2 lines of characters in 16 columns. It is capable of displaying numbers, letters, symbols, ASCII code and so on. As shown below is a monochrome LCD1602 Display Screen along with its circuit pin diagram

I2C LCD1602 Display Screen integrates a I2C interface, which connects the serial-input & parallel-output module to the LCD1602 Display Screen. This allows us to only use 4 lines to operate the LCD1602.
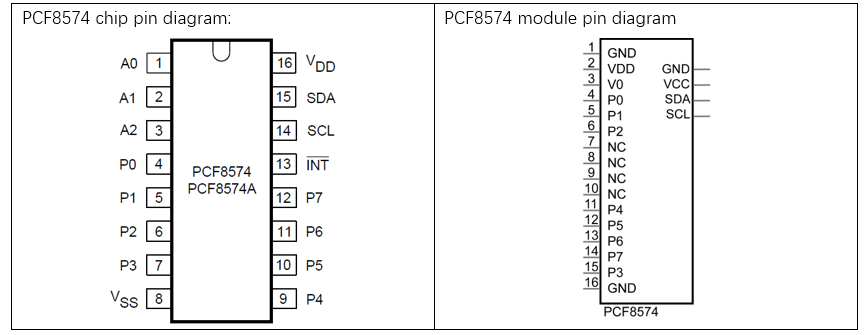
The serial-to-parallel IC chip used in this module is PCF8574T (PCF8574AT), and its default I2C address is 0x27(0x3F). You can also view the RPI bus on your I2C device address through command “i2cdetect -y 1” (refer to the “configuration I2C” section below).
Below is the PCF8574 chip pin diagram and its module pin diagram:
PCF8574 module pins and LCD1602 pins correspond to each other and connected to each other:
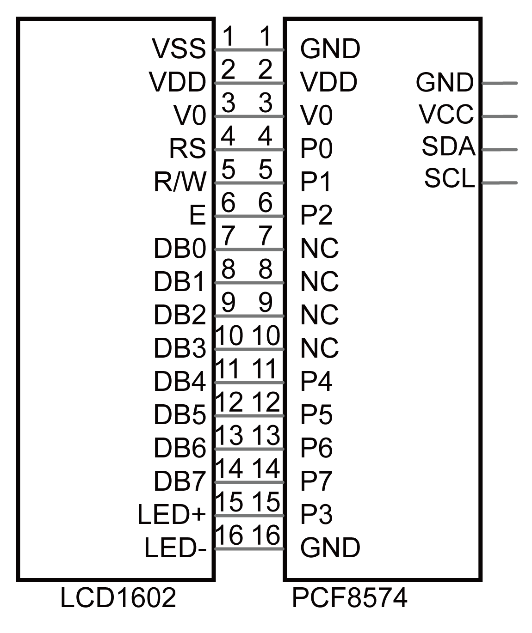
Because of this, as stated earlier, we only need 4 pins to control the16 pins of the LCD1602 Display Screen through the I2C interface.
In this project, we will use the I2C LCD1602 to display some static characters and dynamic variables.
11.1.1. Component List
|
Jumper Wires x4 |
I2C LCD1602 Module x1 |
|

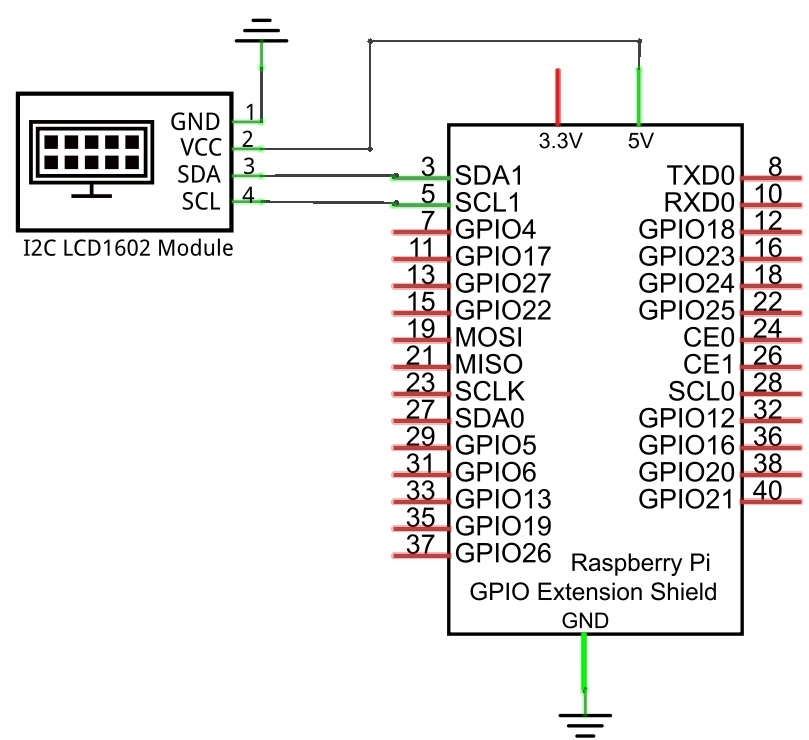
11.1.2. Circuit
Note that the power supply for I2C LCD1602 in this circuit is 5V.
Schematic diagram
|
Hardware connection. If you need any support,please feel free to contact us via:
|

Note
It is necessary to configure 12C and install Smbus first (see Chapter 7 for details)
11.1.3. Code
This code will have your RPi’s CPU temperature and System Time Displayed on the LCD1602.
11.1.3.1. Python Code I2CLCD1602
If you did not configure I2C and install Smbus, please refer to Chapter 7. If you did, continue.
First, observe the project result, and then learn about the code in detail.
Hint
If you have any concerns, please contact us via: support@freenove.com
Use
cdcommand to enter 11.1.1_I2CLCD1602 directory of Python code.
$ cd ~/Freenove_Kit/Code/Python_GPIOZero_Code/11.1.1_I2CLCD1602
Use Python command to execute Python code
I2CLCD1602.py.
$ python I2CLCD1602.py
After the program is executed, the LCD1602 Screen will display your RPi’s CPU Temperature and System Time.
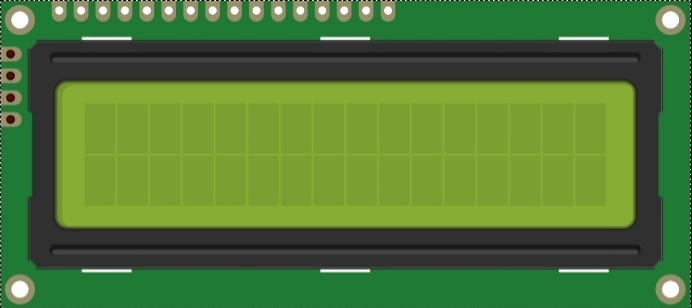
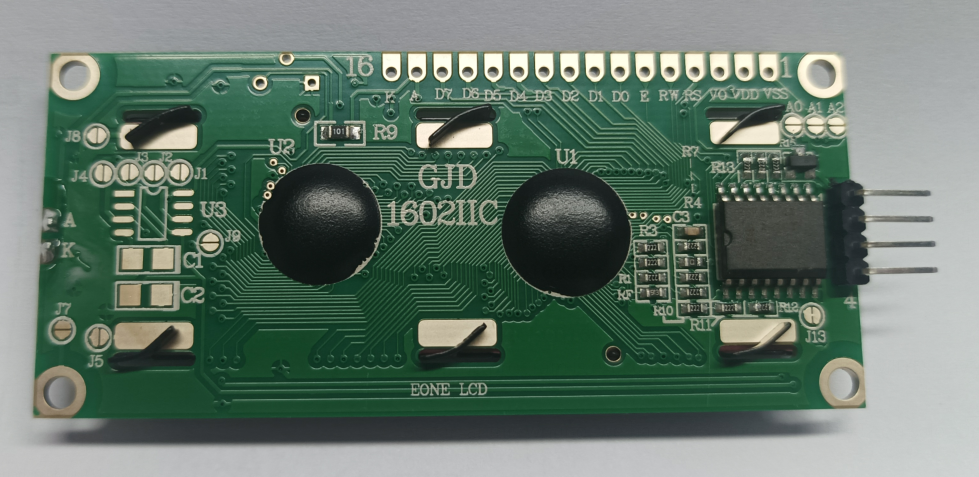
So far, at this writing, we have two types of LCD1602 on sale. One needs to adjust the backlight, and the other does not.
The LCD1602 that does not need to adjust the backlight is shown in the figure below.
The following is the program code:
 1#!/usr/bin/env python3
 2########################################################################
 3# Filename    : I2CLCD1602.py
 4# Description : Use the LCD display data
 5# Author      : freenove
 6# modification: 2023/05/15
 7########################################################################
 8import smbus
 9from time import sleep, strftime
10from datetime import datetime
11from LCD1602 import CharLCD1602
12
13lcd1602 = CharLCD1602()
14def get_cpu_temp():     # get CPU temperature from file "/sys/class/thermal/thermal_zone0/temp"
15    tmp = open('/sys/class/thermal/thermal_zone0/temp')
16    cpu = tmp.read()
17    tmp.close()
18    return '{:.2f}'.format( float(cpu)/1000 ) + ' C '
19
20def get_time_now():     # get system time
21    return datetime.now().strftime('    %H:%M:%S')
22
23def loop():
24    lcd1602.init_lcd()
25    count = 0
26    while(True):
27        lcd1602.clear()
28        lcd1602.write(0, 0, 'CPU: ' + get_cpu_temp() )# display CPU temperature
29        lcd1602.write(0, 1, get_time_now() )   # display the time
30        sleep(1)
31def destroy():
32    lcd1602.clear()
33if __name__ == '__main__':
34    print ('Program is starting ... ')
35    try:
36        loop()
37    except KeyboardInterrupt:
38        destroy()
In a while loop, set the cursor position, and display the CPU temperature and time.
1while(True):
2    lcd1602.clear()
3    lcd1602.write(0, 0, 'CPU: ' + get_cpu_temp() )# display CPU temperature
4    lcd1602.write(0, 1, get_time_now() )   # display the time
5    sleep(1)
CPU temperature is stored in file “/sys/class/thermal/thermal_zone0/temp”. Open the file and read content of the file, and then convert it to Celsius degrees and return. Subfunction used to get CPU temperature is shown below:
1def get_cpu_temp():     # get CPU temperature from file "/sys/class/thermal/thermal_zone0/temp"
2    tmp = open('/sys/class/thermal/thermal_zone0/temp')
3    cpu = tmp.read()
4    tmp.close()
5    return '{:.2f}'.format( float(cpu)/1000 ) + ' C '
Subfunction used to get time:
1def get_time_now():     # get system time
2    return datetime.now().strftime('    %H:%M:%S')
Details about LCD1602.py:
- Module LCD1602
This module provides the basic operation method of LCD1602, including class CharLCD1602.
Some member functions are described as follows:
def init_lcd(self,addr=None, bl=1) : LDC1602 initializes the setting. When the addr is None, the I2C address of the device will be automatically scanned. You can also specify the I2C address, bl=1 to enable the backlight setting.
def clear(self) : clear the screen
def send_command(self,comm) : set the cursor position
def i2c_scan(self) : scan the device I2C address
def write(self,x, y, str) : display contents
Note
More information can be viewed through opening LCD1602.py.