22. Chapter Matrix Keypad
Earlier we learned about a single Push Button Switch. In this chapter, we will learn about Matrix Keyboards, which integrates a number of Push Button Switches as Keys for the purposes of Input.
22.1. Project Matrix Keypad
In this project, we will attempt to get every key code on the Matrix Keypad to work.
22.1.1. Component List
|
4x4 Matrix Keypad x1 |
Jumper wire |
|
Resistor 10kΩ x4 |


22.1.2. Component knowledge
22.1.2.1. 4x4 Matrix Keypad
A Keypad Matrix is a device that integrates a number of keys in one package. As is shown below, a 4x4 Keypad Matrix integrates 16 keys (think of this as 16 Push Button Switches in one module):

Similar to the integration of an LED Matrix, the 4x4 Keypad Matrix has each row of keys connected with one pin and this is the same for the columns. Such efficient connections reduce the number of processor ports required. The internal circuit of the Keypad Matrix is shown below.

The method of usage is similar to the Matrix LED, by using a row or column scanning method to detect the state of each key’s position by column and row. Take column scanning method as an example, send low level to the first 1 column (Pin1), detect level state of row 5, 6, 7, 8 to judge whether the key A, B, C, D are pressed. Then send low level to column 2, 3, 4 in turn to detect whether other keys are pressed. Therefore, you can get the state of all of the keys.
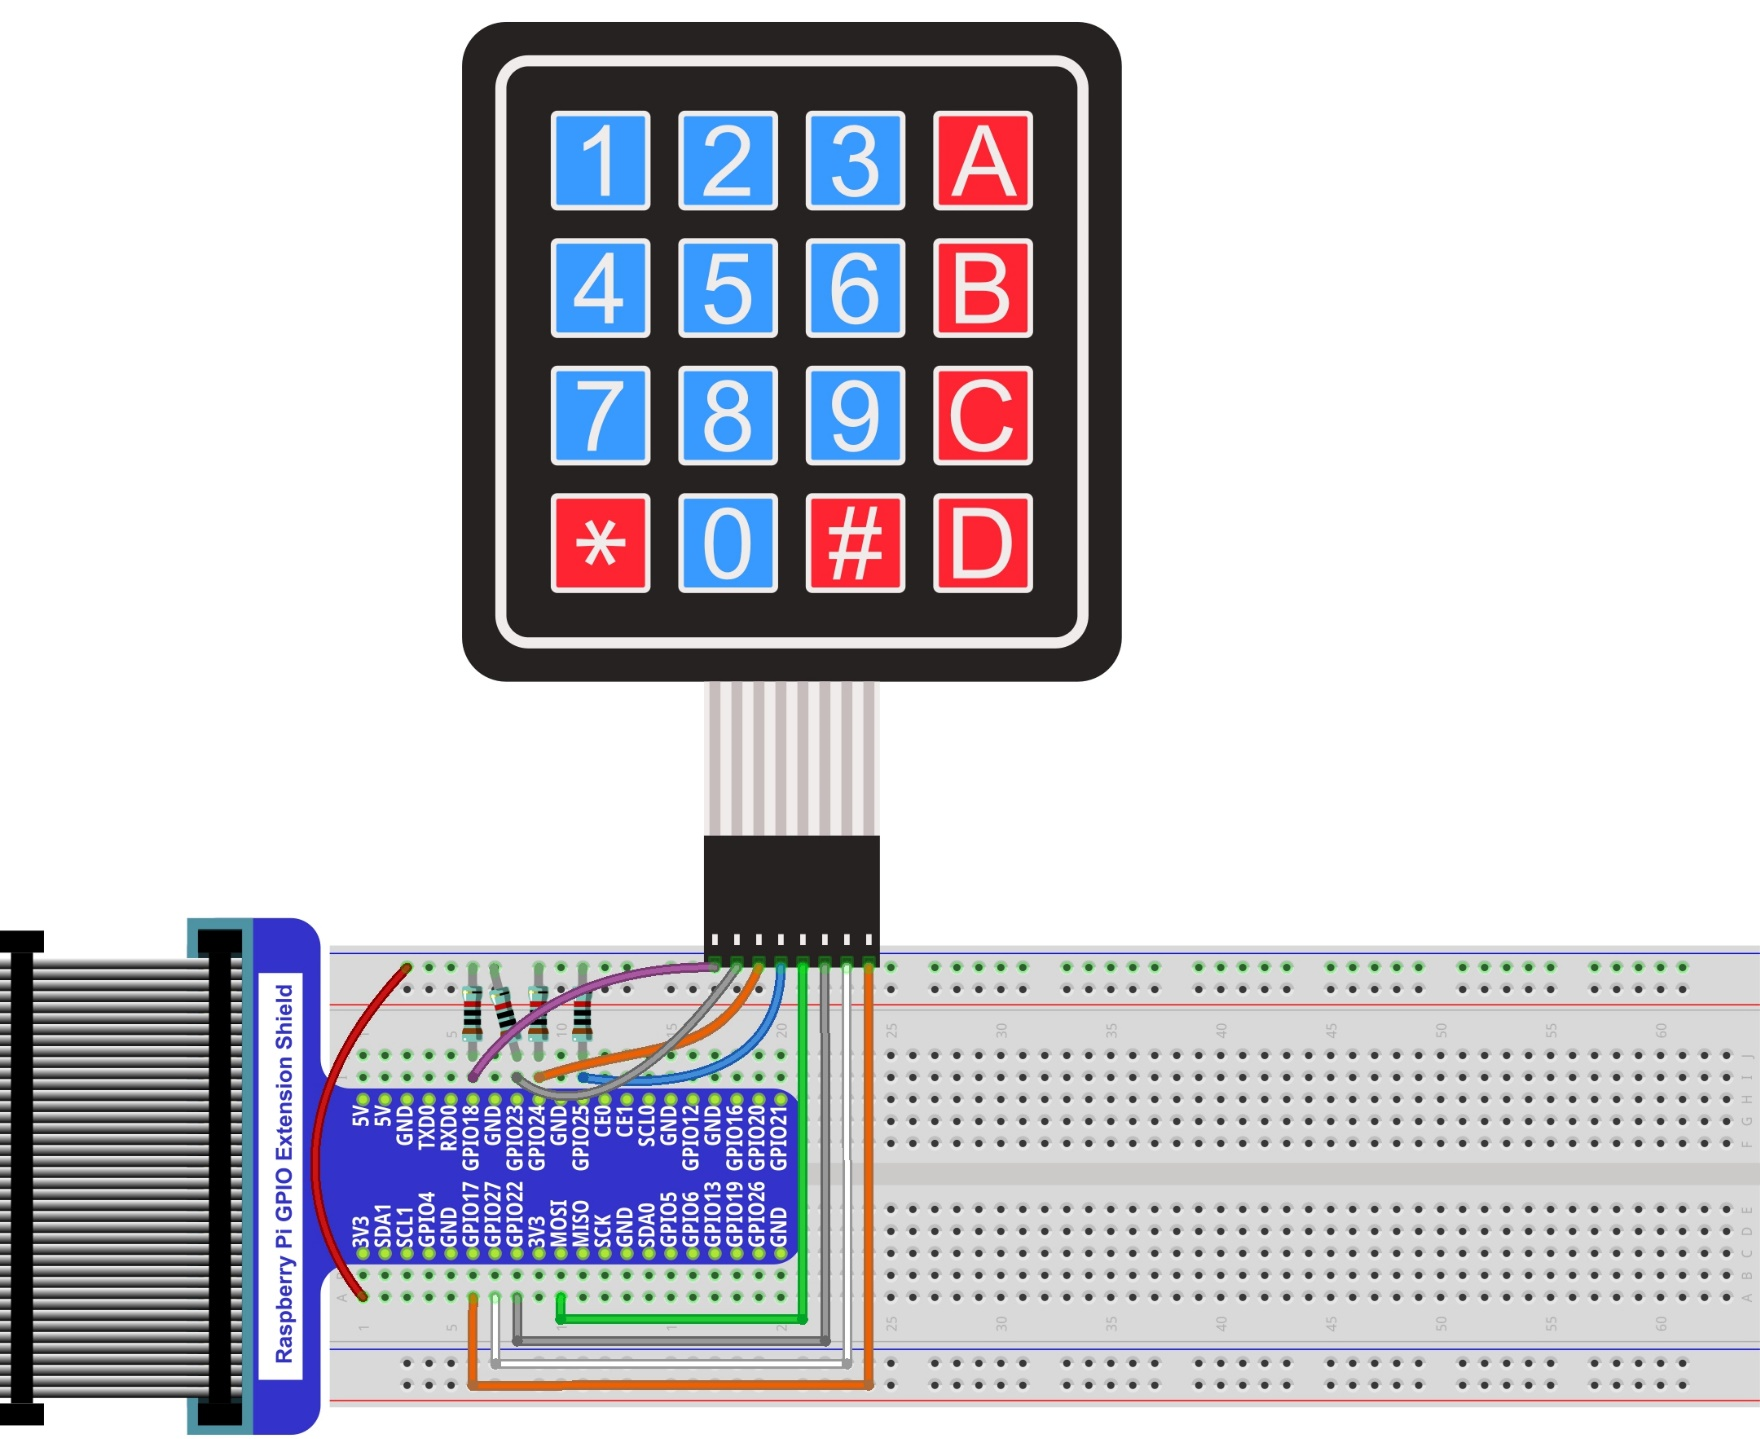
22.1.3. Circuit
Schematic diagram
|
Hardware connection. If you need any support,please feel free to contact us via:
|

22.1.4. Code
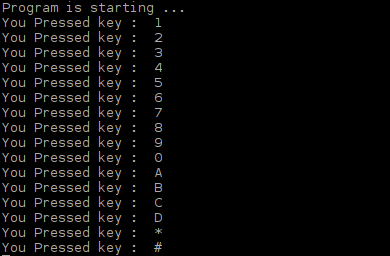
This code is used to obtain all key codes of the 4x4 Matrix Keypad, when one of the keys is pressed, the key code will be displayed in the terminal window.
22.1.4.1. C Code MatrixKeypad
First, observe the project result, and then learn about the code in detail.
Hint
If you have any concerns, please contact us via: support@freenove.com
Use cd command to enter 22.1.1_MatrixKeypad directory of C code.
$ cd ~/Freenove_Kit/Code/C_Code/22.1.1_MatrixKeypad
Code of this project contains a custom header file. Use the following command to compile the code MatrixKeypad.cpp, Keypad.cpp and Key.cpp generate executable file MatrixKeypad. The custom header file will be compiled at the same time.
$ gcc MatrixKeypad.cpp Keypad.cpp Key.cpp -o MatrixKeypad -lwiringPi
Run the generated file “MatrixKeypad”.
$ sudo ./MatrixKeypad
After the program is executed, pressing any key on the MatrixKeypad, will display the corresponding key code on the Terminal. As is shown below:
The following is the program code:
 1/**********************************************************************
 2* Filename    : MatrixKeypad.cpp
 3* Description : Obtain the key code of 4x4 Matrix Keypad
 4* Author      : www.freenove.com
 5* modification: 2019/12/27
 6**********************************************************************/
 7#include "Keypad.hpp"
 8#include <stdio.h>
 9const byte ROWS = 4; //four rows
10const byte COLS = 4; //four columns
11char keys[ROWS][COLS] = {  //key code
12  {'1','2','3','A'},
13  {'4','5','6','B'},
14  {'7','8','9','C'},
15  {'*','0','#','D'}
16};
17byte rowPins[ROWS] = {1, 4, 5, 6 }; //define the row pins for the keypad
18byte colPins[COLS] = {12,3, 2, 0 }; //define the column pins for the keypad
19//create Keypad object
20Keypad keypad = Keypad( makeKeymap(keys), rowPins, colPins, ROWS, COLS );
21
22int main(){
23    printf("Program is starting ... \n");
24
25    wiringPiSetup();
26
27	char key = 0;
28	keypad.setDebounceTime(50);
29    while(1){
30        key = keypad.getKey();  //get the state of keys
31        if (key){       //if a key is pressed, print out its key code
32            printf("You Pressed key :  %c \n",key);
33        }
34    }
35    return 1;
36}
In this project code, we use two custom library file “Keypad.hpp” and “Key.hpp”. They are located in the same directory with program files “MatrixKeypad.cpp”, “Keypad.cpp” and “Key.cpp”. The Library Keypad is “transplanted” from the Arduino Library Keypad. This library file provides a method to read the Matrix Keyboard’s input. By using this library, we can easily read the pressed keys of the Matrix Keyboard.
First, we define the information of the Matrix Keyboard used in this project: the number of rows and columns, code designation of each key and GPIO pin connected to each column and row. It is necessary to include the header file “Keypad.hpp”.
 1#include "Keypad.hpp"
 2#include <stdio.h>
 3const byte ROWS = 4; //four rows
 4const byte COLS = 4; //four columns
 5char keys[ROWS][COLS] = {  //key code
 6  {'1','2','3','A'},
 7  {'4','5','6','B'},
 8  {'7','8','9','C'},
 9  {'*','0','#','D'}
10};
11byte rowPins[ROWS] = {1, 4, 5, 6 }; //define the row pins for the keypad
12byte colPins[COLS] = {12,3, 2, 0 }; //define the column pins for the keypad
Then, based on the above information, initiates a Keypad class object to operate the Matrix Keyboard.
1Keypad keypad = Keypad( makeKeymap(keys), rowPins, colPins, ROWS, COLS );
Set the debounce time to 50ms, and this value can be set based on the actual characteristics of the keyboard’s flexibly, with a default time of 10ms.
1keypad.setDebounceTime(50);
In the “while” loop, use the function key= keypad.getKey () to read the keyboard constantly. If there is a key pressed, its key code will be stored in the variable “key”, then be displayed.
1while(1){
2    key = keypad.getKey();  //get the state of keys
3    if (key){       //if a key is pressed, print out its key code
4        printf("You Pressed key :  %c \n",key);
5    }
6}
The Keypad Library used for the RPi is transplanted from the Arduino Keypad Library. And the source files can be obtained by visiting http://playground.arduino.cc/Code/Keypad. As for transplanted function library, the function and method of all classes, functions, variables, etc. are the same as the original library. Partial contents of the Keypad library are described below:
- class Keypad
Keypad(char *userKeymap, byte *row, byte *col, byte numRows, byte numCols);
Constructor, the parameters are: key code of keyboard, row pin, column pin, the number of rows, the number of columns.
char getKey();
Get the key code of the pressed key. If no key is pressed, the return value is NULL.
void setDebounceTime(uint);
Set the debounce time. And the default time is 10ms.
void setHoldTime(uint);
Set the time when the key holds stable state after pressed.
bool isPressed(char keyChar);
Judge whether the key with code “keyChar” is pressed.
bool isPressed(char keyChar);
Wait for a key to be pressed, and return key code of the pressed key.
KeyState getState();
Get state of the keys.
bool keyStateChanged();
Judge whether there is a change of key state, then return True or False.
See also
For More information about Keypad, please visit: http://playground.arduino.cc/Code/Keypad or through the opening file “Keypad.hpp”.