10. Chapter 74HC595 & LED Bar Graph
We have used LED Bar Graph to make a flowing water light, in which 10 GPIO ports of RPi are occupied. More GPIO ports mean that more peripherals can be connected to RPi, so GPIO resource is very precious. Can we make flowing water light with less GPIO ports? In this chapter, we will learn a component, 74HC595, which can achieve the target.
10.1. Project FollowLight
Now let us learn how to use the 74HC595 IC Chip to make a flowing water light using less GPIO.
10.1.1. Component List
|
Jumper Wires x17 |
||
74HC595 x1 |
Bar Graph LED x1 |
Resistor 220Ω x8 |
|


10.1.2. Component knowledge
A 74HC595 chip is used to convert serial data into parallel data. A 74HC595 chip can convert the serial data of one byte into 8 bits, and send its corresponding level to each of the 8 ports correspondingly. With this characteristic, the 74HC595 chip can be used to expand the IO ports of a Raspberry Pi. At least 3 ports on the RPI board are required to control the 8 ports of the 74HC595 chip.
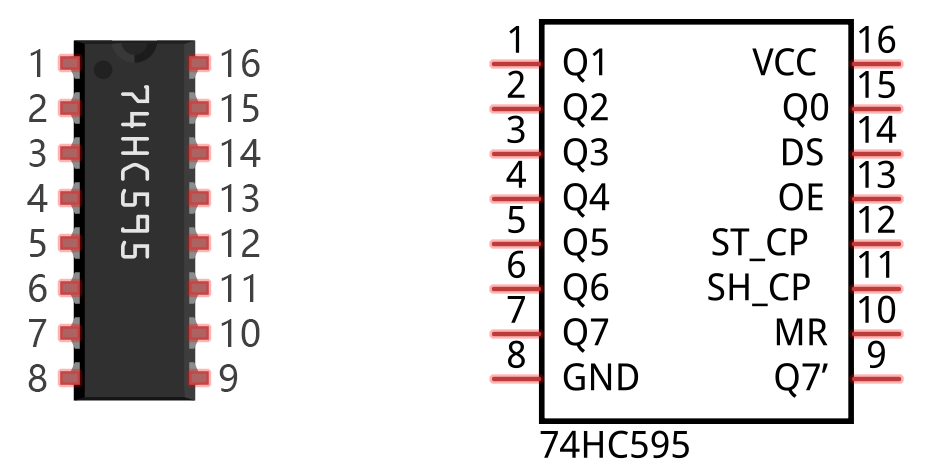
The ports of the 74HC595 chip are described as follows:
Pin name |
Pin number |
Description |
|---|---|---|
Q0-Q7 |
15, 1-7 |
Parallel Data Output |
VCC |
16 |
The Positive Electrode of the Power Supply, the Voltage is 2~6V |
GND |
8 |
The Negative Electrode of Power Supply |
DS |
14 |
Serial Data Input |
OE |
13 |
Enable Output, When this pin is in high level, Q0-Q7 is in high resistance state When this pin is in low level, Q0-Q7 is in output mode |
ST_CP |
12 |
Parallel Update Output: when its electrical level is rising, it will update the parallel data output. |
SH_CP |
11 |
Serial Shift Clock: when its electrical level is rising, it will update the parallel data output. |
MR |
10 |
Remove Shift Register: When this pin is in low level, the content in shift register will be cleared. |
Q7 |
9 |
Serial Data Output: it can be connected to more 74HC595 chips in series. |
See also
For more details, please refer to the datasheet on the 74HC595 chip.
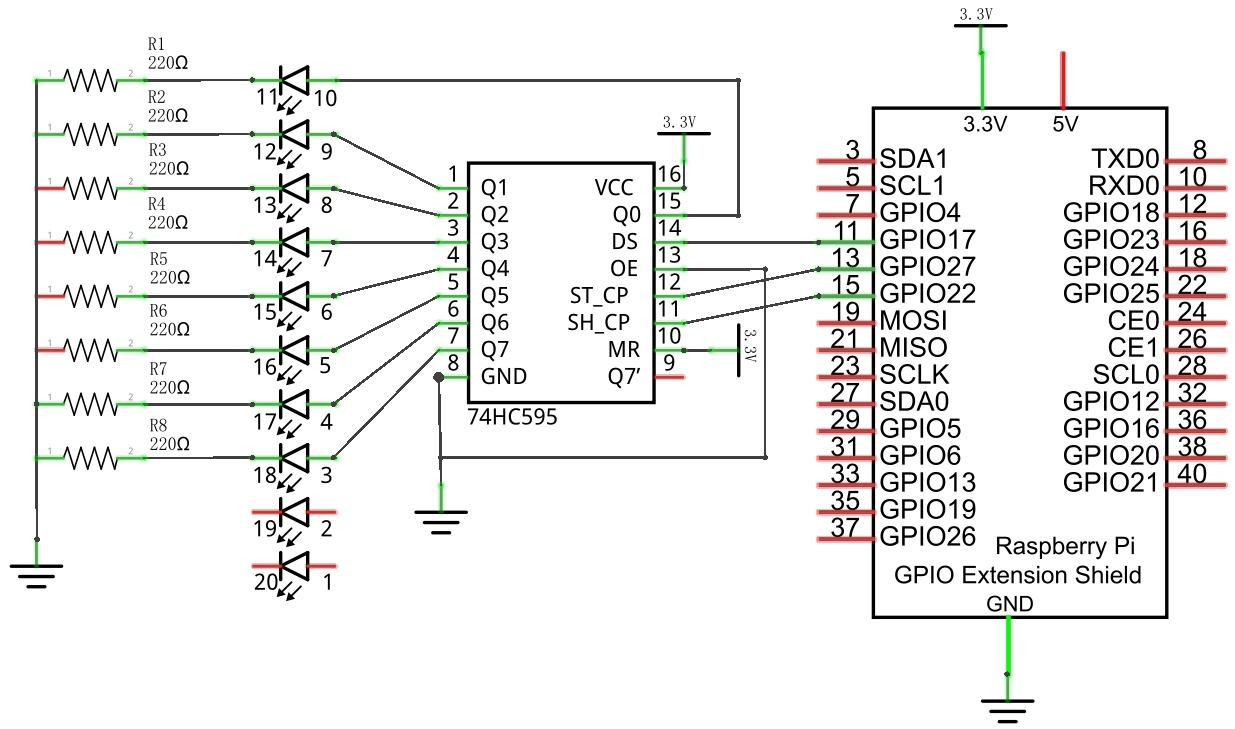
10.1.3. Circuit
Schematic diagram
|
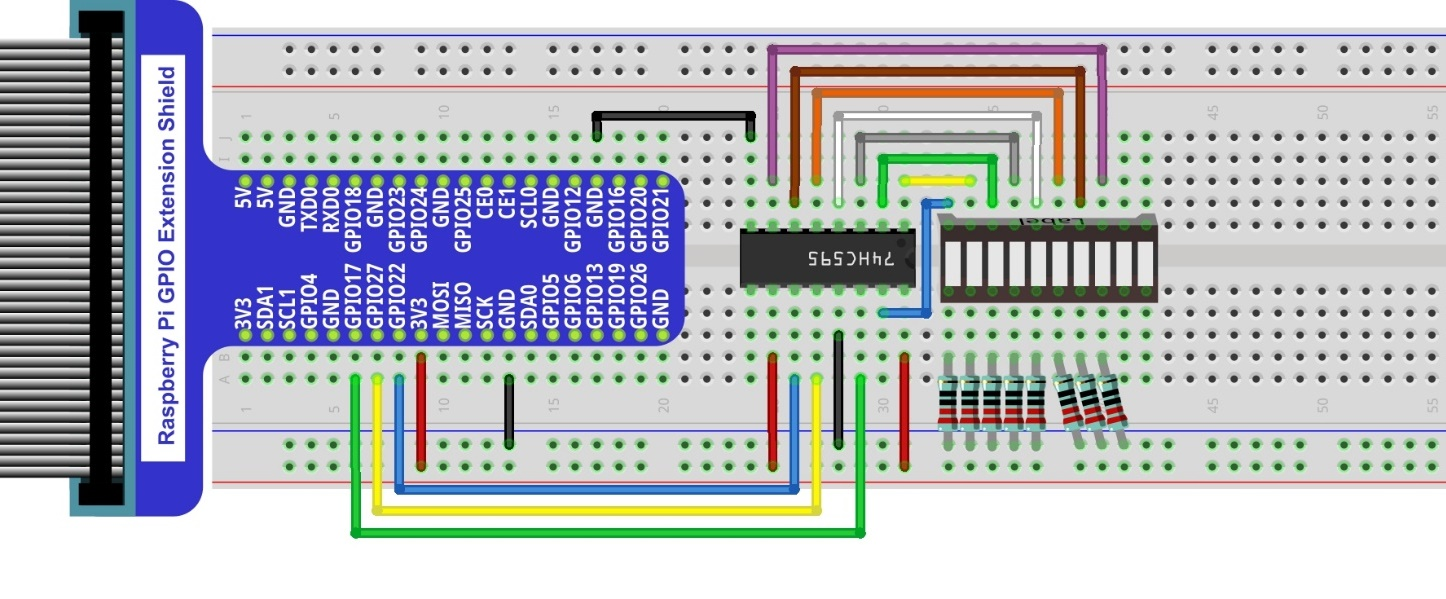
Hardware connection. If you need any support,please feel free to contact us via:
|
10.1.4. Sketch
10.1.4.1. Sketch LightWater
First, observe the result after running the sketch, and then learn about the code in detail.
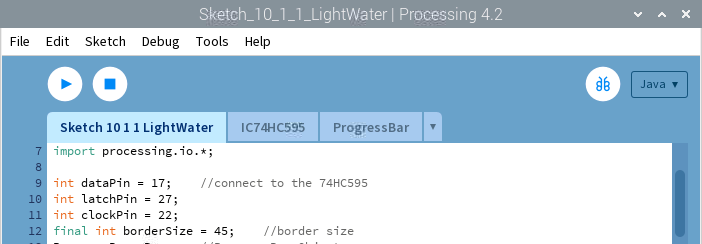
Use Processing to open the file Sketch_10_1_1_LightWater.
$ processing ~/Freenove_Kit/Processing/Sketches/Sketch_10_1_1_LightWater/Sketch_10_1_1_LightWater.pde
Click on “RUN” to run the code.
After the program is executed, Display Window shows a virtual LED Bar Graph, which will bright at the same rate and in the same way as the LED Bar Graph in the circuit. Dragging the progress bar can adjust the flow rate of light water.

This project contains a lot of code files, and the core code is contained in the file Sketch_10_1_1_LightWater. The other files only contain some custom classes.
The following is program code:
 1/*****************************************************
 2 * Filename    : Sketch_10_1_1_LightWater
 3 * Description : Control the LEDBar Graph by 74HC595
 4 * auther      : www.freenove.com
 5 * modification: 2024/09/04
 6 *****************************************************/
 7import freenove.processing.io.*;
 8
 9int dataPin = 17;    //connect to the 74HC595
10int latchPin = 27;
11int clockPin = 22;
12final int borderSize = 45;    //border size
13ProgressBar mBar;    //ProgressBar Object
14IC74HC595 ic;      //IC74HC595 Object
15boolean mMouse = false;    //determined whether a mouse click the ProgressBar
16int leds = 0x01;           //number of led on
17int lastMoveTime = 0;      //led last move time point
18void setup() {
19  size(640, 360);
20  mBar = new ProgressBar(borderSize, height-borderSize, width-borderSize*2);
21  mBar.setTitle("Speed");    //set the ProgressBar's title
22  ic = new IC74HC595(dataPin, latchPin, clockPin);
23}
24
25void draw() {
26  background(255);
27  titleAndSiteInfo();  //title and site information
28  strokeWeight(4);    //border weight
29  mBar.create();      //create the ProgressBar
30  //control the speed of lightwater
31  if (millis() - lastMoveTime > 50/(0.05+mBar.progress)) {
32    lastMoveTime = millis();
33    leds<<=1;
34    if (leds == 0x100)
35      leds = 0x01;
36  }
37  ic.write(ic.LSBFIRST, leds);    //write 74HC595
38
39  stroke(0);
40  strokeWeight(1);
41  for (int i=0; i<10; i++) {    //draw 10 rectanglar box
42    if (leds == (1<<i)) {    //
43      fill(255, 0, 0);        //fill the rectanglar box in red color
44    } else {
45      fill(255, 255, 255);  //else fill the rectanglar box in white color
46    }
47    rect(25+60*i, 90, 50, 180);    //draw a rectanglar box
48  }
49}
50
51void mousePressed() {
52  if ( (mouseY< mBar.y+5) && (mouseY>mBar.y-5) ) {
53    mMouse = true;    //the mouse click the progressBar
54  }
55}
56void mouseReleased() {
57  mMouse  = false;
58}
59void mouseDragged() {
60  int a = constrain(mouseX, borderSize, width - borderSize);
61  float t = map(a, borderSize, width - borderSize, 0.0, 1.0);
62  if (mMouse) {
63    mBar.setProgress(t);
64  }
65}
66void titleAndSiteInfo() {
67  fill(0);
68  textAlign(CENTER);    //set the text centered
69  textSize(40);        //set text size
70  text("LightWater", width / 2, 40);    //title
71  textSize(16);
72  text("www.freenove.com", width / 2, height - 20);    //site
73}
First define the GPIO pin connected to 74HC595, the ProgressBar class object, IC74HC595 class object, and some other variables.
1int dataPin = 17;    //connect to the 74HC595
2int latchPin = 27;
3int clockPin = 22;
4final int borderSize = 45;    //border size
5ProgressBar mBar;    //ProgressBar Object
6IC74HC595 ic;      //IC74HC595 Object
7boolean mMouse = false;    //determined whether a mouse click the ProgressBar
8int leds = 0x01;           //number of led on
9int lastMoveTime = 0;      //led last move time point
In the function setup(), instantiate ProgressBar class object and IC74HC595 class object.
1mBar = new ProgressBar(borderSize, height-borderSize, width-borderSize*2);
2mBar.setTitle("Speed");    //set the ProgressBar's title
3ic = new IC74HC595(dataPin, latchPin, clockPin);
In the function draw(), set the background, text, and other information and draw the progress bar.
1background(255);
2titleAndSiteInfo();  //title and site information
3strokeWeight(4);    //border weight
4mBar.create();      //create the ProgressBar
Then according to the speed of followlight, calculate the data “leds” for 74HC595, and write it to 74HC595, then LEDBar Graph is turned on.
1if (millis() - lastMoveTime > 50/(0.05+mBar.progress)) {
2  lastMoveTime = millis();
3  leds<<=1;
4  if (leds == 0x100)
5    leds = 0x01;
6}
7ic.write(ic.LSBFIRST, leds);    //write 74HC595
Finally, according to the variable leds, draw the virtual LEDBar Graph on Display Window.
 1stroke(0);
 2strokeWeight(1);
 3for (int i=0; i<10; i++) {    //draw 10 rectanglar box
 4  if (leds == (1<<i)) {    //
 5    fill(255, 0, 0);        //fill the rectanglar box in red color
 6  } else {
 7    fill(255, 255, 255);  //else fill the rectanglar box in white color
 8  }
 9  rect(25+60*i, 90, 50, 180);    //draw a rectanglar box
10}
About class IC74HC595:
- class IC74HC595
This is a custom class that is used to operate integrated circuit 74HC595.
public IC74HC595(int dPin, int lPin, int cPin)
Constructor. The parameters are for the GPIO pins connected to 74HC595.
public void write(int order,int value)
Used to write data to 74HC595, and the 74HC595 output port will output these data immediately.