3. Chapter PWM
In previous chapters, we learned that a Push Button Switch has two states: Pressed (ON) and Released (OFF), and an LED has a Light ON and OFF state. Is there a middle or intermediated state? We will next learn how to create an intermediate output state to achieve a partially bright (dim) LED.
First, let us learn how to control the brightness of an LED.
3.1. Project Breathing LED
We describe this project as a Breathing Light. This means that an LED that is OFF will then turn ON gradually and then gradually turn OFF like “breathing”. Okay, so how do we control the brightness of an LED to create a Breathing Light? We will use PWM to achieve this goal.
3.1.1. Component List
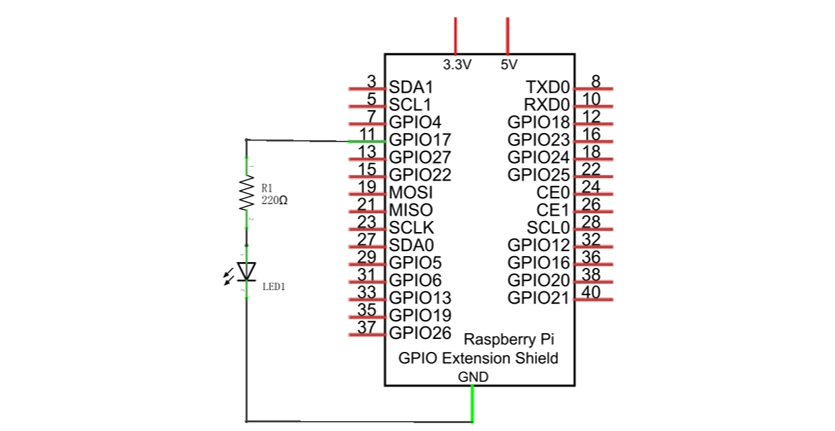
|
Jumper M/M x2 |
LED x1 |
Resistor 220Ω x1 |


3.1.2. Circuit
Schematic diagram
|
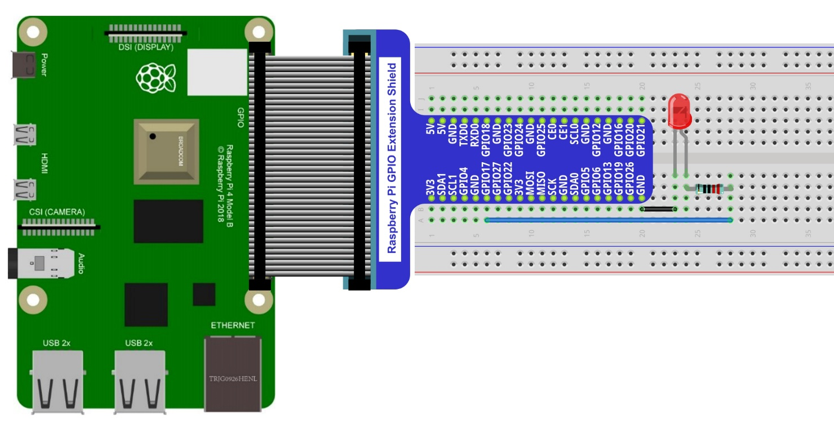
Hardware connection. If you need any support,please feel free to contact us via:
|
3.1.3. Sketch
3.1.3.1. Sketch BreathingLED
First, observe the result after running the sketch, and then learn about the code in detail.
Use Processing to open the file Sketch_03_1_1_BreathingLED.
$ processing ~/Freenove_Kit/Processing/Sketches/Sketch_03_1_1_BreadthingLED/Sketch_03_1_1_BreadthingLED.pde
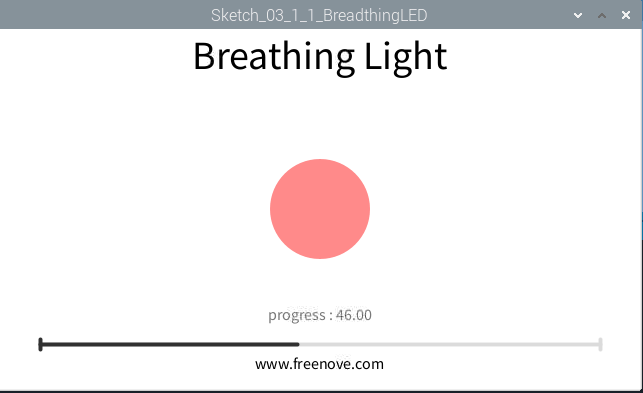
Click on “RUN” to run the code.
After the program is executed, the LED in the circuit will be brightened gradually, and the color of LED pattern in Display Window will deepen gradually at the same time. The progress bar under the paten shows the percentage of completion, and clicking on the inside of window with the mouse can change the progress.
The following is program code:
 1/*****************************************************
 2 * Filename    : Sketch_03_1_1_BreathingLED
 3 * Description : Using PWM control LED brightness
 4 * auther      : www.freenove.com
 5 * modification: 2024/09/04
 6 *****************************************************/
 7import freenove.processing.io.*;
 8
 9int ledPin = 17;    //led Pin
10int borderSize = 40;  //
11float t = 0.0;      //progress percent
12float tStep = 0.004;    // speed
13SOFTPWM p = new SOFTPWM(ledPin, 10, 100);    //Create a PWM pin,initialize the duty cycle and period
14void setup() {
15  size(640, 360);  //display window size
16  strokeWeight(4);  //stroke Weight
17}
18
19void draw() {
20  // Show static value when mouse is pressed, animate otherwise
21  if (mousePressed) {
22    int a = constrain(mouseX, borderSize, width - borderSize);
23    t = map(a, borderSize, width - borderSize, 0.0, 1.0);
24  } else {
25    t += tStep;
26    if (t > 1.0) t = 0.0;
27  }
28  p.softPwmWrite((int)(t*100)); //wirte the duty cycle according to t
29  background(255);  //A white background
30  titleAndSiteInfo();  //title and Site infomation
31
32  fill(255, 255-t*255, 255-t*255);  //cycle
33  ellipse(width/2, height/2, 100, 100);
34
35  pushMatrix();
36  translate(borderSize, height - 45);
37  int barLength = width - 2*borderSize;
38
39  barBgStyle();  //progressbar bg
40  line(0, 0, barLength, 0);
41  line(barLength, -5, barLength, 5);
42
43  barStyle();  //progressbar
44  line(0, -5, 0, 5);
45  line(0, 0, t*barLength, 0);
46
47  barLabelStyle();    //progressbar label
48  text("progress : "+nf(t*100,2,2),barLength/2,-25);
49  popMatrix();
50}
51
52void titleAndSiteInfo() {
53  fill(0);
54  textAlign(CENTER);    //set the text centered
55  textSize(40);        //set text size
56  text("Breathing Light", width / 2, 40);    //title
57  textSize(16);
58  text("www.freenove.com", width / 2, height - 20);    //site
59}
60void barBgStyle() {
61  stroke(220);
62  noFill();
63}
64
65void barStyle() {
66  stroke(50);
67  noFill();
68}
69
70void barLabelStyle() {
71  noStroke();
72  fill(120);
73}
First, use SOFTPWM class to create a PWM pin, which is used to control the brightness of LED. Then define a variable “t” and a variable “tStep” to control the PWM duty cycle and the rate at which “t” increases.
1float t = 0.0;      //progress percent
2float tStep = 0.004;    // speed
3SOFTPWM p = new SOFTPWM(ledPin, 10, 100);    //Create a PWM pin,initialize the duty cycle and period
In the function draw, if there is a click detected, the coordinate in X direction of the mouse will be mapped into the duty cycle “t”; Otherwise, duty cycle “t” will be increased gradually and PWM with the duty cycle will be output.
 1void draw() {
 2  // Show static value when mouse is pressed, animate otherwise
 3  if (mousePressed) {
 4    int a = constrain(mouseX, borderSize, width - borderSize);
 5    t = map(a, borderSize, width - borderSize, 0.0, 1.0);
 6  } else {
 7    t += tStep;
 8    if (t > 1.0) t = 0.0;
 9  }
10  p.softPwmWrite((int)(t*100)); //wirte the duty cycle according to t
The next code is designed to draw a circle filled with colors in different depth according to the “t” value, which is used to simulate LEDs with different brightness.
1fill(255, 255-t*255, 255-t*255);  //cycle
2ellipse(width/2, height/2, 100, 100);
The last code is designed to draw the progress bar and the percentage of the progress.
 1barBgStyle();  //progressbar bg
 2line(0, 0, barLength, 0);
 3line(barLength, -5, barLength, 5);
 4
 5barStyle();  //progressbar
 6line(0, -5, 0, 5);
 7line(0, 0, t*barLength, 0);
 8
 9barLabelStyle();    //progressbar label
10text("progress : "+nf(t*100,2,2),barLength/2,-25);
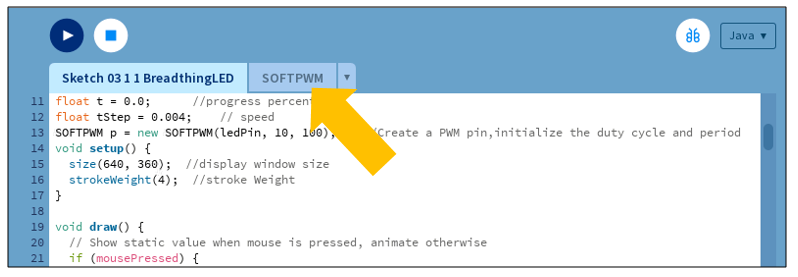
In processing software, you will see a tag page “SOFTPWM” in addition to the above code.
3.1.3.2. Reference
- class SOFTPWM
public SOFTPWM(int iPin, int dc, int pwmRange):
Constructor, used to create a PWM pin, set the pwmRange and initial duty cycle. The minimum of pwmRange is 0.1ms. So pwmRange=100 means that the PWM duty cycle is 0.1ms*100=10ms.
public void softPwmWrite(int value)
Set PMW duty cycle.
public void softPwmStop()
Stop outputting PWM.