Chapter 10 Joystick
In an earlier chapter, we learned how to use Rotary Potentiometer. We will now learn about joysticks, which are electronic modules that work on the same principle as the Rotary Potentiometer.
Project 10.1 Joystick
In this project, we will read the output data of a joystick and display it to the Terminal screen.
Component knowledge
Joystick
A Joystick is a kind of input sensor used with your fingers. You should be familiar with this concept already as they are widely used in gamepads and remote controls. It can receive input on two axes (Y and or X) at the same time (usually used to control direction on a two dimensional plane). And it also has a third direction capability by pressing down (Z axis/direction).
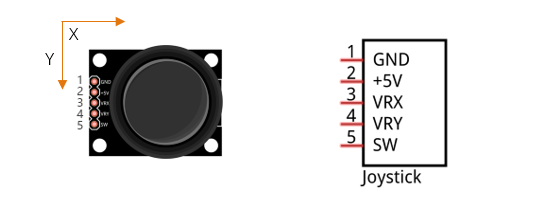
This is accomplished by incorporating two rotary potentiometers inside the Joystick Module at 90 degrees of each other, placed in such a manner as to detect shifts in two directions simultaneously and with a Push Button Switch in the “vertical” axis, which can detect when a User presses on the Joystick.
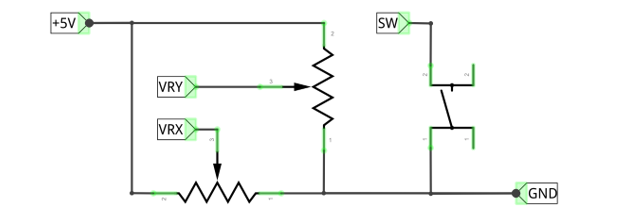
When the Joystick data is read, there are some differences between the axes: data of X and Y axes is analog, which needs to use the ADC. The data of the Z axis is digital, so you can directly use the GPIO to read this data or you have the option to use the ADC to read this.
Component List
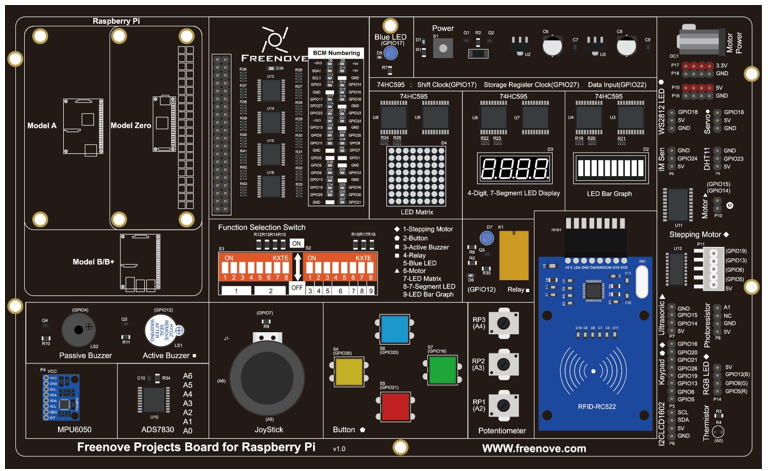
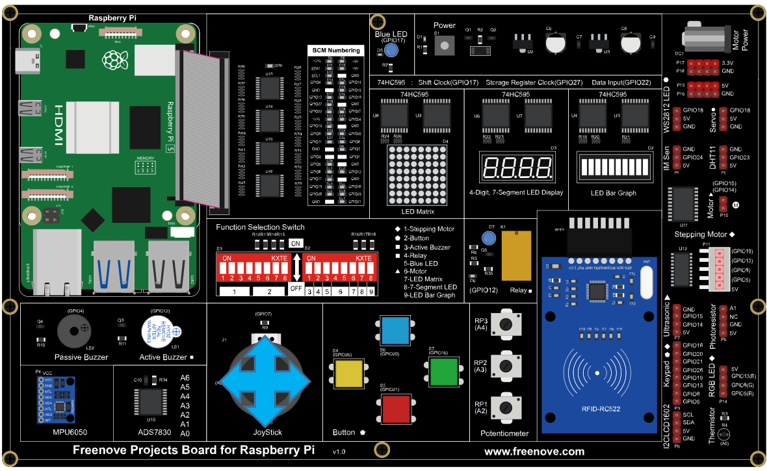
Freenove Projects Board for Raspberry Pi |
|
Raspberry Pi |
GPIO Ribbon Cable |


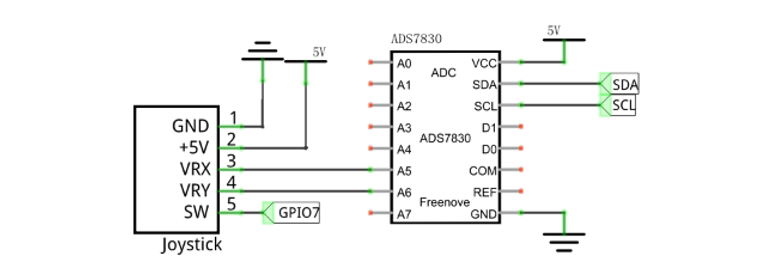
Circuit
Schematic diagram |
|
Hardware connection: |
|
Note
If you have any concerns, please send an email to: support@freenove.com
Sketch
In this project, we will learn the usage of joystick.
Sketch_10_Joystick
First, enter where the project is located:
$ cd ~/Freenove_Kit/Pi4j/Sketches/Sketch_10_Joystick

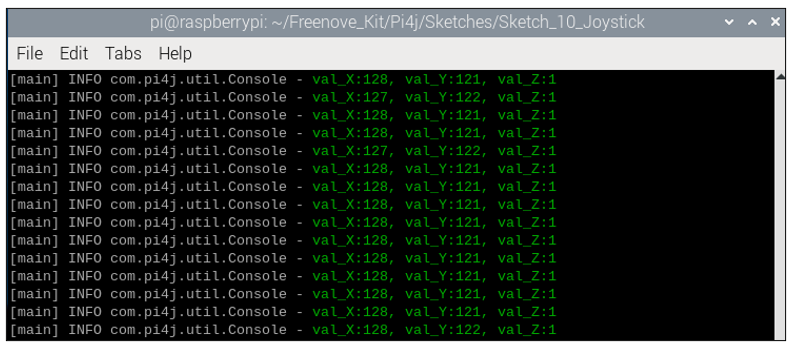
You can enter the command to run the code.
$ jbang Joystick.java

After running the code, the Raspberry Pi will obtain the ADC values of the X-axis and Y-axis of the joystick sensor, as well as the value of the Z-axis, and print them out in the terminal.
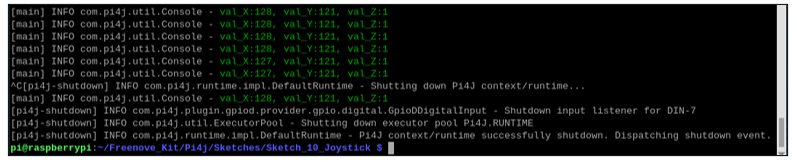
Press Ctrl+C to exit the program.
You can open the code with Geany to view and edit it.
$ geany Thermometer.java
Click the icon to run the code.
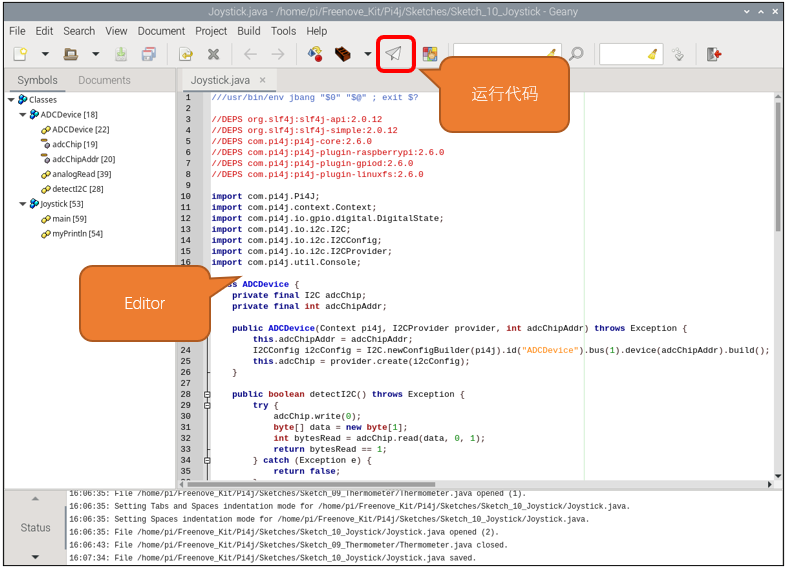
If the code fails to run, please check Geany Configuration.
The following is program code:
 1///usr/bin/env jbang "$0" "$@" ; exit $?
 2
 3//DEPS org.slf4j:slf4j-api:2.0.12
 4//DEPS org.slf4j:slf4j-simple:2.0.12
 5//DEPS com.pi4j:pi4j-core:2.6.0
 6//DEPS com.pi4j:pi4j-plugin-raspberrypi:2.6.0
 7//DEPS com.pi4j:pi4j-plugin-gpiod:2.6.0
 8//DEPS com.pi4j:pi4j-plugin-linuxfs:2.6.0
 9
10import com.pi4j.Pi4J;
11import com.pi4j.context.Context;
12import com.pi4j.io.gpio.digital.DigitalState;
13import com.pi4j.io.i2c.I2C;
14import com.pi4j.io.i2c.I2CConfig;
15import com.pi4j.io.i2c.I2CProvider;
16import com.pi4j.util.Console;
17
18class ADCDevice {
19    private final I2C adcChip;
20    private final int adcChipAddr;
21
22    public ADCDevice(Context pi4j, I2CProvider provider, int adcChipAddr) throws Exception {
23        this.adcChipAddr = adcChipAddr;
24        I2CConfig i2cConfig = I2C.newConfigBuilder(pi4j).id("ADCDevice").bus(1).device(adcChipAddr).build();
25        this.adcChip = provider.create(i2cConfig);
26    }
27
28    public boolean detectI2C() throws Exception {
29        try {
30            adcChip.write(0);
31            byte[] data = new byte[1];
32            int bytesRead = adcChip.read(data, 0, 1);
33            return bytesRead == 1;
34        } catch (Exception e) {
35            return false;
36        }
37    }
38
39    public int analogRead(int chn) {
40        byte command = (byte) (0x84 | (((chn << 2 | chn >> 1) & 0x07) << 4));
41        adcChip.write(command);
42        byte[] data = new byte[1];
43        int bytesRead = adcChip.read(data, 0, 1);
44        if (bytesRead == 1) {
45            int adcValue = data[0] & 0xFF;
46            return adcValue;
47        } else {
48            return -1;
49        }
50    }
51}
52
53public class Joystick{
54	public static void myPrintln(String format, Object... args) {
55		Console console = new Console();
56		console.println(String.format("\u001B[32m" + format + "\u001B[0m", args));
57	}
58
59	public static void main(String[] args) throws Exception {
60        Context pi4j = Pi4J.newAutoContext();
61        I2CProvider i2CProvider = pi4j.provider("linuxfs-i2c");
62
63		final int[] val={0, 0, 1};
64		var button = pi4j.din().create(7);
65		button.addListener(e -> {
66            if (e.state() == DigitalState.LOW) {
67                val[2] = 0;
68            }
69			else if(e.state() == DigitalState.HIGH){
70				val[2] = 1;
71			}
72        });
73
74        try {
75            int ADC_CHIP_ADDR = 0x48;
76            ADCDevice adc = new ADCDevice(pi4j, i2CProvider, ADC_CHIP_ADDR);
77
78            if (adc.detectI2C()) {
79
80                while (true) {
81					val[0] = adc.analogRead(5);
82					val[1] = adc.analogRead(6);
83                    if (val[0] != -1 && val[1] != -1) {
84                        myPrintln("val_X:%d, val_Y:%d, val_Z:%d", val[0], val[1], val[2]);
85                    } else {
86                        myPrintln("Failed to read data from ADC.");
87                    }
88                    Thread.sleep(100);
89                }
90            } else {
91                myPrintln("ADS7830 device not detected at address 0x" + Integer.toHexString(ADC_CHIP_ADDR));
92            }
93        } finally {
94            pi4j.shutdown();
95        }
96    }
97}
Configure the Raspberry Pi’s I2C to obtain the ADC values of the x-axis and y-axis of the joystick sensor, and configure the Z-axis to be associated with GPIO7 of the Raspberry Pi.
 1        Context pi4j = Pi4J.newAutoContext();
 2        I2CProvider i2CProvider = pi4j.provider("linuxfs-i2c");
 3
 4		final int[] val={0, 0, 1};
 5		var button = pi4j.din().create(7);
 6		button.addListener(e -> {
 7            if (e.state() == DigitalState.LOW) {
 8                val[2] = 0;
 9            }
10			else if(e.state() == DigitalState.HIGH){
11				val[2] = 1;
12			}
13        });
The joystick sensor is associated with channel 5 and channel 6 of ADS7830, and its data is acquired every 100 milliseconds and the collected values are printed on the terminal.
 1                while (true) {
 2					val[0] = adc.analogRead(5);
 3					val[1] = adc.analogRead(6);
 4                    if (val[0] != -1 && val[1] != -1) {
 5                        myPrintln("val_X:%d, val_Y:%d, val_Z:%d", val[0], val[1], val[2]);
 6                    } else {
 7                        myPrintln("Failed to read data from ADC.");
 8                    }
 9                    Thread.sleep(100);
10                }