Chapter 21 Infrared Motion Sensor
In this chapter, we will learn a widely used sensor, Infrared Motion Sensor.
Project 21.1 PIR Infrared Motion Detector with LED Indicator
In this project, we will make a Motion Detector, with the human body infrared pyroelectric sensors.
When someone is in close proximity to the Motion Detector, it will automatically light up and when there is no one close by, it will be out.
This Infrared Motion Sensor can detect the infrared spectrum (heat signatures) emitted by living humans and animals.
Component Knowledge
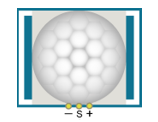
The following is the diagram of the Infrared Motion Sensor(HC SR-501)a PIR Sensor:
Top |
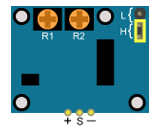
Bottom |
Schematic |
|---|---|---|
|
|
|
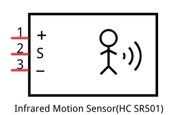
Description:
Working voltage: 5v-20v(DC) Static current: 65uA.
Automatic Trigger. When a living body enters into the active area of sensor, the module will output high level (3.3V). When the body leaves the sensor’s active detection area, it will output high level lasting for time period T, then output low level(0V). Delay time T can be adjusted by the potentiometer R1.
According to the position of Fresnel lenses dome, you can choose non-repeatable trigger modes or repeatable modes.
L: non-repeatable trigger mode. The module outputs high level after sensing a body, then when the delay time is over, the module will output low level. During high level time, the sensor no longer actively senses bodies.
H: repeatable trigger mode. The distinction from the L mode is that it can sense a body until that body leaves during the period of high level output. After this, it starts to time and output low level after delaying T time.
Induction block time: the induction will stay in block condition and does not induce external signal at lesser time intervals (less than delay time) after outputting high level or low level
Initialization time: the module needs about 1 minute to initialize after being powered ON. During this period, it will alternately output high or low level.
One characteristic of this sensor is when a body moves close to or moves away from the sensor’s dome edge, the sensor will work at high sensitively. When a body moves close to or moves away from the sensor’s dome in a vertical direction (perpendicular to the dome), the sensor cannot detect well (please take note of this deficiency). Actually this makes sense when you consider that this sensor is usually placed on a celling as part of a security product. Note: The Sensing Range (distance before a body is detected) is adjusted by the potentiometer.
We can regard this sensor as a simple inductive switch when in use.
Component List
Freenove Projects Board for Raspberry Pi |
|
Raspberry Pi |
GPIO Ribbon Cable |
Jumper Wire |
HC SR501 |
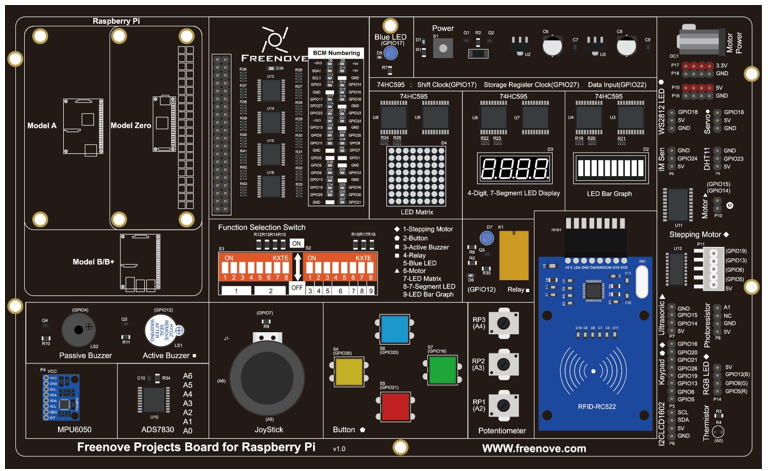


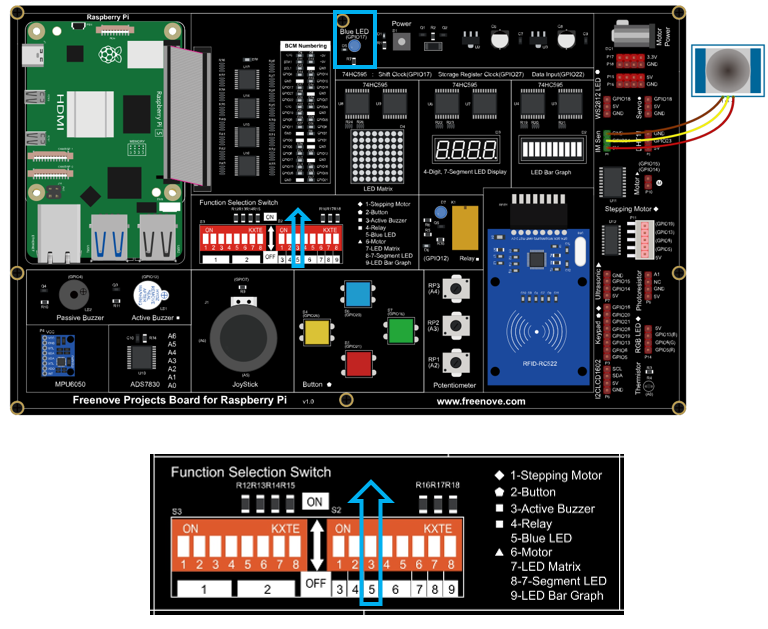
Circuit
Schematic diagram |
|
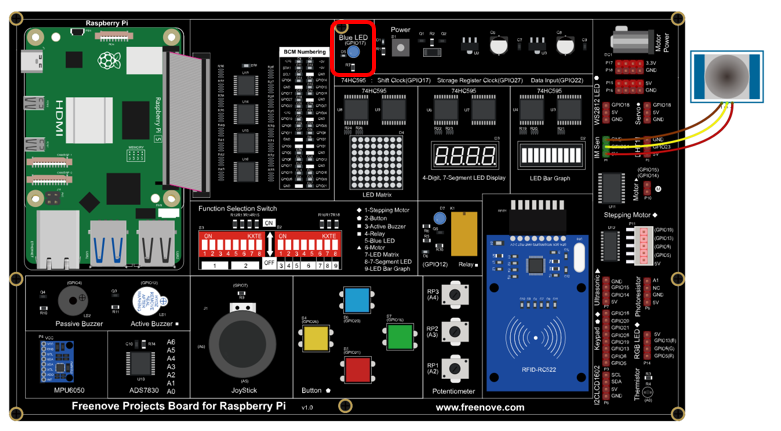
Hardware connection: |
|

Note
If you have any concerns, please send an email to: support@freenove.com
How to use this sensor?
Top |
Bottom |
|
|
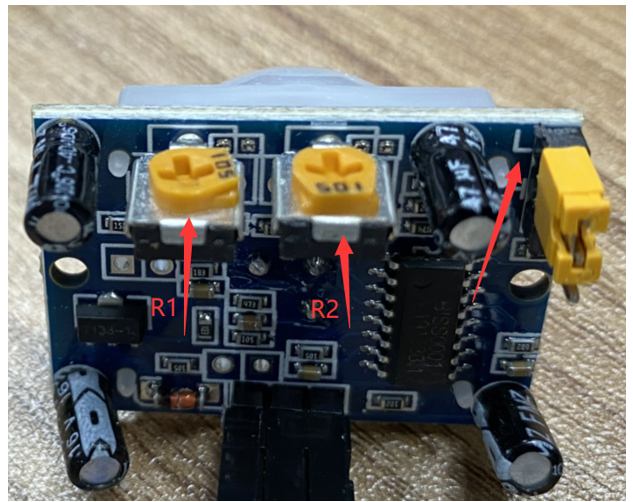
Description:
You can choose non-repeatable trigger modes or repeatable modes.
L: non-repeatable trigger mode. The module outputs high level after sensing a body, then when the delay time is over, the module will output low level. During high level time, the sensor no longer actively senses bodies.
H: repeatable trigger mode. The distinction from the L mode is that it can sense a body until that body leaves. After this, it starts to time and output low level after delaying T time.
R1 is used to adjust HIGH level lasting time when sensor detects human motion, 1.2s-320s.
R2 is used to adjust the maxmum distance the sensor can detect, 3~5m.
Here we connect L and adjust R1 and R2 like below to do this project.
Put you hand close and away from the sensor slowly. Obsever the LED in previous circuit.
It need some time between two detections.
Note
If you have any concerns, please send an email to: support@freenove.com
Sketch
In this section, we will utilize an infrared motion sensor to control an LED, where the sensor will function as a motion-activated switch. The code is quite analogous to our previous project “Push Button Switch and LED.” However, unlike the button which outputs a low signal when pressed, the infrared motion sensor outputs a high signal upon detecting motion. Consequently, when the sensor outputs a high level, the LED will illuminate or turn off.
Sketch_21_1_InfraredSensor
First, enter where the project is located:
$ cd ~/Freenove_Kit/Pi4j/Sketches/Sketch_21_1_InfraredSensor

Enter the command to run the code.
$ jbang SenseLED.java

Once the code is running, you can observe whether the LED turns on or off by moving away from or closer to the infrared motion sensor.
The terminal will continuously display the LED status, as shown below:

Press Ctrl+C to exit the program.
You can run the following command to open the code with Geany to view and edit it.
$ geany SenseLED.java
Click the icon to run the code.
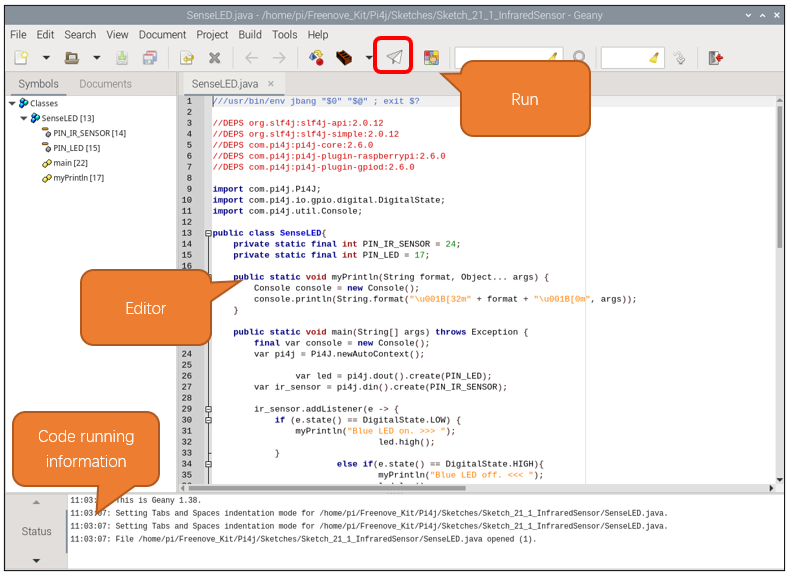
If the code fails to run, please check Geany Configuration.
The following is program code:
 1///usr/bin/env jbang "$0" "$@" ; exit $?
 2
 3//DEPS org.slf4j:slf4j-api:2.0.12
 4//DEPS org.slf4j:slf4j-simple:2.0.12
 5//DEPS com.pi4j:pi4j-core:2.6.0
 6//DEPS com.pi4j:pi4j-plugin-raspberrypi:2.6.0
 7//DEPS com.pi4j:pi4j-plugin-gpiod:2.6.0
 8
 9import com.pi4j.Pi4J;
10import com.pi4j.io.gpio.digital.DigitalState;
11import com.pi4j.util.Console;
12
13public class SenseLED {
14    private static final int PIN_IR_SENSOR = 24;
15    private static final int PIN_LED = 17;
16
17    public static void myPrintln(String format, Object... args) {
18        Console console = new Console();
19        console.println(String.format("\u001B[32m" + format + "\u001B[0m", args));
20    }
21
22    public static void main(String[] args) throws Exception {
23        final var console = new Console();
24        var pi4j = Pi4J.newAutoContext();
25
26        var led = pi4j.dout().create(PIN_LED);
27        var ir_sensor = pi4j.din().create(PIN_IR_SENSOR);
28
29        ir_sensor.addListener(e -> {
30            if (e.state() == DigitalState.LOW) {
31                myPrintln("Blue LED on. >>> ");
32                led.high();
33            } else if (e.state() == DigitalState.HIGH) {
34                myPrintln("Blue LED off. <<< ");
35                led.low();
36            }
37        });
38
39        try {
40            while (true) {
41                Thread.sleep(500);
42            }
43        } finally {
44            pi4j.shutdown();
45        }
46    }
47}