Chapter 6 Buzzer
In this chapter, we will learn about buzzers and the sounds they make. And in our next project, we will use an active buzzer to make a doorbell and a passive buzzer to make an alarm.
Project 6.1 Doorbell
We will make a doorbell with this functionality: when the Push Button Switch is pressed the buzzer sounds and when the button is released, the buzzer stops. This is a momentary switch function.
Component knowledge
Buzzer
A buzzer is an audio component. They are widely used in electronic devices such as calculators, electronic alarm clocks, automobile fault indicators, etc. There are both active and passive types of buzzers. Active buzzers have oscillator inside, these will sound as long as power is supplied. Passive buzzers require an external oscillator signal (generally using PWM with different frequencies) to make a sound.
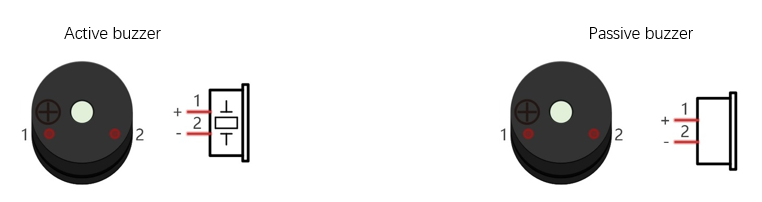
Active buzzers are easier to use. Generally, they only make a specific sound frequency. Passive buzzers require an external circuit to make sounds, but passive buzzers can be controlled to make sounds of various frequencies. The resonant frequency of the passive buzzer in this Kit is 2kHz, which means the passive buzzer is the loudest when its resonant frequency is 2kHz.
How to identify active and passive buzzer?
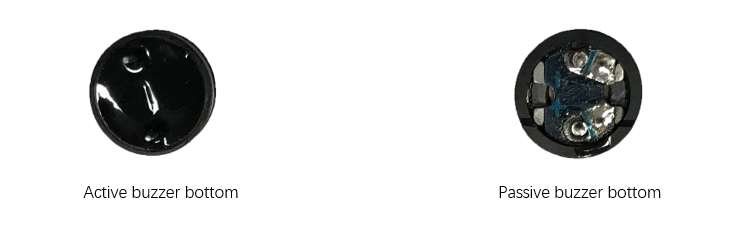
As a rule, there is a label on an active buzzer covering the hole where sound is emitted, but there are exceptions to this rule.
Active buzzers are more complex than passive buzzers in their manufacture. There are many circuits and crystal oscillator elements inside active buzzers; all of this is usually protected with a waterproof coating (and a housing) exposing only its pins from the underside. On the other hand, passive buzzers do not have protective coatings on their underside. From the pin holes, view of a passive buzzer, you can see the circuit board, coils, and a permanent magnet (all or any combination of these components depending on the model.
Transistors
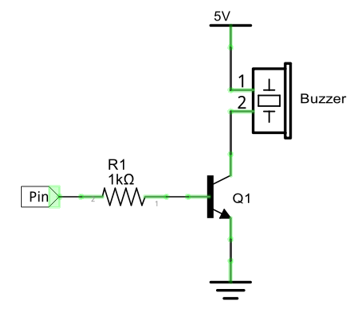
A transistor is required in this project due to the buzzer’s current being so great that GPIO of RPi’s output capability cannot meet the power requirement necessary for operation. A NPN transistor is needed here to amplify the current.
Transistors, full name: semiconductor transistor, is a semiconductor device that controls current (think of a transistor as an electronic “amplifying or switching device”. Transistors can be used to amplify weak signals, or to work as a switch. Transistors have three electrodes (PINs): base (b), collector (c) and emitter (e). When there is current passing between “be” then “ce” will have a several-fold current increase (transistor magnification), in this configuration the transistor acts as an amplifier. When current produced by “be” exceeds a certain value, “ce” will limit the current output. at this point the transistor is working in its saturation region and acts like a switch. Transistors are available as two types as shown below: PNP and NPN,
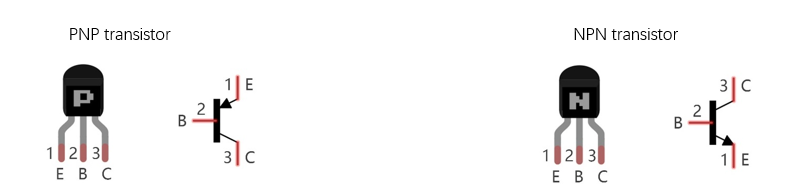
In our kit, the PNP transistor is marked with 8550, and the NPN transistor is marked with 8050.
Thanks to the transistor’s characteristics, they are often used as switches in digital circuits. As micro-controllers output current capacity is very weak, we will use a transistor to amplify its current in order to drive components requiring higher current.
When we use a NPN transistor to drive a buzzer, we often use the following method. If GPIO outputs high level, current will flow through R1 (Resistor 1), the transistor conducts current and the buzzer will make sounds. If GPIO outputs low level, no current will flow through R1, the transistor will not conduct currentand buzzer will remain silent (no sounds).
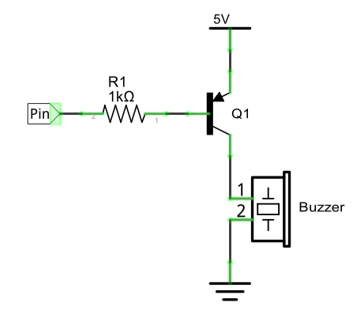
When we use a PNP transistor to drive a buzzer, we often use the following method. If GPIO outputs low level, current will flow through R1. The transistor conducts current and the buzzer will make sounds. If GPIO outputs high level, no current flows through R1, the transistor will not conduct current and buzzer will remain silent (no sounds). Below are the circuit schematics for both a NPN and PNP transistor to power a buzzer.
NPN transistor to drive buzzer |
PNP transistor to drive buzzer |
|
|
Component List
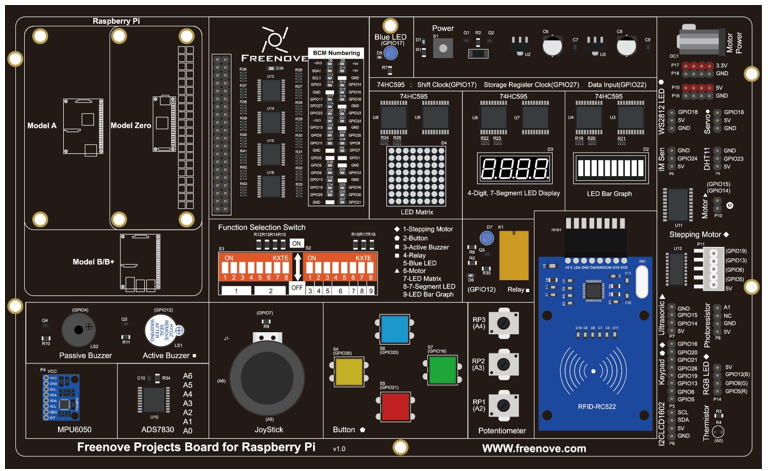
Freenove Projects Board for Raspberry Pi |
|
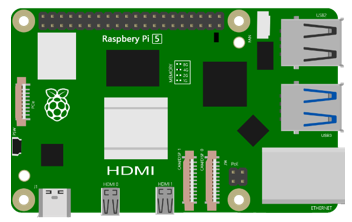
Raspberry Pi |
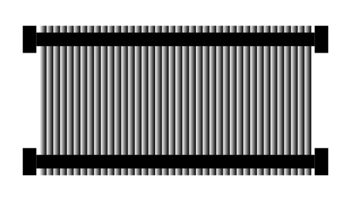
GPIO Ribbon Cable |
Circuit
Schematic diagram |
|
Hardware connection: |
|

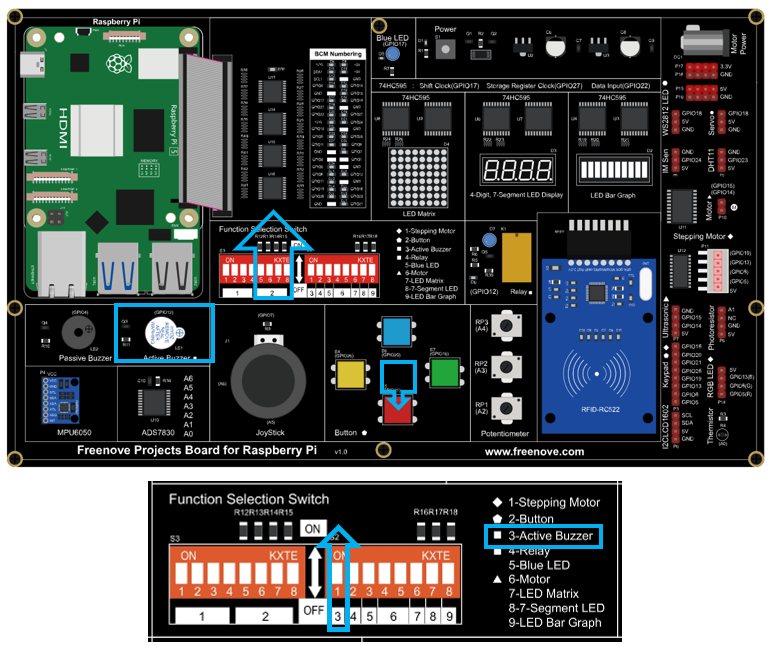
Note
If you have any concerns, please send an email to: support@freenove.com
Code
In this project, a buzzer will be controlled by a push button switch. When the button switch is pressed, the buzzer sounds and when the button is released, the buzzer stops. It is analogous to our earlier project that controlled an LED ON and OFF.
C Code 6.1 Doorbell
First, observe the project result, and then learn about the code in detail.
Note
If you have any concerns, please send an email to: support@freenove.com
Use cd command to enter 6_1_Doorbell directory of C code.
$ ~/Freenove_Kit/Code/C_Code/6_1_Doorbell
Use following command to compile “Doorbell.c” and generate executable file “Doorbell.c”.
$ gcc Doorbell.c -o Doorbell -lwiringPi
Then run the generated file “Doorbell”.
$ ./Doorbell
After the program is executed, press the push button switch and the will buzzer sound. Release the push button switch and the buzzer will stop.
The following is the program code:
 1/**********************************************************************
 2* Filename    : Doorbell.c
 3* Description : Make doorbell with buzzer and button.
 4* Author      : www.freenove.com
 5* modification: 2024/07/29
 6**********************************************************************/
 7#include <wiringPi.h>
 8#include <stdio.h>
 9
10#define buzzerPin 12  	//define the buzzerPin
11#define buttonPin 21		//define the buttonPin
12
13void main(void)
14{
15	printf("Program is starting ... \n");
16
17	wiringPiSetupGpio();//Initialize wiringPi. Use BCM Number.
18
19	pinMode(buzzerPin, OUTPUT);
20	pinMode(buttonPin, INPUT);
21
22	pullUpDnControl(buttonPin, PUD_UP);  //pull up to HIGH level
23	while(1){
24
25		if(digitalRead(buttonPin) == LOW){ //button is pressed
26			digitalWrite(buzzerPin, HIGH);   //Turn on buzzer
27			printf("buzzer turned on >>> \n");
28		}
29		else {				//button is released
30			digitalWrite(buzzerPin, LOW);   //Turn off buzzer
31			printf("buzzer turned off <<< \n");
32		}
33	}
34}
35
Python Code 6.1 Doorbell
First, observe the project result, then learn about the code in detail.
Note
If you have any concerns, please send an email to: support@freenove.com
Use cd command to enter 6_1_Doorbell directory of Python code.
$ cd ~/Freenove_Kit/Code/Python_GPIOZero_Code/6_1_Doorbell
Use python command to execute python code “Doorbell.py”.
$ python Doorbell.py
After the program is executed, press the push button switch and the buzzer will sound. Release the push button switch and the buzzer will stop.
The following is the program code:
 1#!/usr/bin/env python3
 2########################################################################
 3# Filename    : Doorbell.py
 4# Description : Make doorbell with buzzer and button
 5# Author      : www.freenove.com
 6# modification: 2024/07/29
 7########################################################################
 8from gpiozero import Buzzer, Button
 9import time
10
11buzzer = Buzzer(12)
12button = Button(21)
13
14def onButtonPressed():
15    buzzer.on()
16    print("Button is pressed, buzzer turned on >>>")
17
18def onButtonReleased():
19    buzzer.off()
20    print("Button is released, buzzer turned on <<<")
21
22def loop():
23    button.when_pressed = onButtonPressed
24    button.when_released = onButtonReleased
25    while True :
26        time.sleep(1)
27
28def destroy():
29    buzzer.close()
30    button.close()
31
32if __name__ == '__main__':     # Program entrance
33    print ('Program is starting ... ')
34    try:
35        loop()
36    except KeyboardInterrupt:  # Press ctrl-c to end the program.
37        print("Ending program")
38    finally:
39        destroy()
Project 6.2 Alertor
Next, we will use a passive buzzer to make an alarm.
Component List
Freenove Projects Board for Raspberry Pi |
|
Raspberry Pi |
GPIO Ribbon Cable |
Circuit
Schematic diagram |
|
Hardware connection: |
|

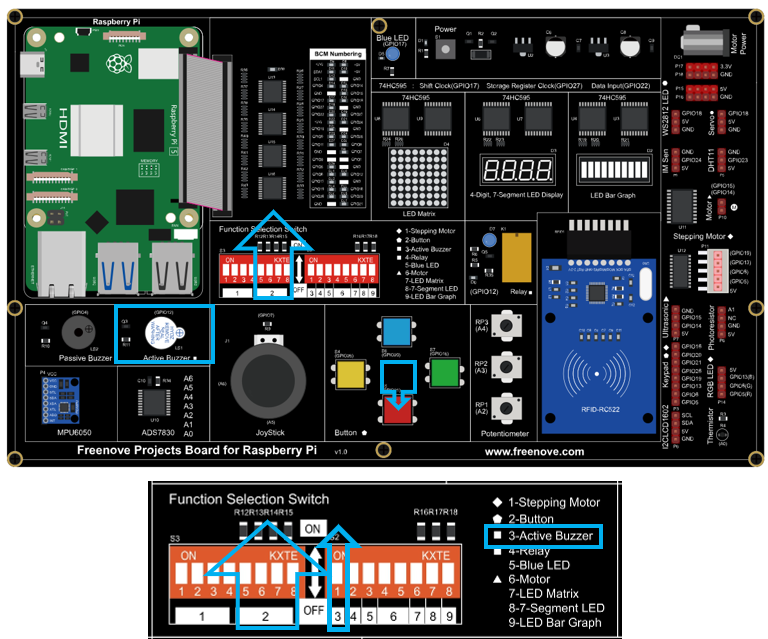
Note
If you have any concerns, please send an email to: support@freenove.com
Code
In this project, our buzzer alarm is controlled by the push button switch. Press the push button switch and the buzzer will sound. Release the push button switch and the buzzer will stop.
As stated before, it is analogous to our earlier project that controlled an LED ON and OFF.
To control a passive buzzer requires PWM of certain sound frequency.
C Code 6.2 Alertor
First, observe the project result, and then learn about the code in detail.
Note
If you have any concerns, please send an email to: support@freenove.com
Use cd command to enter 6_2_Alertor directory of C code.
$ cd ~/Freenove_Kit/Code/C_Code/6_2_Alertor
Use following command to compile “Alertor.c” and generate executable file “Alertor”. “-lm” and “-lpthread” compiler options need to added here.
$ gcc Alertor.c -o Alertor -lwiringPi -lm -lpthread
Then run the generated file “Alertor”.
$ ./Alertor
After the program is executed, press the push button switch and the buzzer will sound. Release the push button switch and the buzzer will stop.
The following is the program code:
 1/**********************************************************************
 2* Filename    : Alertor.c
 3* Description : Make Alertor with buzzer and button.
 4* Author      : www.freenove.com
 5* modification: 2024/07/29
 6**********************************************************************/
 7#include <wiringPi.h>
 8#include <stdio.h>
 9#include <softTone.h>
10#include <math.h>
11
12#define buzzerPin    4  	//define the buzzerPin
13#define buttonPin 	 20		//define the buttonPin
14
15void alertor(int pin){
16	int x;
17	double sinVal, toneVal;
18	for(x=0;x<360;x++){ // frequency of the alertor is consistent with the sine wave
19		sinVal = sin(x * (M_PI / 180));		//Calculate the sine value
20		toneVal = 2000 + sinVal * 500;		//Add the resonant frequency and weighted sine value
21		softToneWrite(pin,toneVal);			//output corresponding PWM
22		delay(1);
23	}
24}
25void stopAlertor(int pin){
26	softToneWrite(pin,0);
27}
28int main(void)
29{
30	printf("Program is starting ... \n");
31
32	wiringPiSetupGpio();//Initialize wiringPi. Use BCM Number.
33
34	pinMode(buzzerPin, OUTPUT);
35	pinMode(buttonPin, INPUT);
36	softToneCreate(buzzerPin); //set buzzerPin
37	pullUpDnControl(buttonPin, PUD_UP);  //pull up to HIGH level
38	while(1){
39		if(digitalRead(buttonPin) == LOW){ //button is pressed
40			alertor(buzzerPin);   // turn on buzzer
41			printf("alertor turned on >>> \n");
42		}
43		else {				//button is released
44			stopAlertor(buzzerPin);   // turn off buzzer
45			printf("alertor turned off <<< \n");
46		}
47	}
48	return 0;
49}
50
The code is the same to the active buzzer but the method is different. A passive buzzer requires PWM of a certain frequency, so you need to create a software PWM pin though softToneCreate (buzzeRPin). Here softTone is designed to generate square waves with variable frequency and a duty cycle fixed to 50%, which is a better choice for controlling the buzzer.
1softToneCreate(buzzeRPin);
In the while loop of the main function, when the push button switch is pressed the subfunction alertor() will be called and the alarm will issue a warning sound. The frequency curve of the alarm is based on a sine curve. We need to calculate the sine value from 0 to 360 degrees and multiplied by a certain value (here this value is 500) plus the resonant frequency of buzzer. We can set the PWM frequency through softToneWrite (pin, toneVal).
 1void alertor(int pin){
 2	int x;
 3	double sinVal, toneVal;
 4	for(x=0;x<360;x++){ // frequency of the alertor is consistent with the sine wave
 5		sinVal = sin(x * (M_PI / 180));		//Calculate the sine value
 6		toneVal = 2000 + sinVal * 500;		//Add the resonant frequency and weighted sine value
 7		softToneWrite(pin,toneVal);			//output corresponding PWM
 8		delay(1);
 9	}
10}
If you want to stop the buzzer, just set PWM frequency of the buzzer pin to 0.
1void stopAlertor(int pin){
2	softToneWrite(pin,0);
3}
The related functions of softTone are described as follows:
-
int softToneCreate(int pin);
This creates a software controlled tone pin.
-
void softToneWrite(int pin, int freq);
This updates the tone frequency value on the given pin.
For more details about softTone, please refer to : https://github.com/WiringPi/WiringPi
Python Code 6.2 Alertor
First observe the project result, and then learn about the code in detail.
Note
If you have any concerns, please send an email to: support@freenove.com
Use cd command to enter 6_2_Alertor directory of Python code.
$ cd ~/Freenove_Kit/Code/Python_GPIOZero_Code/6_2_Alertor
Use the python command to execute the Python code “Alertor.py”.
$ python Alertor.py
After the program is executed, press the push button switch and the buzzer will sound. Release the push button switch and the buzzer will stop.
The following is the program code:
 1#!/usr/bin/env python3
 2########################################################################
 3# Filename    : Alertor.py
 4# Description : Make Alertor with buzzer and button
 5# Author      : www.freenove.com
 6# modification: 2024/07/29
 7########################################################################
 8from gpiozero import TonalBuzzer,Button
 9from gpiozero.tones import Tone
10import time
11import math
12
13buzzer = TonalBuzzer(4)
14button = Button(20) # define Button pin according to BCM Numbering
15
16def loop():
17    while True:
18        if button.is_pressed:  # if button is pressed
19            alertor()
20            print ('alertor turned on >>> ')
21        else :
22            stopAlertor()
23            print ('alertor turned off <<<')
24def alertor():
25    buzzer.play(Tone(220.0))
26    time.sleep(0.1)
27
28def stopAlertor():
29    buzzer.stop()
30
31def destroy():
32    buzzer.close()
33    button.close()
34
35if __name__ == '__main__':     # Program entrance
36    print ('Program is starting...')
37    try:
38        loop()
39    except KeyboardInterrupt:  # Press ctrl-c to end the program.
40        print("Ending program")
41    finally:
42        destroy()
The code is the same as the active buzzer, but the method is different. Passive buzzers require PWM of a certain frequency, so you need to create a buzzer object through TonalBuzzer.
1buzzer = TonalBuzzer(4)
2button = Button(20) # define Button pin according to BCM Numbering
In the while loop of the main function, when the button switch is pressed, the child function alertor() will be called and the alarm will sound a warning. The buzzer will sound at 220Hz.
1def alertor():
2    buzzer.play(Tone(220.0))
3    time.sleep(0.1)
When the push button switch is released, the buzzer (in this case our Alarm) will stop.
1def stopAlertor():
2    buzzer.stop()